App registration for MS Graph are really powerful, as you can raise any request if granted. In this article, I want to illuminate, what is an app registration. For what can it be used and what are the boundaries. After setting a common understanding, I want to share you my considerations about the security of app registrations. At the end of the article you’ll also be able to understand how to create an app registration with the right permissions for MS Graph
Before we start highlighting this topic, let’s answer the following question:
What is an app registration in Azure Active Directory?
An app registration in Azure Active Directory is an authentication and authorization layer to access Microsoft cloud services.
If we want to impersonate or use our scripts as a backend automation e.g., to get SharePoint Sites with Microsoft Graph, we need to ensure, that we have set up an app registration in Azure Active Directory. The app registration and the resulting enterprise application provides us the ability to authenticate to Microsoft’s cloud services and also to authorize us for the actions we need to trigger. Means we are not dependent to a functional account like a service user, if we want to run this code as an application, with no human interaction.
- You can configure the app to run in the background – This would be considered as an app with “application permission”.
- On the other hand you can configure app, which impersonate someone – Here you would take “delegated permission”
Considerations about app registration in Azure Active Directory
In this section I want to give you an overview, what to consider in terms of security of app registration in Azure Active Directory
Permissions to create App registration for MS Graph
To create an app registration for MS Graph, you need the proper permissions for your user account. By default, every user has the permission to create app registrations in the tenant. If you want to restrict this, you should change this setting below User settings page for your organization (azure.com).
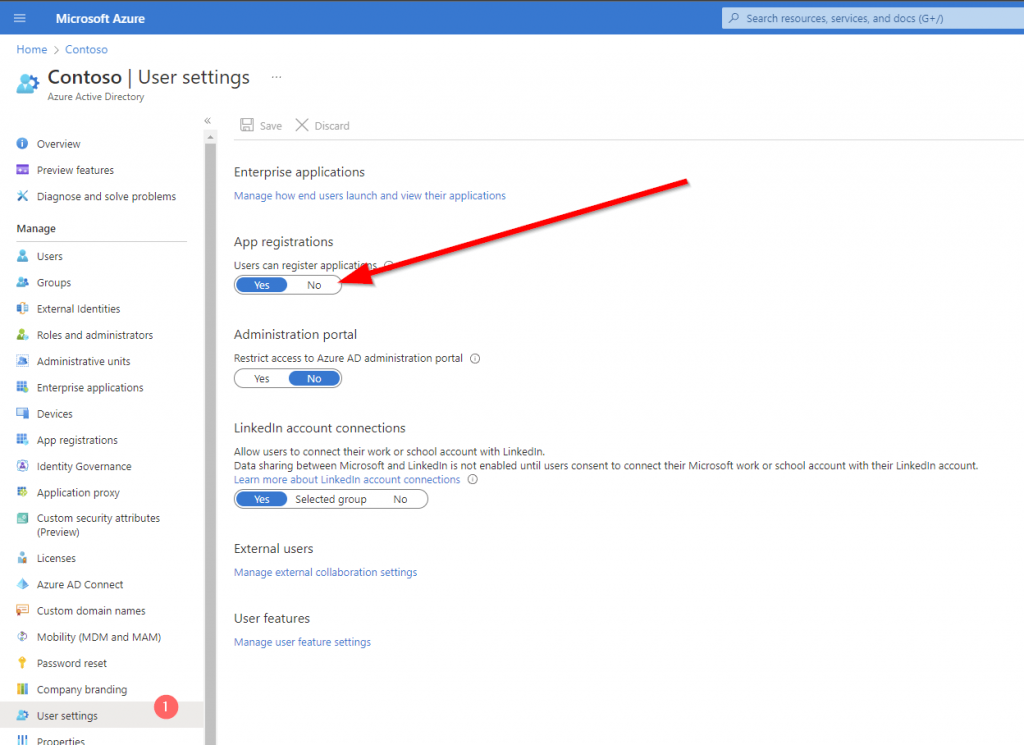
Even if every user is able to create an app registration, they require the requested permission granted by a global administrator for some special permissions. So it is actually not a bad idea to let the users preconfigure their apps.
What permissions can be granted with an app registration in azure active directory?
Before we set up an application registration, we need to think about the security requirements of our organization, and we should answer us the questions accordingly. Since you will be able to have a big impact on the tenant, I suggest you to consult also the security department of your organization to be on the safe side.
- Will this script run in the background e.g., as a Scheduled Task / Runbook in an Azure Automation Account or will this script used by personnel, which can interact with the script and which are granted permission to the content.
- If human interaction is OK, we should design the register the application as delegated permissioned application
- Does any security requirement/ guide/ policy restricts me to use an enterprise application?
- If yes, we should think about an application registration with delegated permissions.
In general, I would strongly encourage you to think about your solution, before you start delegating application permission to your application registration. If any malicious user gets access to the application ID and application secret, he will be able to raise any action in your tenant for the defined set of the permission.
How to create an App registration for MS Graph?
To create an app registration, you need to browse to Azure Portal:
Register an application – Microsoft Azure
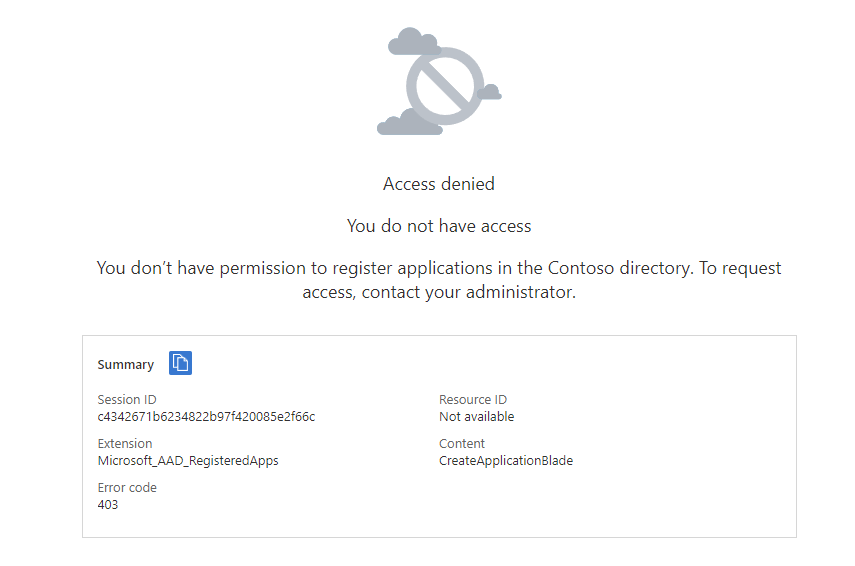
If you encounter this, your administrator has restricted the permission to create apps:
Otherwise, you should see this:
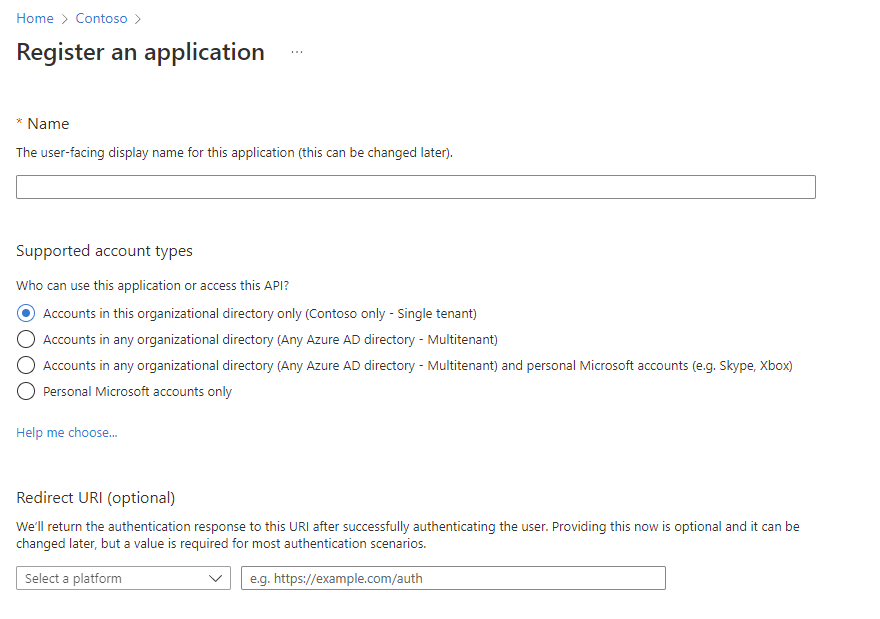
Based on your use case you have the ability to create different supported account types
| Type | Use case |
Accounts in this organizational directory only (Contoso only – Single tenant) | If your app will be used to access resources within your tenant, this is the way to go |
| Accounts in any organizational directory (Any Azure AD directory – Multitenant) | If your app will be used to access resources across your tenant, this is the way to go. This might make sense if your organization is a software provider and wants to grant access to the customer. |
| Accounts in any organizational directory (Any Azure AD directory – Multitenant) and personal Microsoft accounts (e.g. Skype, Xbox) | If your app will be used to access resources across your tenant, this is the way to go. This might make sense if your organization is a software provider and wants to grant access to the customer. In addition you enable users to make use of different identity providers. |
| Personal Microsoft accounts only | If your app is a consumer faced app, this is the way to go. Not suitable for b2b or inter organizational use. |
In my example I am looking forward to get all SharePoint Sites in my SharePoint tenant.

How to grant the least privilege Permission to the Azure Application to work with SharePoint Sites?
As per Microsoft documentation, following permissions are required get all sites:
| Permission | Display String | Description | Admin Consent Required | When to use? |
|---|---|---|---|---|
| Sites.Read.All | Read items in all site collections | Allows the app to read documents and list items in all site collections without a signed in user. | Yes | Read content from all Sites |
| Sites.ReadWrite.All | Read and write items in all site collections | Allows the app to create, read, update, and delete documents and list items in all site collections without a signed in user. | Yes | Write content to all sites (you cannot create Lists/Libraries with this permission) |
| Sites.Manage.All | Create, edit, and delete items and lists in all site collections | Allows the app to manage and create lists, documents, and list items in all site collections without a signed-in user. | Yes | Write content to all sites including lists and libraries |
| Sites.FullControl.All | Have full control of all site collections | Allows the app to have full control to SharePoint sites in all site collections without a signed-in user. | Yes | Write content to all sites including lists and libraries + Manage Site permissions |
| Sites.Selected | Access selected site collections | Allow the application to access a subset of site collections without a signed in user. The specific site collections and the permissions granted will be configured in SharePoint Online. | Yes | Write content for one specific site including lists and libraries + Manage Site permissions |
For my current example, I am designing the Azure Application to run in the background, therefore I am choosing the Application Permission type and as I am targeting least privilege, I am using Sites.Read.All. However, you should carefully select the permission level and make sure that you follow the least privilege approach, try to use Sites.Selected if you can.
In order to configure it, switch to the API Permission blade.

To add the permission, click on add permission

As I want to add Graph permissions, I am clicking on Microsoft Graph.

Now you can select between Delegated and Application Permission. In my case I am using Application permissions.

By searching for sites, I am getting to the sites permission section. Follow the enumeration in red circles to add the permission.

Now you need to ensure, that the global administrator in your organization grants the permission for the organization, for which you are requesting the permission. In my example, I am requesting the permission for my organization and as I am the global administrator, I am able to directly grant the permission.

This is how it looks like, once the permissions for the designated organization is granted.

In order to use the app registration, you need to configure the app secret or credential part.
This can be done in the Credential & secrets blade of your azure app registration.

Now you have the option, either to upload a certificate or create a secret.
How to Create and Upload a certificate for an App Registration
I have used following script to create the certificate and export it.
$Certname = "SPSitesReadAll2"    ## Replace {certificateName}
$ExportFilePathPFX = "C:\Users\Serka\OneDrive\Desktop\PS\Keys\SPSitesReadAll2.pfx"   # Path to save the exported certificate with private key
$ExportFilePathCer = "C:\Users\Serka\OneDrive\Desktop\PS\Keys\SPSitesReadAll2.cer"   # Path to save the exported certificate (only public part)

$Cert = New-SelfSignedCertificate -Subject "CN=$certname" -CertStoreLocation "Cert:\CurrentUser\My" -KeyExportPolicy Exportable -KeySpec Signature -KeyLength 2048 -KeyAlgorithm RSA -HashAlgorithm SHA256


# Define parameters

$Password = Read-host -Prompt "Provide a password for the certificate" -AsSecureString | ConvertTo-SecureString  -Force -AsPlainText   # Password to protect the private key (if exporting private key)

# Retrieve the certificate by its subject name
$Certificate = Get-ChildItem -Path Cert:\CurrentUser\My | Where-Object { $_.Subject -like "CN=$Certname" }

# Check if the certificate was found
if ($null -eq $Certificate)
{
    Write-Error "Certificate with the name $Certname not found."
    return
}

# Export the certificate (with private key, as PFX)
Export-PfxCertificate -Cert $Certificate -FilePath $ExportFilePathPFX -Password $Password
Export-Certificate -Cert $Cert -FilePath $ExportFilePathCER

Write-Output "Certificate exported successfully to $ExportFilePathPFX and $ExportFilePathCer"
Now upload the certificate and give it a meaningful name:

This is how it shall look like after the upload:

With the uploaded certificate, I can now make use of the Azure App registration to get all sites.
You can see below, that I was able to authenticate with my application and fetch all sites.
How to create a client secret in an App Registration
Besides the certificate option, you can also create an Client Secret in Azure Portal. Give it a meaningful name.

Upon addition, you’ll see the app secret value once. Make sure to store it at a protected place like Azure Key Vault.

How to use the Site Selected Permission in an App Registration for MS Graph?
In order to use the site selected permission in an app registration, you need to create two apps:
- TenantAdminApp with the permissions Sites.FullControl.All
- SpSiteAdmin App with the permission Sites.Selected
You need to upload a certificate or a client secret to authenticate with this application. You can do it like this:
I gave the app secret a meaningful name: SharePointAdmin_AppOnlySecret_6months. Note the secret down, you’ll need it when you want to grant the SiteAdminApp the permission to alter a specific site.
he TenantAdminApp should look like this:

Your SiteAdminApp registration shall look like this, when it comes to the permissions:

How to Grant the App registration Permissions to use Sites.Selected permissions using MS Graph
Now, that the App has in principle the permission to alter SharePoint Sites, we need to specify for which SharePoint Site the App registration is entitled to conduct the changes. This can be done by running this script after adjusting the parameters:
- $Tenant: Specifies the Entra ID tenant ID, which is used for authentication. The tenant ID is the unique identifier for your organization in Azure AD. It helps the script understand which Entra ID to authenticate against (e.g.,
m365x16735261) in my example. - $TenantAppID: The Application (client) ID of the Entra ID application that will handle permissions related to creating SharePoint sites. This app registration is responsible for granting the necessary permissions to interact with SharePoint resources on behalf of the script. You can obtain the App ID from the overview page of the TenantAdminApp App Registration.
- $SiteAdminAppID: The Application (client) ID of another Entra ID application. This app is the one that will be responsible for performing administrative tasks related to SharePoint site creation, such as managing permissions and administering the site. You can obtain the App ID from the overview page of the SiteAdminApp App Registration.
- $PermissionDisplayName: The name associated with a specific permission in SharePoint, which you are looking forward to grant to the SiteAdminApp.
- $HostName: The domain name for your tenant’s SharePoint environment. This is used to construct the base URL for interacting with SharePoint resources (e.g.,
m365x16735261.sharepoint.com). - $ServerRelativePath: The relative path to the SharePoint site you wish to access. This is typically used after the hostname to construct the full URL to the site (e.g.,
/sites/GraphSite1), where the script will perform the necessary actions.
When you run the script, you’ll be prompted for the app secret of the TenantApp.
# Define parameters for the tenant, application ID, site name, and mail nickname
Param (
    # The Entra ID tenant ID for authentication
    $Tenant = "m365x16735261",
    # The Application (client) Id of the registered Entra ID application registration, which is supposed to grant permissions to the App registration, which creates the SharePoint Site (TenantAdminApp)
    $TenantAppID = "39180af4-ad90-442f-a4ca-028b9221b133",
    # The Application (client) ID of the registered Entra ID application registration, which is supposed to create SharePoint Sites (SPSiteAdminApp)
    $SiteAdminAppID = "3342565c-dca1-4b55-b107-7aa0e2f7bfd6",
    # The displayname of the permission as part of the SharePoint Site
    $PermissionDisplayName = "GraphSites_ReadWrite_Permission",
    # hostname of the tenant
    $HostName = "m365x16735261.sharepoint.com",
    # The relative path of the site, beginning with /sites/, /teams/, or another valid site type path.
    $ServerRelativePath = "sites/GraphSite1"
)
# Function to obtain the Microsoft Graph API token
function Get-GraphToken
{
    param (
        [string]$Tenant,
        [PSCredential]$AppCredential
    )

    # Define the required scope for accessing the Microsoft Graph API
    $Scope = "https://graph.microsoft.com/.default"

    # Prepare the body for the token request with client ID, client secret, and scope
    $Body = @{
        client_id     = $AppCredential.UserName                     # Client ID from app registration
        client_secret = $AppCredential.GetNetworkCredential().password   # Securely retrieve the client secret
        scope         = $Scope                                         # API scope required for MS Graph API access
        grant_type    = 'client_credentials'                      # Grant type for app-only authentication
    }

    # Entra ID endpoint to request an OAuth token
    $GraphUrl = "https://login.microsoftonline.com/$($Tenant).onmicrosoft.com/oauth2/v2.0/token"

    try
    {
        # Request the access token from Entra ID
        $AuthorizationRequest = Invoke-RestMethod -Uri $GraphUrl -Method "Post" -Body $Body
        # Retrieve the access token from the response
        return $AuthorizationRequest.Access_token
    }
    catch
    {
        # Handle authentication errors, if any
        Write-Error "Error during token retrieval: $_"
        return $null
    }
}

#region authentication - obtain bearer token
$TenantAdminAppCredential = Get-Credential -UserName $TenantAppID -Message "Enter the client secret for the app TenantAppID $TenantAppID"

# Call the Get-GraphToken function and store the result
$Access_token = Get-GraphToken -Tenant $Tenant -AppCredential $TenantAdminAppCredential

# Check if access token is successfully obtained
if (-not $Access_token)
{
    Write-Error "Failed to retrieve access token. Exiting script."
    return
}

# Set the Authorization header with the bearer token for API requests
$Header = @{
    Authorization  = "Bearer $Access_token"              # Bearer token for API authorization
    "Content-Type" = "application/json"                 # JSON content type for the request body
}

Write-Output "Access token retrieved successfully."
#endregion

#Obtain the SiteID of the Site

$Url = "https://graph.microsoft.com/v1.0/sites/${HostName}:/$ServerRelativePath"
$Site = Invoke-RestMethod -Uri $Url -Headers $Header

#region grant the SiteAdminApp the write permission for the Site

$Url = "https://graph.microsoft.com/v1.0/sites/$($Site.ID)/permissions"
$Body = @{
    roles               = @("write")
    grantedToIdentities = @(
        @{
            application = @{
                id          = $SiteAdminAppID
                displayName = $PermissionDisplayName
            }
        }
    )
}

$BodyJSON = $Body | ConvertTo-Json -Depth 3

try
{
    # Send the HTTP POST request to create the Grant write permission to the specified site
    $response = Invoke-RestMethod -Uri $Url -Headers $Header -Method Post -Body $BodyJSON
    Write-Output "Permission granted successfully:"
    Write-Output $response
}
catch
{
    # Handle errors that may occur during the permission granting process
    Write-Error "The permission could not be granted successfully."
    Write-Error $Error[0]
}
#endregion
Reference
Authentication and authorization basics – Microsoft Graph | Microsoft Docs