Hi folks, when migrating our SharePoint to SharePoint Online, it can be really hard to separate the wheat from the chaff. SharePoint Site usage helps you find, what is actually used in your current farm. SharePoint farms grow by new projects and with the change of structures. If you want to have an overview, it is every time a good idea, to get rid of old stuff.
In a previous article, I showed you how to get all sites and subsites in SharePoint Online. This is a good basis, but if you need more, you should definitely continue reading. In this article, I want to show you one of my tools, which shows you the SharePoint site usage for previous months, so you understand what is needed in your new environment and what’s not. I am getting the data by using the interface IAnalyticsItemData of the search analytics component.
Prerequisites
SharePoint Search is up and running
You have access to SharePoint Server with a highly privileged account (SP_Admin or SP_Farm)
Description of the PowerShell script
This script iterates through all sites and asks the Search service application for the roll-up analytics data for the month specific month. The offset is the integer, which states a gap between the current month and the offset month.
Example:
If the variable PrevMonthOffset is 3, it is 3 months ago from the current month.
After you run the script and export will be created at your user’s desktop with all the site usage for the previous months. The current configuration in the script shows the SharePoint Site usage for the previous six months ($PrevMonthOffset = 6). You can change it for more months, if you need to.
SharePoint Site Usage PowerShell script
If you run the script like this, you do get the SharePoint site usage statistics for the last six months.
SharePoint sites are created very fast. With a few clicks, admins and users can create dozens of sites and subsites. Since it is so easy to create sites, we as admins should have an overview, what is going on at our SharePoint environment. You need also an overview of your environment, If you are looking forward to migrate your environment to a different environment. For this purpose I wrote scripts to get all sites and subsites of your SharePoint, so you can trim your SharePoint to your business needs. You will find a script for SharePoint Online and SharePoint Server.
If you run the script, an export will be created at the path, which you have specified. If you want to change the separation of columns to comma separated, change the following export line:
If you don’t have access to all SharePoint sites, you will only get the SharePoint sites (not the subsites).
PowerShell Script to get all sites and subsites for SharePoint Online
In this script I used an exported credential to authenticate with the PNP module. As always, please change the values in the parameter block.
$CredentialPath is the path to an exported credential file of the user with the SharePoint administrator role. If you leave the variable empty, the script will notice, that the credential is empty (line 47). Thus, it will ask you for the username and password for the user, and also the path, where the script can locate the credential file (line 17, 29 and 22). After the export, it will import the credential file to connect to SharePoint Online.
Depending on your locality, you have to change the delimiter in the last line:
Param(
    $TenantUrl = "https://devmodernworkplace-admin.sharepoint.com/",
    $CredentialPath = "C:\Users\Serkar\Desktop\devmod.key",
    $DesktopPath = [System.Environment]::GetFolderPath([System.Environment+SpecialFolder]::Desktop),
    $ExportPath = $DesktopPath + "\SitesExport.csv"
)

Function Export-CredentialFile
{
    param(
    $Username,
    $Path
    )

    While ($Username -eq "" -or $null -eq $Username)
    {
        $Username = Read-Host "Please enter your username (john.doe@domain.de)"
    }

    While ($Path -eq ""-or $null -eq $Path)
    {
        $Path = Read-Host "Where should the credentials be exported to?"
    }
    $ParentPath = Split-Path $Path
    If ((Test-Path $ParentPath) -eq $false)
    {
        New-Item -ItemType Directory -Path $ParentPath
    }
    $Credential = Get-Credential($Username)
    $Credential | Export-Clixml -Path $Path
    Return $Credential
}
Function Import-CredentialFile ($Path)
{
    if (! (Test-Path $Path))
    {
        Write-Host "Could not find the credential object at $Path. Please export your credentials first"
    }
    else
    {
        Import-Clixml -Path $Path
    }
}

$Credential = Import-CredentialFile -Path $CredentialPath

If ($Credential -eq $null)
{
    $Username = Read-Host "Please enter your username (john.doe@domain.de)"
    Export-CredentialFile -Path $CredentialPath -Username $Username
    $Credential = Import-CredentialFile $CredentialPath
}

#Connect to tenant
Connect-PnPOnline -Url $TenantUrl -Credentials $Credential

$Export = New-Object System.Collections.Generic.List[object]

$Sites = Get-PnPTenantSite
$SitesCount = $Sites.Count
$i= 1

foreach ($Site in $Sites)
{
    Write-Host "($i / $SitesCount) Processing site $($Site.Url)"
    Disconnect-PnPOnline
    Connect-PnPOnline -Url $Site.Url -Credentials $Credential
    $Site = Get-PnPSite

    #get the information of the root
    $NewExport = New-Object PsObject -Property @{

            Url = $Site.URl
            SubSitesCount = (Get-PnPSubWebs -Recurse).count
            ParentWeb = $null
    }
    $Export.Add($NewExport)

    #get the information of subwebs
    Get-PnPSubWebs -Recurse  -Includes ParentWeb| ForEach-Object {
        $NewExport = New-Object PsObject -Property @{

            Url = $_.URl
            SubSitesCount = $_.Webs.count
            ParentWeb = $_.ParentWeb.ServerRelativeUrl
        }
        $Export.Add($NewExport)
    }
    $i++
}
$Export | Export-Csv -Path $ExportPath -NoTypeInformation -Delimiter ";" -Force
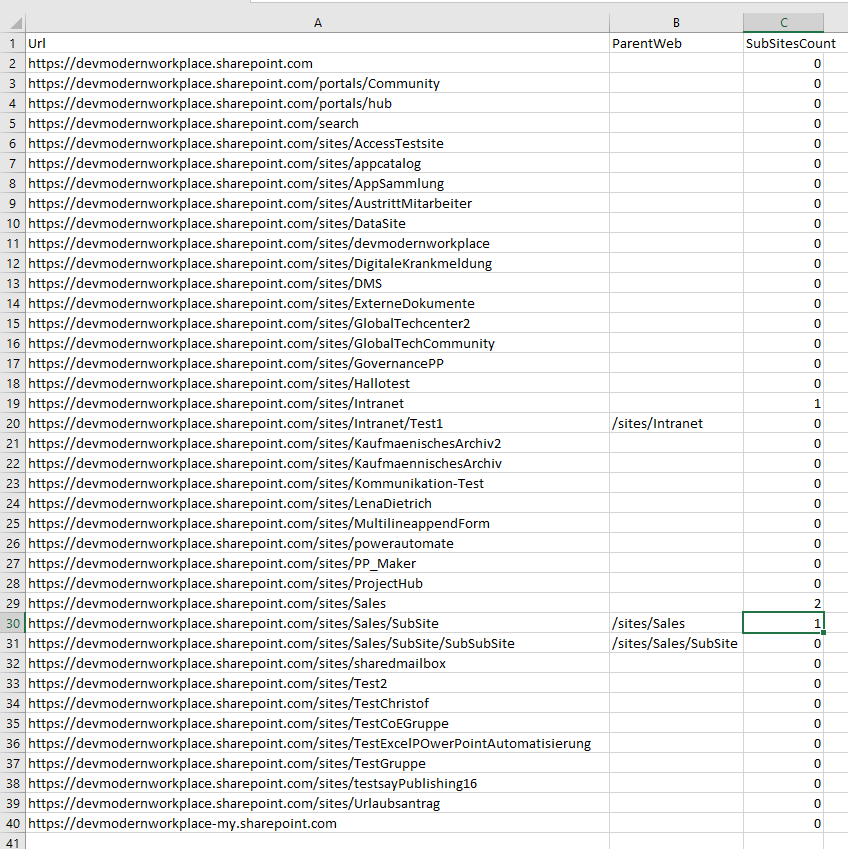
If you run the script, the export will be created on your desktop, which will look like this:
Get all sites and subsites for SharePoint Server
You can use this module for following SharePoint versions:
SharePoint 2013
SharePoint 2016
SharePoint 2019
If you start this script, your user context is used to run the cmdlets. An dedicated authentication is not needed.
Prerequisites
In order to run this script, you need to use a user, with permissions to access each all subsites. For this purpose I am using the SP_Admin account or SP_Farm account.
PowerShell script to get all sites and subsites for SharePoint Server
Since we got no authentication, It is way shorter, than the SharePoint Online script. If your export is not delimited properly, consider to change the delimiter, which I have described in the beginning.
Param(
    $DesktopPath = [System.Environment]::GetFolderPath([System.Environment+SpecialFolder]::Desktop),
    $ExportPath = $DesktopPath + "\SitesExport.csv"
)

Add-PSSnapin Microsoft.SharePoint.PowerShell

$Export = New-Object System.Collections.Generic.List[object]

$Sites = Get-SPSite -Limit all
$SitesCount = $Sites.Count
$i= 1

foreach ($Site in $Sites)
{
    Write-Host "($i / $SitesCount) Processing site $($Site.Url)"

    #get the information of the root
    #removed one site from allwebs, because it contains also the root
    $NewExport = New-Object PsObject -Property @{

            Url = $Site.URl
            SubSitesCount = ($Site.AllWebs.Count - 1)
            ParentWeb = $null
    }
    $Export.Add($NewExport)

    #get the information of subwebs
    #Skip the first web, since it is the rootweb
    Get-SPWeb -Site $Site.Url -Limit all | Select-Object -Skip 1 | ForEach-Object {
        $NewExport = New-Object PsObject -Property @{

            Url = $_.URl
            SubSitesCount = $_.Webs.Count
            ParentWeb = $_.Site.Url

        }
        $Export.Add($NewExport)
    }
    $i++
}
$Export | Export-Csv -Path $ExportPath -NoTypeInformation -Delimiter ";" -Force
Conclusion
Getting an overview for migration/ clean up purposes is key for a clean migration. With the scripts, I have provided, you get a brief overview over your environment. If it does not work for you, please write me a mail: Serkar@workplace-automation.com.
In my role as an automation consultant, I encounter several challenges, where you have to think out of the box. Thinking out of the box also means, to reconsider the tools, which you are using. If you start with SharePoint/ M365 automation, you will notice that there are at least three SharePoint PowerShell modules and snappins, with which you can automate your SharePoint environment. All of the SharePoint PowerShell modules/ snappins have indeed a reason for existence. In this article, I will show you where the focus of each module is, so you can get an idea, when to use which module. You will also get a overview, how to use all of them and what pros and cons eacht SharePoint PowerShell module/ snappin has.
PNP PowerShell
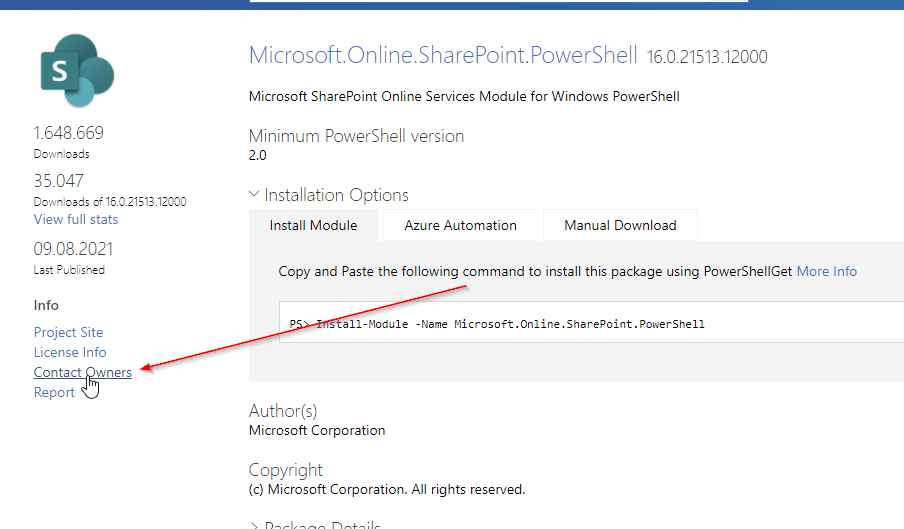
The beginning of PNP PowerShell was a community project of several developers, which have developed many client side object model (CSOM) wrappers for SharePoint 2013, 2016 and 2019. In fact PNP stands for Patterns and Practices. The modules are known as SharePointPnPPowerShell20xx or SharePointPnPPowerShellOnline. About the turn of the year all consolidated to PNP.PowerShell. Also the main focus from “catchall” have changed to the cloud version of SharePoint.
When to use PNP PowerShell
PNP.PowerShell is developing to one of the overreaching modules in Microsoft 365 cosmos. I would recommend to try everything first with PNP.PowerShell before you try doing it with SharePointOnlinePowerShell, since the development of the module goes on and on and you can do way more things with PNP PowerShell, than with SharePointOnlinePowerShell in terms of business process automation.
Topics covered by PNP PowerShell
Currently PNP PowerShell covers following topics and services:
SharePoint Online
SharePoint Server (on premises)
M365 Groups
Power Automate
Azure AD
SharePoint Syntex
Microsoft Teams
Microsoft Planner
Pros and Cons of PNP PowerShell
Pros
Cons
✅ You can use it for on-premises and cloud services
❌ Some cmdlets are not working as expected e.g. Set-PNPSite -SitecollectionAdmin
✅ You can use it on all servers/ clients, which have access to the tenant/ farm (online or on-premises)
❌ With constant development, cmdlets might change, so you have to monitor the changes, when updating the module
✅ Constant development of module
❌ You have to consent the access with the global admin role
✅ Supports many branches of M365 (SharePoint, Teams, Planner etc.)
❌ Microsoft Support won’t support if there is a bug in the modules. You have to open a request in github
✅ You don’t have to make breaking changes to your scripts if you move from SharePoint Server to SharePoint Online
✅ You can change a wide range of content in SharePoint (Sites, Lists, Items)
✅ You don’t need SharePoint Admin permission to connect to a site
In this section, I want to give you an overview of what you can change with PNP Powershell. Indeed there are more objects in SharePoint. I focus in the first place on objects, which I think are mostly changed with PowerShell for business process automation.
The module is maintained by the PNP Developer Community. At this stage I have to thank you guys for your hard and good work. It was really a game changer, when I didn’t had to use scripts on the SharePoint Server.
Be sure to follow their rules, when you open an issue, so they can help you faster. In the first step check the discussions. You have to be patient, since it is a community developed module.
SharePointOnlinePowerShell is the official Module, which is published by Microsoft. In comparison to PNP Powershell, SharePointOnlinePowerShell focuses only on the administration of SharePoint Online.
When to use SharePointOnlinePowerShell
My strategy is to use SharePointOnlinePowerShell, when I experience a buggy behaviour by PNP.PowerShell. Altough it is the official SharePoint PowerShell module, you cannot change e.g. list items.
Topics covered by SharePointOnlinePowerShell
SharePointOnlinePowerShell is only focussing on SharePoint Online. You cannot connect to another service or to SharePoint Server (on premises).
Pros and Cons of SharePointOnlinePowerShell
Pros
Cons
✅ I have experienced more stability on this module – It tends to have less bugs
❌ You can only administer SharePoint. Business process automation will be hard to cover with this module, because you cannot change webs, lists or items
✅ It is supported by Microsoft
❌ You can use it only for SharePoint Online
✅ Constant development of module – I have not experienced any breaking changes
Microsoft.SharePoint PowerShell is the only type of cmdlets, which is not a SharePoint PowerShell Module, but a PSSnappin. Snapins are considered as the old way to add cmdlets and other resources. It’s focus is SharePoint Server.
When to use Microsoft.SharePoint.PowerShell
I recommend to use Microsoft.SharePoint.PowerShell in following situations:
You don’t plan to migrate the automation solution to SharePoint Online
You have access to the SharePoint Servers
You want to administer SharePoint Server
Topics covered by Microsoft.SharePoint.PowerShell
With Microsoft.SharePoint.PowerShell you can only connect to SharePoint Server (on premises). You can see all cmdlets here from the Microsoft reference: SharePointServer Module | Microsoft Docs
Pros and Cons of Microsoft.SharePoint.PowerShell
Pros
Cons
✅ Microsoft.SharePoint.PowerShell is a established PSSNappin, which tends to have very few bugs
❌ You have to readapt the scripts, if you want to migrate to SharePoint Online
✅ It is supported by Microsoft
❌ You can use it only for SharePoint Server
✅ You can change nearly everything with this SharePoint PowerShell Module on your SharePoint Server
❌ You need SPShellAdmin rights to access SharePoint Server with this SharePoint PowerShell Module
How to make use of Microsoft.SharePoint.PowerShell?
Connect to SharePoint Server with a user, which is SPShellAdmin
Start Windows PowerShell
Type Add-PSSnapin Microsoft.SharePoint.Powershell
You are connected!
What can I change with Microsoft.SharePoint.PowerShell?
If you work with this SharePoint PowerShell snappin, you will notice, that you have to use mostly the SpWeb classes to change everything below a SpWeb. Check out the Microsoft docs to see, which classes are below SPWeb: SPWeb Class (Microsoft.SharePoint) | Microsoft Docs. If you need help, don’t hesitate to contact me: Serkar@workplace-automation.com
No dedicated cmdlet. You have to call lists from web object (get-spweb "url").lists
SPShellAdminAcess
Library
✅
No dedicated cmdlet. You have to call libraries from web object
(get-spweb "url").lists
SPShellAdminAcess
Item
✅
No dedicated cmdlet. You have to call libraries from list object
(get-spweb "url").lists.items
SPShellAdminAcess
File
✅
No dedicated cmdlet -You have to call the file from the item object
(get-spweb "url").lists.items[0].file
SPShellAdminAcess
Page
✅
No dedicated cmdlet – You have to call it from the sitepages library.
SPShellAdminAcess
Who is maintaing Microsoft.SharePoint.PowerShell?
The module is maintained by Microsoft.
What if I find a bug in Microsoft.SharePoint.PowerShell?
You can contact Microsoft Support and report the bug there.
Conclusio
As you saw each of the SharePoint PowerShell module / snappin got its pros and cons. PNP PowerShell is the number one choice, if you want to automate processes in Microsoft Cloud. Beside this SharePointOnlinePowerShell is the second tool recommended, If you only seek to administer SharePoint Online. As a final point Microsoft.SharePoint.PowerShell should be mentioned as a powerful tool if you want to administer SharePoint Server (on-premises). If I missed a point, I would appreciate, if you contact me: serkar@workplace-automation.com.
You have to determine the internal name of SharePoint columns, when you want to get the values of the items programatically or develop some apps with PowerApps. If you make use of display names of columns, you might not get the values of the columns, that’s why you should use the internal name of the columns, In this article I will show you how to do it by a step-by-step description.
Description
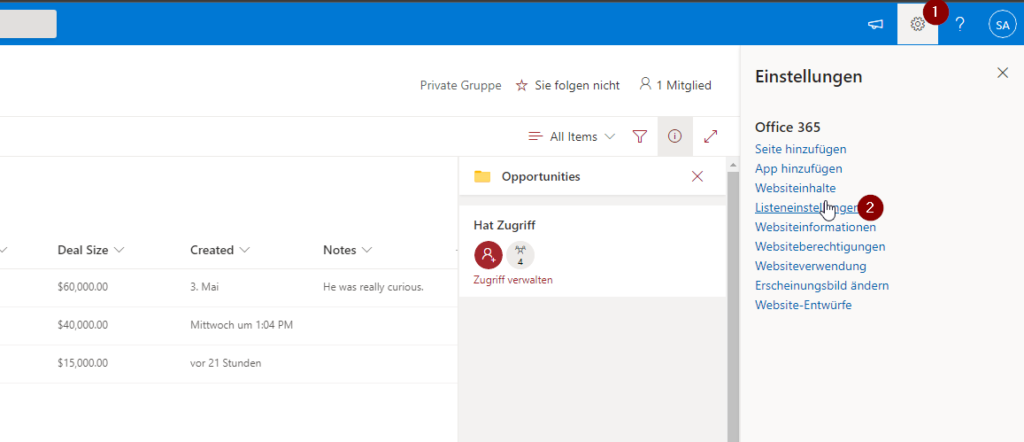
Browse to the list, where you want to get field internal name and open the list settings.
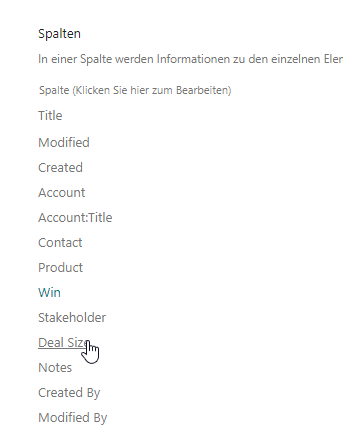
Scroll down to the SharePoint columns and click on the column, which you want to get the internal name of. In my example I want to check it for the SharePoint Column Deal Size.
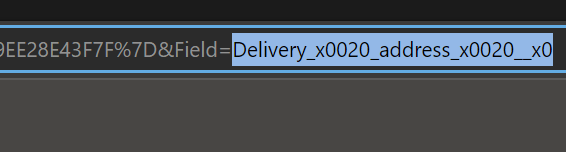
After clicking on Deal Size, I am checking the URL in the adress bar. The part after Field= is the internal name for the column. In my case it is DealSize.
If you use special characters, you will notice, that it won’t be that easy to determine the internal name of the SharePoint columns. Let me show it to you for the column Delivery address (Customer). As you can see, it got _x0020 and some other placeholder, which are not guessable easily.