Tag: PowerShell

  • How to Get SharePoint Files with MSGraph with PowerShell

    With the newest MSGraph module one has the capability to get SharePoint files with MSGraph. I recently figured out, how to fetch them in a recursed manner. In this article I want to share with you how to get SharePoint files with MSGraph. You will need to get the files with MSGraph, if you are thinking about to do following things:

    • Read/ Write/ Delete Metadata of SharePoint Files
    • Obtain DriveItem IDs, if you want to upload files to specific folders
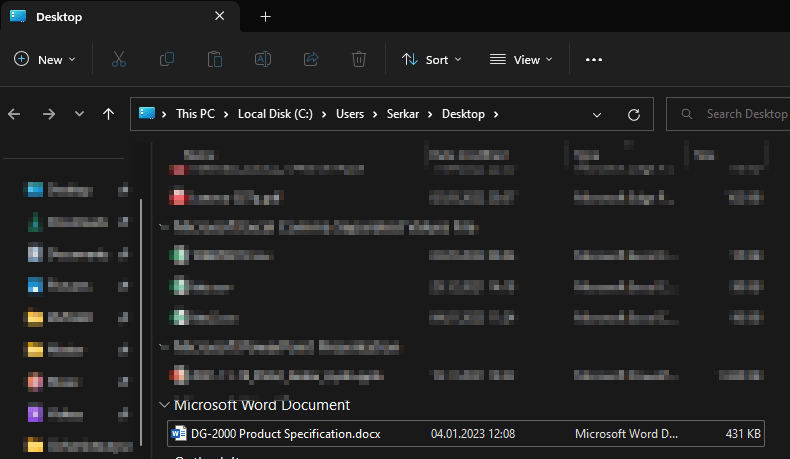
    • Download specific SharePoint files
    • Assess the storage of your SharePoint libraries

    What do you need to get SharePoint Files with MSGraph

    You need to fulfil two requirements, so that you can get SharePoint files with MSGraph recursedly.

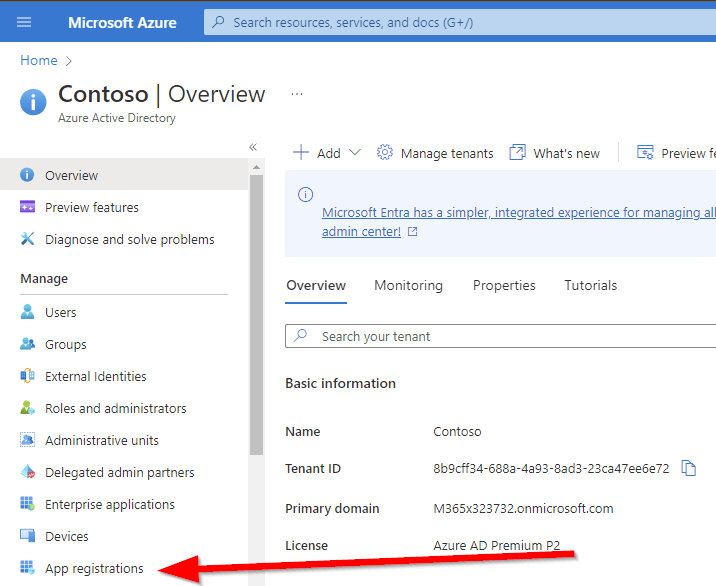
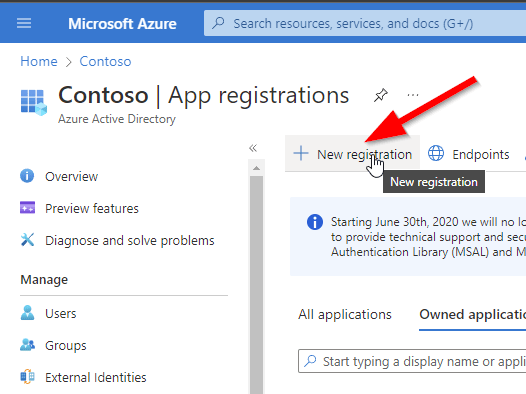
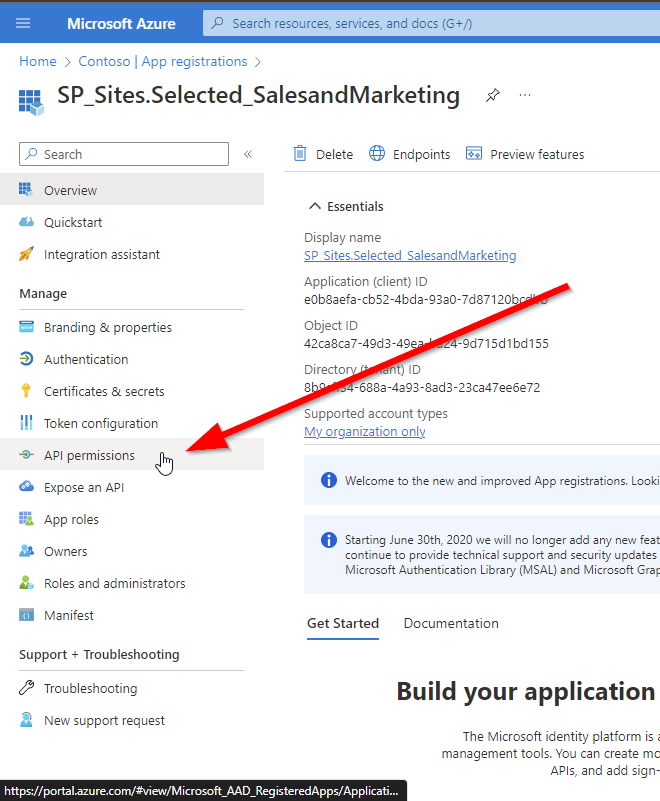
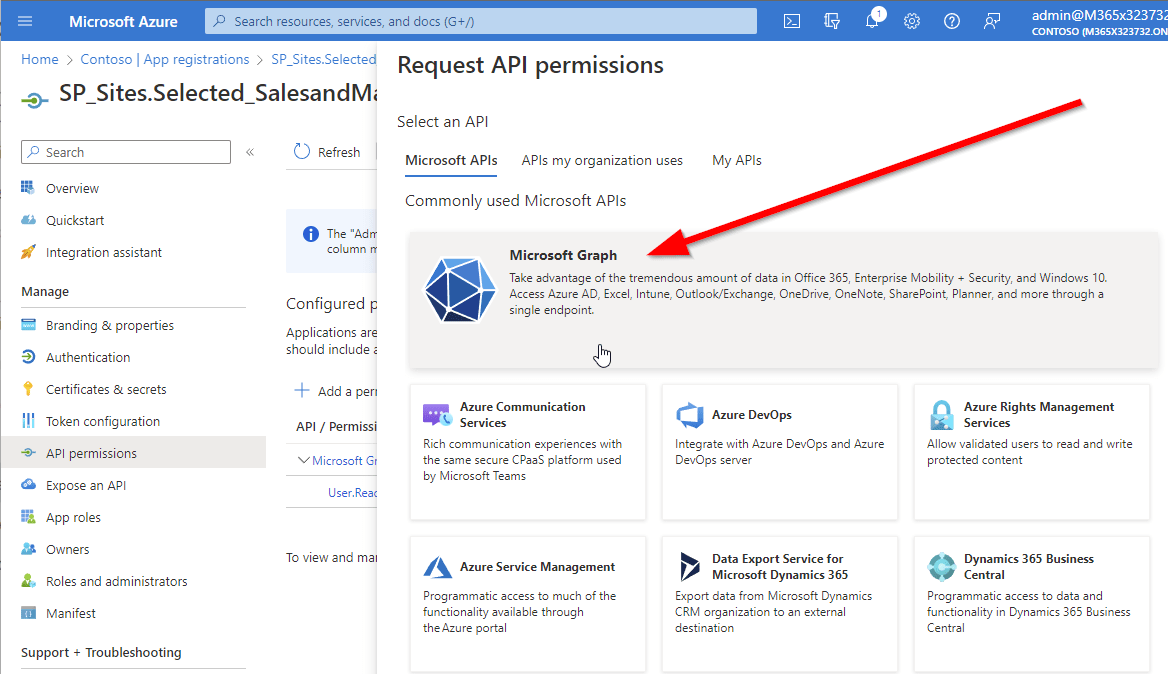
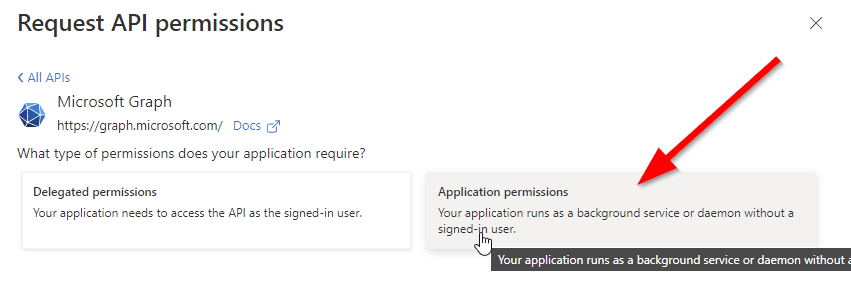
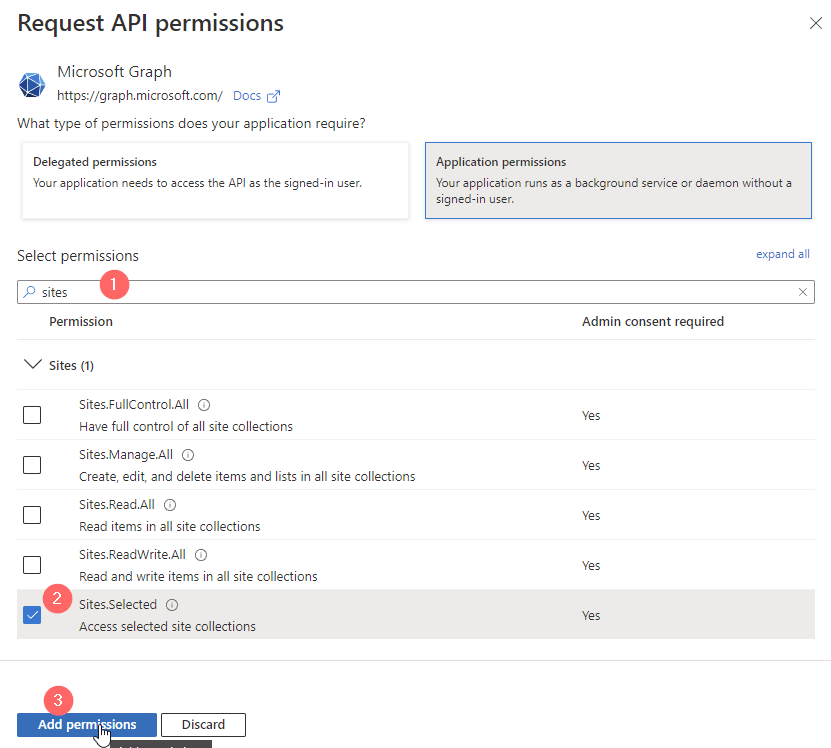
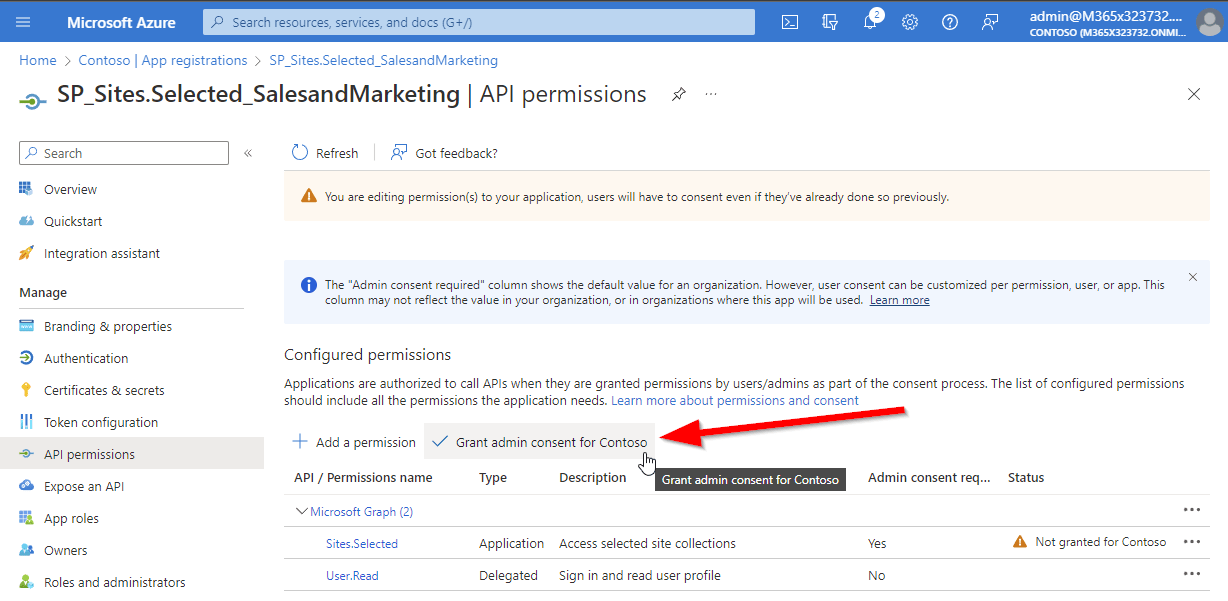
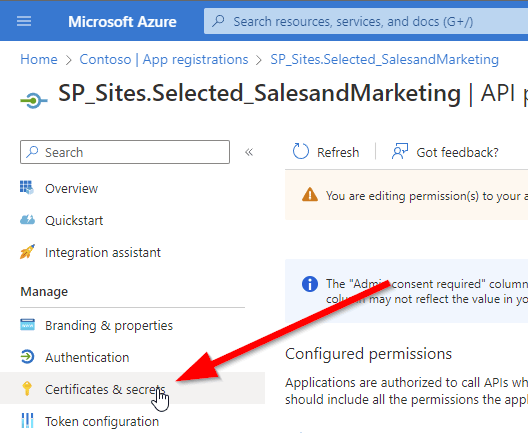
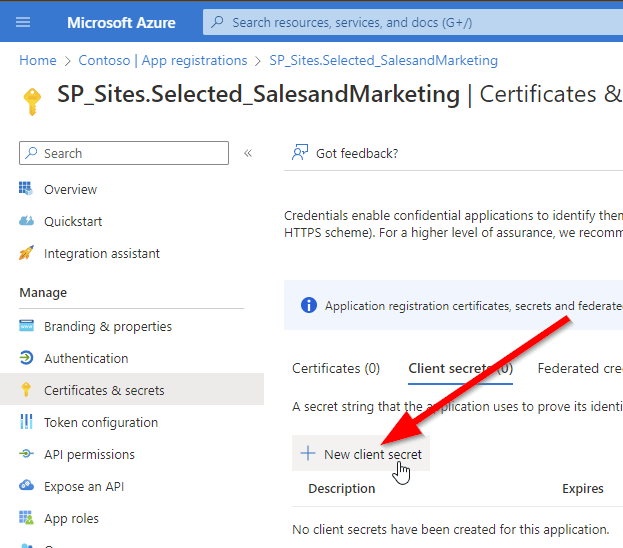
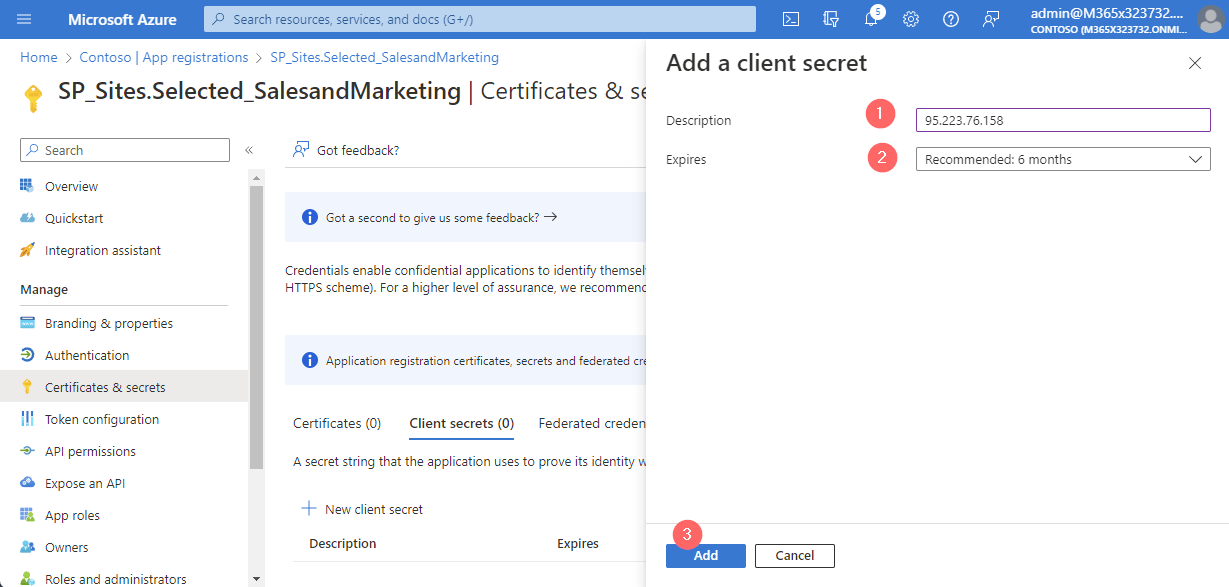
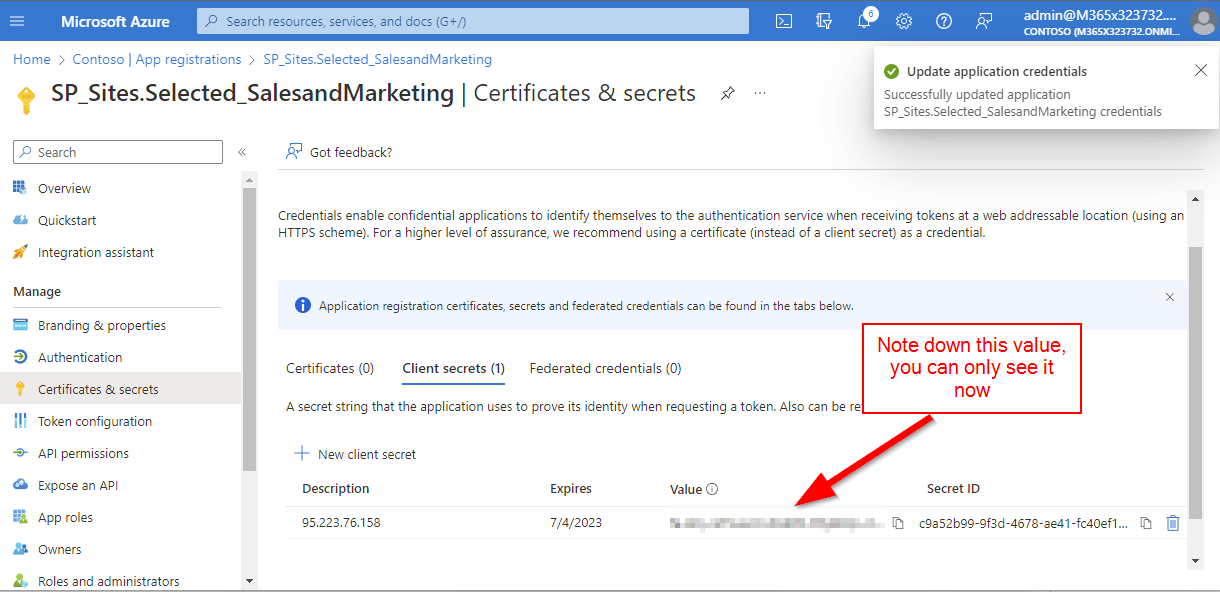
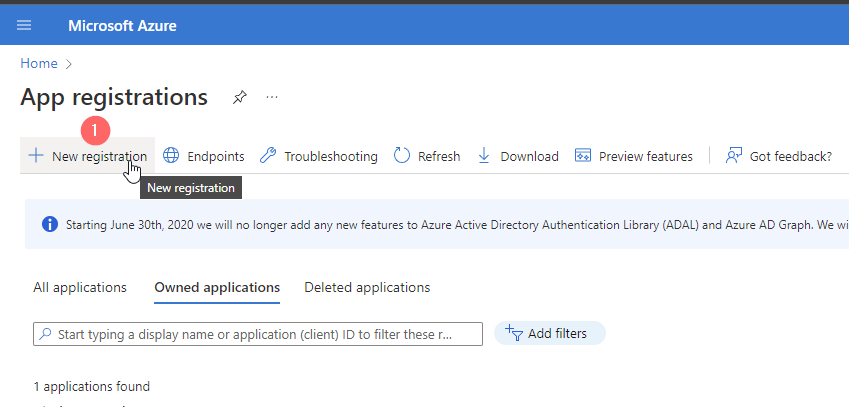
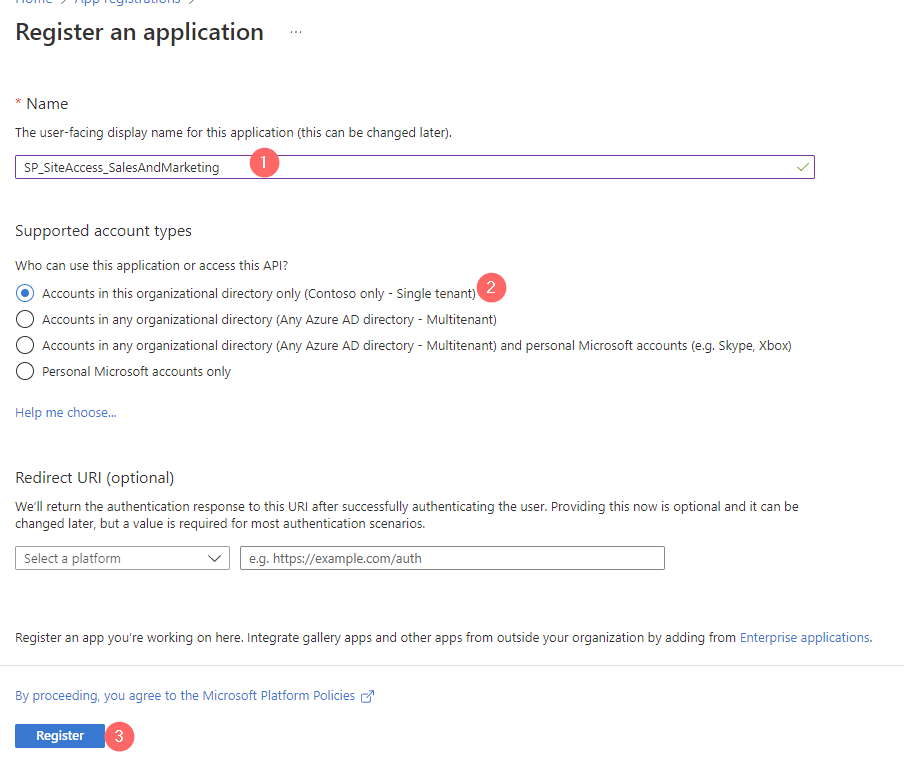
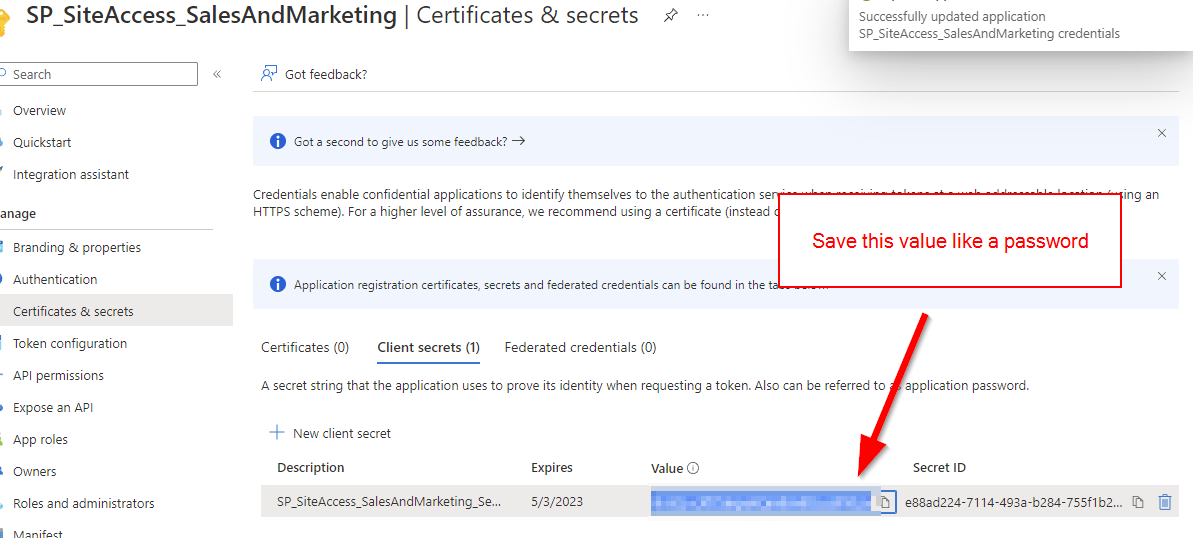
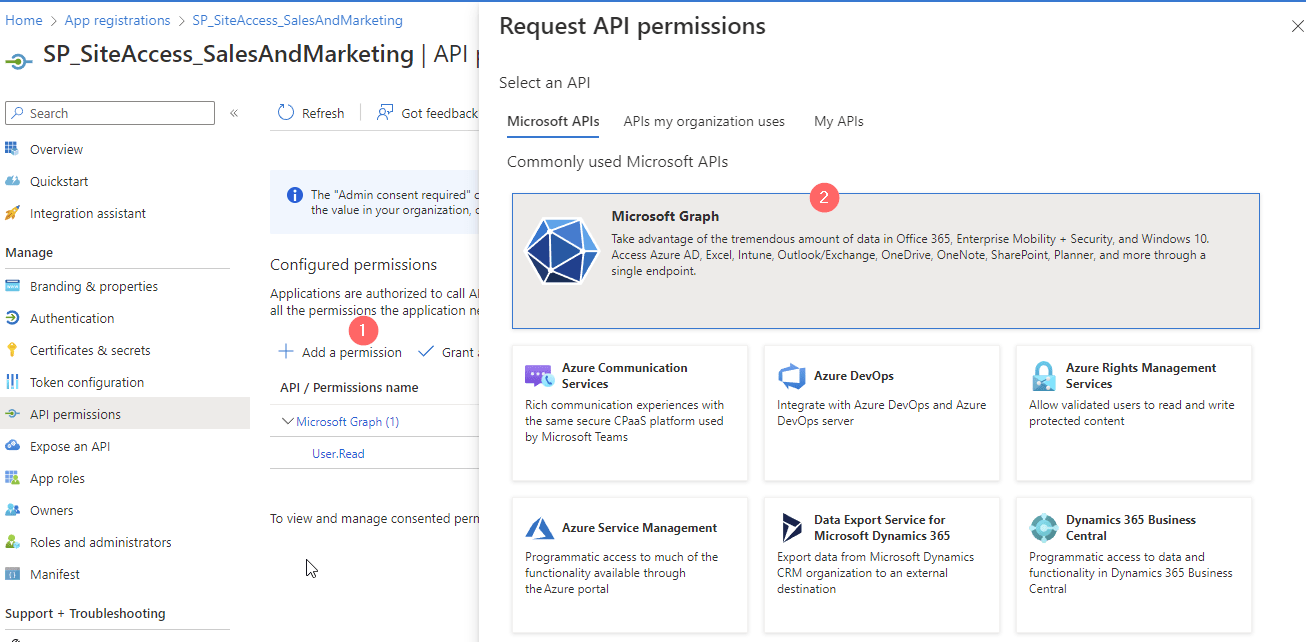
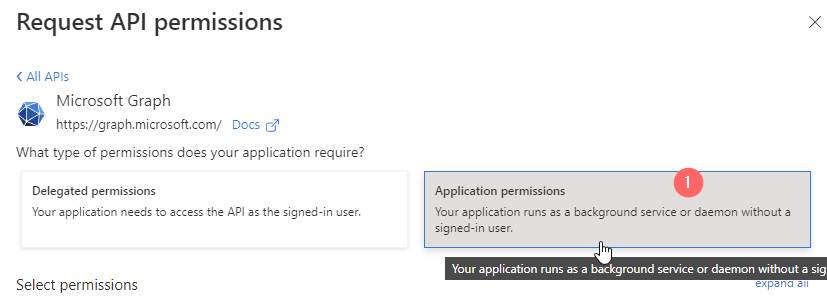
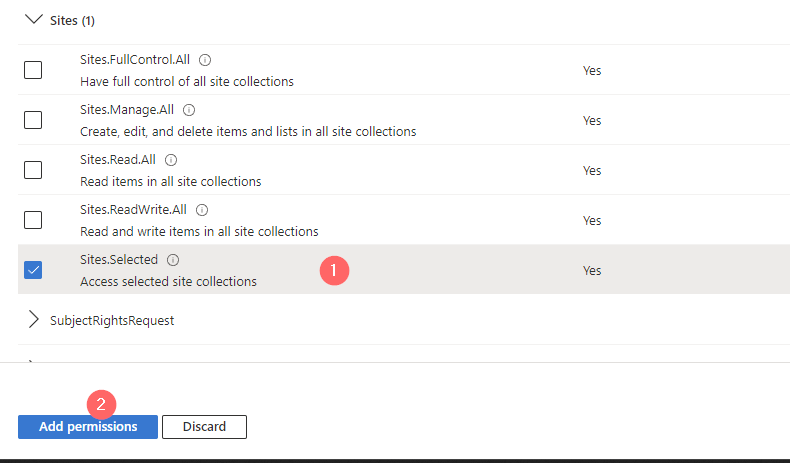
    1. You need to configure an Azure App registration with read permission to the SharePoint sites, where you want to obtain the files from. If you have never done this, follow my article, where I explain how to configure your Azure App registration for MSGraph access.
      How to configure Azure App registration for MS Graph | SPO Scripts
    2. Install the MSGraph module for PowerShell
      Install the Microsoft Graph PowerShell SDK | Microsoft Learn

    Demo Setup

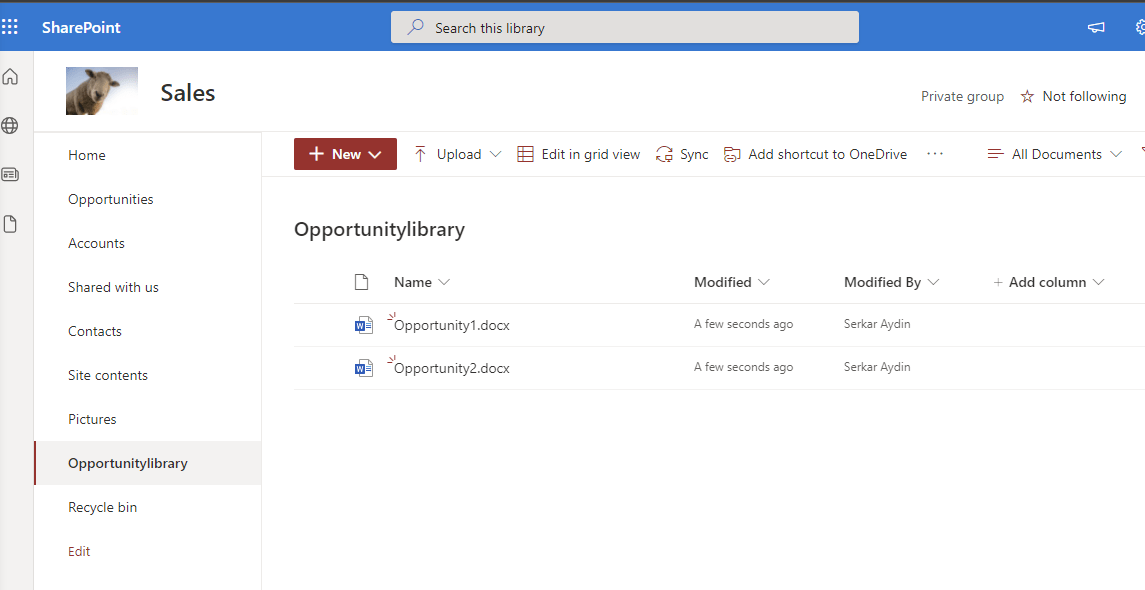
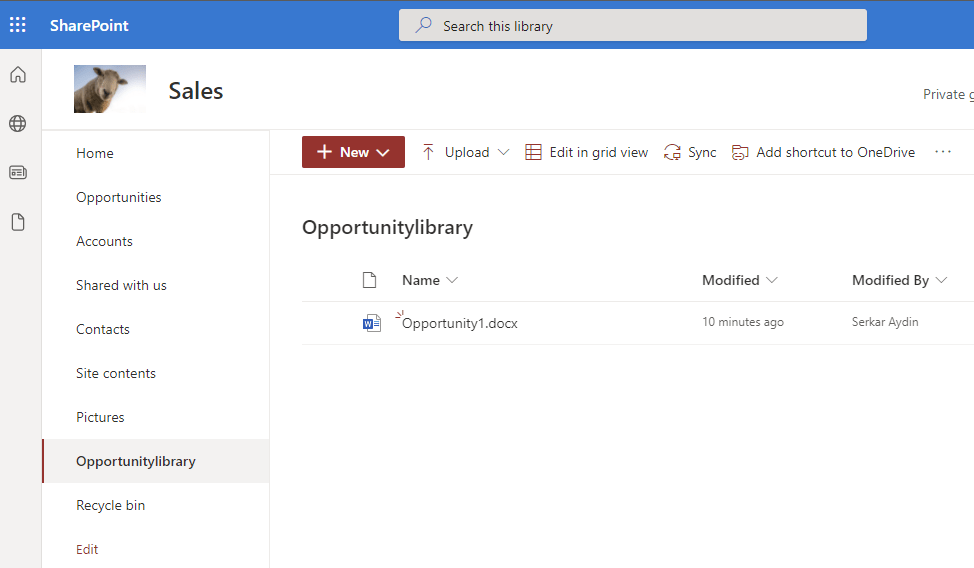
    In my demo setup I have a SharePoint Library, where I have stored some files and folders. I am showcasing you, so that you can understand what you can expect from the solution. I have also some files in a folder, which will show that the solution is able to fetch folder items.

    Get SharePoint Files with MSGraph
    SharePoint Subfolder

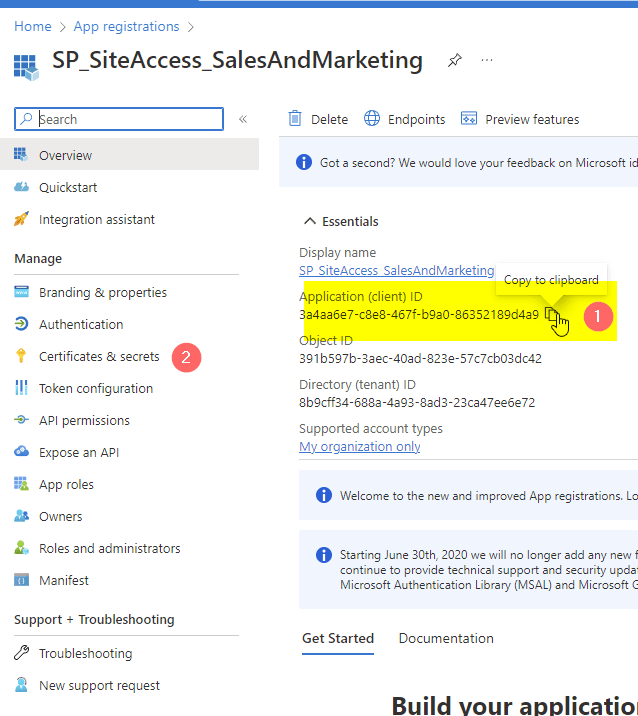
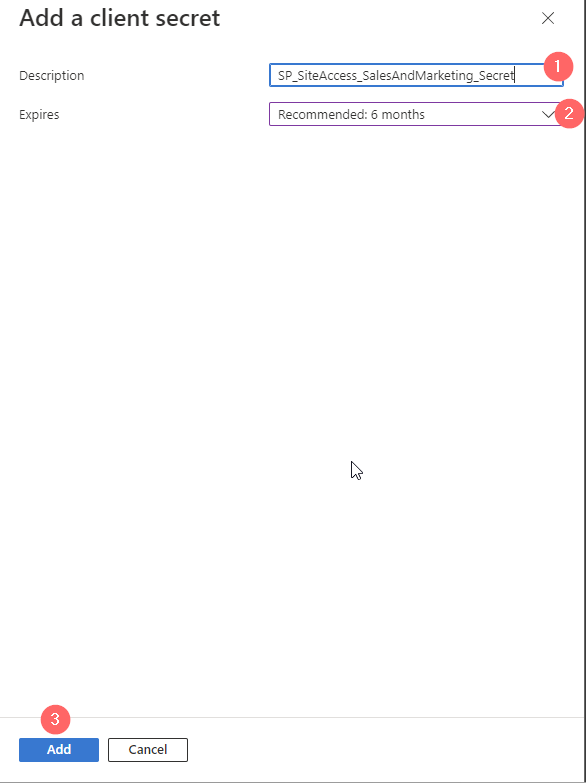
    I have created an Azure App registration with the Sites Read All permission. The authentication will be done with a self signed certificate.

    Azure App Registration with MSGraph permission

    Azure App Registration with certificate for authentication

    How to Get all SharePoint Files with MSGraph in PowerShell (recursively)

    Below you can find the PowerShell script to get all SharePoint files. I have created the function List-MgDriveItem in order to list the drive items of a drive. A drive item is either a file or a folder within a SharePoint Library You can adjust the function, if you want to have different attributes.

    function List-MgDriveItem
    {
        [CmdletBinding()]
        param (
            [Parameter()]
            $Drive,
            [Parameter()]
            $DriveItem
        )
    
        Try
        {
            if ($DriveItem.folder)
            {
                # Recurse in the folder to get the childitems of the folder
                $ChildItems = (Get-MgDriveItem -DriveId $Drive.Id -DriveItemId $DriveItem.Id  -ExpandProperty Children ).Children
    
                if ($ChildItems.Count -gt 0)
                {
                    <# Action to perform if the condition is true #>
                    $ChildItems | ForEach-Object { 
                        List-MgDriveItem -Drive $Drive -DriveItem (Get-MgDriveItem -DriveId $Drive.Id -DriveItemId $($_.Id) ) 
                    }
                }
    
            }
    
                $Result = New-Object psobject -Property @{
                DriveItemName = $DriveItem.name;
                DriveitemSize   = $DriveItem.Size
            }
            return $Result
        }
        catch
        {
            Return $Error[0]
        }
    
    }

    A sample output of a folder driveitem looks like this:

    PS C:\Users\Serka\OneDrive\Desktop\PS> $driveitem | Select-Object *
    
    webUrl               : https://m365x04995906.sharepoint.com/sites/Remoteliving/Shared%20Documents/General
    id                   : 01NLC4VWP4YR6WIO6O6JFIFTARZGEQZMAL
    createdBy            : {[user, System.Collections.Hashtable], [application, System.Collections.Hashtable]}
    lastModifiedBy       : {[user, System.Collections.Hashtable], [application, System.Collections.Hashtable]}
    lastModifiedDateTime : 31.07.2023 12:17:50
    name                 : General
    folder               : {[childCount, 3]}
    size                 : 4505145
    fileSystemInfo       : {[lastModifiedDateTime, 31.07.2023 12:17:50], [createdDateTime, 31.07.2023 12:17:50]}
    createdDateTime      : 31.07.2023 12:17:50
    parentReference      : {[id, 01NLC4VWN6Y2GOVW7725BZO354PWSELRRZ], [path, /drives/b!kJV0CniHeUeAiju7m8Gl4ZmfCOoRAXJNrYB9wjbkfZ-Vmuw3EELGQ7bZlNIfSaf4/root:], [driveType, documentLibrary], [driveId, b!kJV0CniHeUeAiju7m8Gl4ZmfCOoRAXJNrYB9wjbkfZ-Vmuw3EELGQ7bZlNIfSaf4]…}
    eTag                 : "{647DC4FC-CE3B-4AF2-82CC-11C9890CB00B},2"
    cTag                 : "c:{647DC4FC-CE3B-4AF2-82CC-11C9890CB00B},0"
    shared               : {[scope, users]}

    A sample output of a file driveitem looks like this:

    PS C:\Users\Serka\OneDrive\Desktop\PS> $driveitem | select-object * |Format-list
    
    createdDateTime              : 19.08.2023 20:56:39
    cTag                         : "c:{6C722880-DCC4-45F4-B64C-96805B32D473},2"
    lastModifiedBy               : {[user, System.Collections.Hashtable]}
    @microsoft.graph.downloadUrl : https://m365x04995906.sharepoint.com/sites/Remoteliving/_layouts/15/download.aspx?UniqueId=6c722880-dcc4-45f4-b64c-96805b32d473&Translate=false&tempauth=eyJ0eXAiOiJKV1QiLCJhbGciOiJIUzI1NiJ9.eyJhdWQiOiIwMDAwMDAwMy0wMDAwLTBmZjEtY2UwMC0wMDAwMDAwMDAwMDAvbTM2NXgwNDk5NTkwNi5zaGFyZXBvaW50LmNvbUAxZjc5NWU5NS1jMDZiLTQxMDktOTI0ZS0zNTY5ZmRkZjQ5OWYiLCJpc3MiOiIwMDAwMDAwMy0wMDAwLTBmZjEtY2UwMC0wMDAwMDAwMDAwMDAiLCJuYmYiOiIxNjk0OTc0NTMzIiwiZXhwIjoiMTY5NDk3ODEzMyIsImVuZHBvaW50dXJsIjoib0dEUzI3bnFpOEtUSHd5NHRaQ1NYVzE1Mk1KVGFMVkpZZmh0VUhBTVUrUT0iLCJlbmRwb2ludHVybExlbmd0aCI6IjE0MyIsImlzbG9vcGJhY2siOiJUcnVlIiwiY2lkIjoiVWxYbUJaczF1MHU4d3ZpSTFwTGhudz09IiwidmVyIjoiaGFzaGVkcHJvb2Z0b2tlbiIsInNpdGVpZCI6Ik1HRTNORGsxT1RBdE9EYzNPQzAwTnpjNUxUZ3dPR0V0TTJKaVlqbGlZekZoTldVeCIsImFwcF9kaXNwbGF5bmFtZSI6IlNQX1NlbnNpdGl2aXR5X0xhYmVscyIsIm5hbWVpZCI6IjkwNzQ3OTI1LTU1MGMtNDY1OC04NTBmLWIxOWQyNmVkMWE0M0AxZjc5NWU5NS1jMDZiLTQxMDktOTI0ZS0zNTY5ZmRkZjQ5OWYiLCJyb2xlcyI6ImFsbHNpdGVzLndyaXRlIiwidHQiOiIxIiwiaXBhZGRyIjoiMjAuMTkwLjE5MC4xMDMifQ.knKrUliPCxeMF4NQ2-3_FSAkEYRBD5nlTOvAVurT_gQ&ApiVersion=2.0
    file                         : {[mimeType, image/png], [hashes, System.Collections.Hashtable]}
    photo                        : {}
    name                         : 2023-06-25 00_18_51-Alfahosting.de® • Meine Rechnungen and 2 more pages - Personal - Microsoft​ Edge.png
    fileSystemInfo               : {[lastModifiedDateTime, 19.08.2023 20:56:39], [createdDateTime, 19.08.2023 20:56:39]}
    id                           : 01NLC4VWMAFBZGZRG46RC3MTEWQBNTFVDT
    shared                       : {[scope, users]}
    image                        : {[width, 868], [height, 406]}
    createdBy                    : {[user, System.Collections.Hashtable]}
    size                         : 23175
    eTag                         : "{6C722880-DCC4-45F4-B64C-96805B32D473},1"
    lastModifiedDateTime         : 19.08.2023 20:56:39
    webUrl                       : https://m365x04995906.sharepoint.com/sites/Remoteliving/Shared%20Documents/2023-06-25%2000_18_51-Alfahosting.de%C2%AE%20%E2%80%A2%20Meine%20Rechnungen%20and%202%20more%20pages%20-%20Personal%20-%20Microsoft%E2%80%8B%20Edge.png
    parentReference              : {[id, 01NLC4VWN6Y2GOVW7725BZO354PWSELRRZ], [path, /drives/b!kJV0CniHeUeAiju7m8Gl4ZmfCOoRAXJNrYB9wjbkfZ-Vmuw3EELGQ7bZlNIfSaf4/root:], [driveType, documentLibrary], [driveId, b!kJV0CniHeUeAiju7m8Gl4ZmfCOoRAXJNrYB9wjbkfZ-Vmuw3EELGQ7bZlNIfSaf4]…}

    Here you can find the PowerShell script to get all SharePoint files with MSGraph. Keep in mind that you replace the param block with the values from your tenant, app etc.

    Param (
        $AppID = "90747925-550c-4658-850f-b19d26ed1a43", # Replace with the App ID of your App registration
        $Tenant = "1f795e95-c06b-4109-924e-3569fddf499f", # Replace with the Tenant ID
        $SiteID = "0a749590-8778-4779-808a-3bbb9bc1a5e1", # Replace it with the SiteID of your SharePoint Site https://m365x04995906.sharepoint.com/sites/Remoteliving/_api/site/id
        $LibraryName = "Documents", # Replace with the list name,
        $CertificatePath = "C:\Users\Serka\OneDrive\Desktop\PS\SPSitesReadAll.pfx", # Replace with the path to your certificate,
        $CertificatePassword = "XXX" # Replace with the password of your certificate
    )
    
    function List-MgDriveItem {
        [CmdletBinding()]
        param (
            [Parameter()]
            $Drive,
            [Parameter()]
            $DriveItem
        )
        
        if ($DriveItem.folder) {
            <# Action to perform if the condition is true #>
            Write-Output "Folder $($DriveItem.Name), size $($DriveItem.Size) `n"
    
            # Recurse in the folder to get the childitems of the folder
            $ChildItems = $null
            $ChildItems = (Get-MgDriveItem -DriveId $Drive.id -DriveItemId $DriveItem.id  -ExpandProperty Children ).Children
    
            if ($ChildItems.Count -gt 0) {
                <# Action to perform if the condition is true #>
                $ChildItems | ForEach-Object { 
                    List-MgDriveItem -Drive $Drive -DriveItem (Get-MgDriveItem -DriveId $Drive.ID -DriveItemId $($_.Id) ) 
                }
            }
            
        }   
        elseif ($null -ne $DriveItem.file) {
            <# Action when this condition is true #>
            Write-Output "File $($DriveItem.Name), size $($DriveItem.Size) `n"
        }
    }
    
    #region prerequistes
    Import-Module microsoft.graph.authentication
    
    # Load the certificate from file
    $Certificate = New-Object System.Security.Cryptography.X509Certificates.X509Certificate2($CertificatePath, $CertificatePassword)
    
    # Authenticate
    Connect-MgGraph -ClientID $AppID -TenantId $Tenant -CertificateThumbprint $Certificate.Thumbprint
    #endregion
    
    #region main
    # Get drive
    $Drive = Get-MgSite -SiteId $SiteID -Property Drives -ExpandProperty Drives | Select-Object Drives -ExpandProperty Drives | Where-Object { $_.Name -eq $LibraryName }
    
    # Get drive item
    $DriveItems = Invoke-MgGraphRequest -Uri "v1.0/drives/$($Drive.ID)/root/children"
    
    foreach ($DriveItem in $DriveItems.Value) {
    
        #Get All drivitems below root
        List-MgDriveItem -Drive $Drive -DriveItem $DriveItem
    }
    
    #
    #endregion

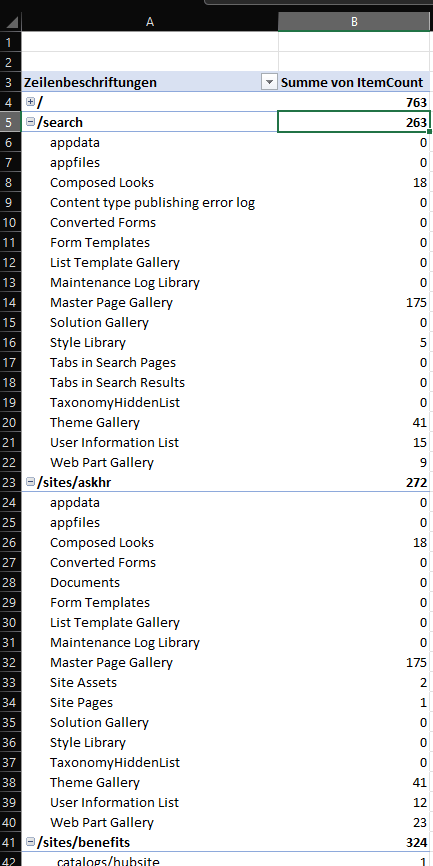
    As you can see below, the script populates the space ocupation for each SharePoint file/ folder.

    Output of get SharePoint files for MSGraph

    How to get DriveItemIDs for SharePoint Files?

    I have modified the script, so that you can get all driveItemIDs for all SharePoint Files in your library. Below you can find the script with certificate based authentication.

    Param 
    (
        $AppId = "90747925-550c-4658-850f-b19d26ed1a43", # Replace with the App Id of your App registration
        $Tenant = "1f795e95-c06b-4109-924e-3569fddf499f", # Replace with the Tenant prefix
        $SiteId = "0a749590-8778-4779-808a-3bbb9bc1a5e1", # Replace it with the SiteId of your SharePoint Site https://m365x04995906.sharepoint.com/sites/Remoteliving/_api/site/Id
        $LibraryName = "Documents", # Replace with the list name,
        $CertificatePath = "C:\Users\Serka\OneDrive\Desktop\PS\SPSitesReadAll.pfx", # Replace with the path to your certificate,
        $CertificatePasswordPath = "C:\Users\Serka\OneDrive\Desktop\PS\SPSitesReadAll.key" # Replace with the path to the password of your certificate,
    )
    
    function List-MgDriveItem
    {
        [CmdletBinding()]
        param (
            [Parameter()]
            $Drive,
            [Parameter()]
            $DriveItem
        )
    
        Try
        {
            if ($DriveItem.folder)
            {
                # Recurse in the folder to get the childitems of the folder
                $ChildItems = (Get-MgDriveItem -DriveId $Drive.Id -DriveItemId $DriveItem.Id  -ExpandProperty Children ).Children
    
                if ($ChildItems.Count -gt 0)
                {
                    <# Action to perform if the condition is true #>
                    $ChildItems | ForEach-Object { 
                        List-MgDriveItem -Drive $Drive -DriveItem (Get-MgDriveItem -DriveId $Drive.Id -DriveItemId $($_.Id) ) 
                    }
                }
    
            }
    
                $Result = New-Object psobject -Property @{
                DriveItemName = $DriveItem.name;
                DriveitemId   = $DriveItem.Id;
                DriveId       = $Drive.Id;
                DriveItemURL  = $DriveItem.webUrl
            }
            return $Result
        }
        catch
        {
            Return $Error[0]
        }
    
    }
    
    
    # Load required Modules
    Import-Module Microsoft.Graph.Authentication, Microsoft.Graph.Files
    
    # Load the certificate from file
    $CertificatePassword = (Import-Clixml -Path $CertificatePasswordPath).getnetworkcredential().Password
    $Certificate = New-Object System.Security.Cryptography.X509Certificates.X509Certificate2($CertificatePath, $CertificatePassword)
    
    # Authenticate
    Connect-MgGraph -ClientId $AppId -TenantId $Tenant -CertificateThumbprint $Certificate.Thumbprint -NoWelcome
     
    #region prepare export
    
    # Get drive
    $Drive = Get-MgSite -SiteId $SiteId -Property Drives -ExpandProperty Drives | Select-Object Drives -ExpandProperty Drives | Where-Object { $_.Name -eq $LibraryName }
    
    # Get drive item
    $DriveItems = Invoke-MgGraphRequest -Uri "v1.0/drives/$($Drive.Id)/root/children"
    
    $ItemExportRaw = New-Object System.Collections.Generic.List[object]
    
    foreach ($DriveItem in $DriveItems.Value)
    {
        #Get All drivitems below root
        $ItemExportRaw.Add( $(List-MgDriveItem -Drive $Drive -DriveItem $DriveItem))
    }
    
    $ItemExport = New-Object System.Collections.Generic.List[object]
    
    
    $ItemExportRaw |ForEach-Object {
    
            $_ | ForEach-Object {$ItemExport.add($_)}    
    }
    
    $ItemExport
    #endregion

    If you want to use app secrets instead of certificate based authentication, you can use following script

    Param 
    (
        $AppId = "13b20636-5165-402e-aedc-5e05eeb4a57f", # Replace with the App Id of your App registration
        $Tenant = "b7b0953d-d866-4606-9199-7642f06a0b2e", # Replace with the Tenant prefix
        $SiteId = "2dfd508f-98ab-46ad-839b-f0435730c79a", # Replace it with the SiteId of your SharePoint Site https://m365x04995906.sharepoint.com/sites/Remoteliving/_api/site/Id
        $LibraryName = "Documenten" # Replace with the list name,
    )
    
    function List-MgDriveItem
    {
        [CmdletBinding()]
        param (
            [Parameter()]
            $Drive,
            [Parameter()]
            $DriveItem
        )
    
        Try
        {
            if ($DriveItem.folder)
            {
                # Recurse in the folder to get the childitems of the folder
                $ChildItems = (Get-MgDriveItem -DriveId $Drive.Id -DriveItemId $DriveItem.Id  -ExpandProperty Children ).Children
    
                if ($ChildItems.Count -gt 0)
                {
                    <# Action to perform if the condition is true #>
                    $ChildItems | ForEach-Object { 
                        List-MgDriveItem -Drive $Drive -DriveItem (Get-MgDriveItem -DriveId $Drive.Id -DriveItemId $($_.Id) ) 
                    }
                }
    
            }
    
                $Result = New-Object psobject -Property @{
                DriveItemName = $DriveItem.name;
                DriveitemId   = $DriveItem.Id;
                DriveId       = $Drive.Id;
                DriveItemURL  = $DriveItem.webUrl
            }
            return $Result
        }
        catch
        {
            Return $Error[0]
        }
    
    }
    
    
    # Load required Modules
    Import-Module Microsoft.Graph.Authentication, Microsoft.Graph.Files
    
    # Complie Client Credential
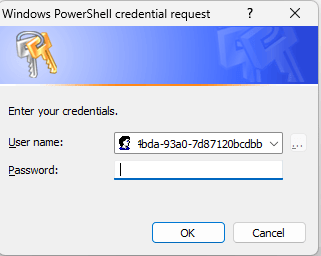
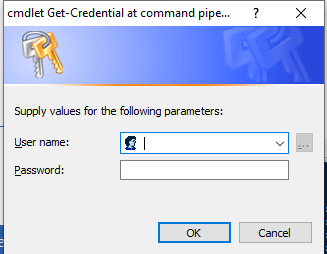
    $ClientSecretCredential = Get-Credential($AppID)
    
    # Authenticate
    Connect-MgGraph -TenantId $Tenant -ClientSecretCredential $ClientSecretCredential -NoWelcome
    
    #region prepare export
    
    # Get drive
    $Drive = Get-MgSite -SiteId $SiteId -Property Drives -ExpandProperty Drives | Select-Object Drives -ExpandProperty Drives | Where-Object { $_.Name -eq $LibraryName }
    
    # Get drive item
    $DriveItems = Invoke-MgGraphRequest -Uri "v1.0/drives/$($Drive.Id)/root/children"
    
    $ItemExportRaw = New-Object System.Collections.Generic.List[object]
    
    foreach ($DriveItem in $DriveItems.Value)
    {
        #Get All drivitems below root
        $ItemExportRaw.Add( $(List-MgDriveItem -Drive $Drive -DriveItem $DriveItem))
    }
    
    $ItemExport = New-Object System.Collections.Generic.List[object]
    
    
    $ItemExportRaw |ForEach-Object {
    
            $_ | ForEach-Object {$ItemExport.add($_)}    
    }
    
    $ItemExport
    #endregion

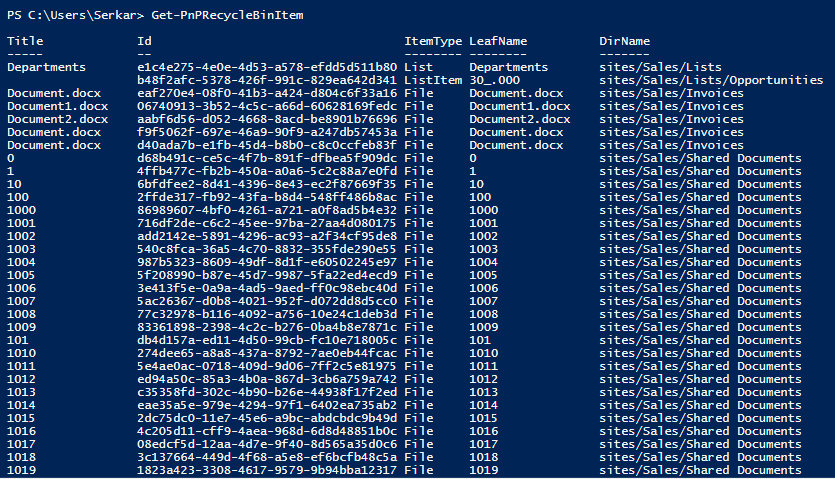
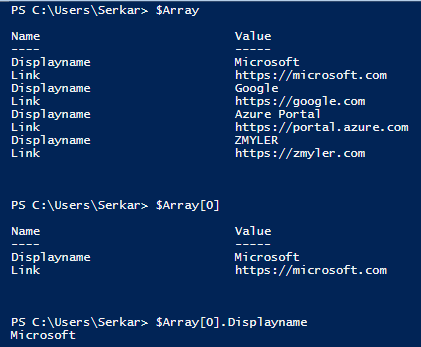
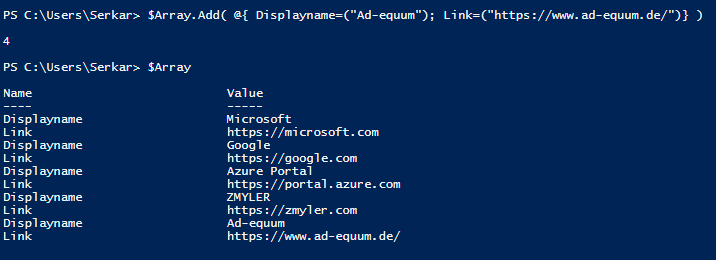
    Once the script is exectued, all driveitems are shown like this:

    Output of all driveitems

    Further Reference

    Here you can obtain the permission levels, which are required for your Azure App Registration:
    Microsoft Graph permissions reference – Microsoft Graph | Microsoft Learn

    Here you can find the cmdlet map for MS Graph module

    Find Azure AD and MSOnline cmdlets in Microsoft Graph PowerShell | Microsoft Learn

  • How to download files from SharePoint using Graph API (PowerShell)

    How to download files from SharePoint using Graph API (PowerShell)

    Downloading files from SharePoint is a common use case, when we are integrating 3rd party systems with SharePoint. In my previous articles, I have been explaining how you can upload files to SharePoint using PNP module. In this article, I want to show you how you can achieve download files from SharePoint using Graph API.

    In the beginning, we will create an Entra ID Enterprise Application in Entra ID, grant the created Enterprise Application the permission to interact with selected sites. At the end, I will share a PowerShell script to download files from the SharePoint using Graph API.

    What do I need to download files to SharePoint using Graph API?

    To downlaod a file to SharePoint using Graph API, you need the following prerequisites fulfilled:

    Your Sites.Selected App registration shall have following permission (at least):

    Screenshot of app registration with sites selected permissions

    How to Download Files from SharePoint using Graph API?

    As we have created an app registration and gave it the permission to write to a selected site, we can use to download files from SharePoint using Graph API. In my example, I want to download an Excel file from the SharePoint Library Shared Documents. Make sure, that you have adjusted the parameters and have the client secret handy, which we have created in the previous steps.

    Before you run the code, change the value of there parameters:

    $Tenant = “m365x323732” -> Name of the tenant. You can fetch it from the URL of your SharePoint: https://m365x16735261.sharepoint.com

    $AppID = “e0b8aefa-cb52-4bda-93a0-7d87120bcdbb” -> App ID, which you previously created in Entra ID

    $SiteID = “e35cee33-6d10-4e2c-a83b-496a26062ad3” -> ID of the Site, where you want to download the file from. In my example it would be https://m365x323732.sharepoint.com/sites/SalesAndMarketing/_api/site/id

    $LibraryURL = “https://m365x323732.sharepoint.com/sites/SalesAndMarketing/Shared%20Documents” -> URL to the SharePoint Library, where the file is located, which you want to download.

    $Path = “C:\Users\Serkar\Desktop\DG-2000 Product Specification.docx” – Path to where the file should be downloaded to

    $FileName = “DG-2000 Product Specification.docx” -> Name of the file

    When you run the code, you will be asked to provide the client secret for your app registration.

    Screenshot of credential prompt
    Param (
        $Tenant = "m365x323732",
        $AppID = "e0b8aefa-cb52-4bda-93a0-7d87120bcdbb",
        $SiteID = "e35cee33-6d10-4e2c-a83b-496a26062ad3",
        $LibraryURL = "https://m365x323732.sharepoint.com/sites/SalesAndMarketing/Shared%20Documents",
        $Path = "C:\Users\Serkar\Desktop\DG-2000 Product Specification.docx",
        $FileName = "DG-2000 Product Specification.docx"
    )
    
    $AppCredential = Get-Credential($AppID)
    
    #region authorize
    $Scope = "https://graph.microsoft.com/.default"
    
    $Body = @{
        client_id = $AppCredential.UserName
        client_secret = $AppCredential.GetNetworkCredential().password
        scope = $Scope
        grant_type = 'client_credentials'
    }
    
    $GraphUrl = "https://login.microsoftonline.com/$($Tenant).onmicrosoft.com/oauth2/v2.0/token"
    $AuthorizationRequest = Invoke-RestMethod -Uri $GraphUrl -Method "Post" -Body $Body
    $Access_token = $AuthorizationRequest.Access_token
    
    $Header = @{
        Authorization = $AuthorizationRequest.access_token
        "Content-Type"= "application/json"
    }
    #endregion
    
    #region get drives
    
    $GraphUrl = "https://graph.microsoft.com/v1.0/sites/$SiteID/drives"
    
    $BodyJSON = $Body | ConvertTo-Json -Compress
    $Result = Invoke-RestMethod -Uri $GraphUrl -Method 'GET' -Headers $Header -ContentType "application/json" 
    $DriveID = $Result.value| Where-Object {$_.webURL -eq $LibraryURL } | Select-Object id -ExpandProperty id
    
    If ($DriveID -eq $null){
    
        Throw "SharePoint Library under $LibraryURL could not be found."
    }
    
    #endregion
    
    #region download file
    
    $Url  = "https://graph.microsoft.com/v1.0/drives/$DriveID/items/root:/$($FileName)"
    
    $Response =  Invoke-RestMethod -Uri $Url -Headers $Header -Method Get -ContentType 'multipart/form-data' 
    
    Invoke-WebRequest -Uri $Response.'@microsoft.graph.downloadUrl' -OutFile $Path
    
    #endregion

    At the end you will receive the following response as example

    As you can see, the file was downloaded successfully from the SharePoint Library

    Screenshot of the downloaded file from SharePoint using Graph API
    Result of download files from SharePoint using Graph

    Further Reference

    You might be also interested in following articles, which are related to MS Graph API:

    Security of app registration in Entra ID | SPO Scripts

    Create SharePoint list items using Graph API (PowerShell) (workplace-automation.com/)

    How to get SharePoint List Items with Graph API (PowerShell) | SPO Scripts

  • How to upload files to SharePoint using Graph API (PowerShell)

    How to upload files to SharePoint using Graph API (PowerShell)

    Uploading files to SharePoint is a common use case, when we are integrating 3rd party systems with SharePoint. In my previous articles, I have been explaining how you can upload files to SharePoint using PNP module. In this article, I want to show you how you can achieve upload files to SharePoint using Graph API.

    Note: This method works for files, where the size is maximum 4 MB.

    In the beginning, we will create an Azure Enterprise Application in Azure Active Directory. Then we will grant the created Enterprise Application the permission to interact with selected sites. At the end, I will share a PowerShell script to upload files to the SharePoint using Graph API.

    What do I need to upload files to SharePoint using Graph API?

    To upload a file to SharePoint using Graph API, you need the following prerequisites fulfilled:

    • You need your global administrator in your organization to grant the sites.selected permission for an Azure Enterprise Application
    • You need to install PNP PowerShell module, to grant the Enterprise Application the permission to upload files to the specific SharePoint Site

    How to create the Enterprise Application to upload Files to SharePoint?

    In the beginning it is import to understand, which permission the Enterprise Application needs so that we can upload files to SharePoint using Graph API.

    1. Browse to Azure Active Directory Portal
    2. Create an App Registration with Sites.Selected permissions
    3. Create and note down credentials for the App Registration


    I will explain how to do it step-by-step.

    Browse to Azure Active Directory Portal

    Open https://portal.azure.com/#view/Microsoft_AAD_IAM/ActiveDirectoryMenuBlade in your browser.

    If you have the global admin rights, I recommend authenticating with that account, so that you can directly grant your enterprise application the permission. Otherwise, you need to reauthenticate or ask your administrator to grant your enterprise application the permissions.

    Create an App Registration with Sites.Selected permissions

    Browse to the App Registration blade

    Screenshot of the App registrations shortcut

    Click on new registration

    Screenshot of new enterprise app registration

    Define for the App a meaningful name, which follows your organization standards (Different admins should recognize what the purpose for this app is) and register it.

    Screenshot on how to create the App registration in MS Azure

    Browse to API permissions to grant your app registration the permission to upload files to SharePoint using Graph API.

    Screenshot of configuration blade for App API permissions

    Click on Add a permission

    Screenshot of how to add the API permission to the App registration

    Now choose Microsoft Graph

    Chose of Microsoft Graph Permission

    If you want your application to work in the background (Without any user authentication), you need to choose Application permission. As my intention is to show you how to automate the process, I am sharing with you the application permission way.

    Screenshot of Application permission path of API permission

    Now search for Sites.Selected and click on add permissions.

    If you are signed in with a user account with global administrator privileges, you can grant administrator admin consent for your tenant. In other case, you either need to sign in with the global administrator account or you have to ask your administrator to grant your app registration the permission.

    Screenshot of grant admin consent for tenant of the app registration

    Create Secret for the App Registration

    To authenticate with your enterprise application, you need to either upload a certificate or create a secret for your enterprise application. In this case I am creating a secret.

    Browse to Certificates & secrets

    Screenshot of Certificates & secrets blade

    Screenshot on how to create a client secret

    For the description, I think it makes sense to define which application is going to use your client secret. For the duration, I would go with the recommendation of Microsoft, as you might have lost this application out of sight in 24 months, which is the maximum duration for a client secret.

    Screenshot of creation of app secret

    Now note down, what you see under value, you can only see it now.

    Screenshot of app secret

    With that last step, your Enterprise application has the right permissions on Azure Active Directory. In the next step you need to grant your enterprise Application the permission to write into the specific SharePoint site.

    How to grant the App Registration Write Permissions for a Selected SharePoint Site?

    In order to grant the app registration the permission, you need to ensure that PNP Module is installed on your client and that you are allowed to use it.

    If you have not yet installed it, check the following documentation:

    Connect to SharePoint with PowerShell | SharePoint Online (workplace-automation.com/)

    If both conditions are applying, you can use this code to grant your App registration right permission to write in the site.

    You can get your App ID by browsing to the overview page of your app registration.

    Screenshot of Application (client) ID

    Import-Module PnP.PowerShell
    
    $AppID = "e0b8aefa-cb52-4bda-93a0-7d87120bcdbb"
    $AppRegistrationName = "SP_Sites.Selected_SalesandMarketing"
    
    $DisplayNameofSitePermission = "Enterprise Application $AppRegistrationName"
    $SiteURL = "https://m365x323732.sharepoint.com/sites/SalesAndMarketing"
    
    
    Connect-PnPOnline -Url $SiteURL -Interactive
    Grant-PnPAzureADAppSitePermission -AppId $AppID -DisplayName $DisplayNameofSitePermission -Site $SiteURL -Permissions Write

    You will be asked to authenticate.

    Screenshot of authentication prompt

    At the end, your app registration has write permissions.

    Screenshot of App registration to write permissions to SharePoint Site

    How to Upload Files to SharePoint using Graph API?

    As we have created an app registration and gave it the permission to write to a selected site, we can use to upload files to SharePoint using Graph API. In my example, I want to upload a picture to the SharePoint Library Shared Documents. Make sure, that you have adjusted the parameters and have the client secret handy, which we have created in the previous steps.

    When you run the code, you will be asked to provide the client secret for your app registration.

    Screenshot of credential prompt
    Param (
        $Tenant = "m365x323732",
        $AppID = "e0b8aefa-cb52-4bda-93a0-7d87120bcdbb",
        $SiteID = "e35cee33-6d10-4e2c-a83b-496a26062ad3",
        $LibraryURL = "https://m365x323732.sharepoint.com/sites/SalesAndMarketing/Shared%20Documents",
        $Path = "C:\Users\Serkar\Desktop\security.png"
    )
    
    $AppCredential = Get-Credential($AppID)
    
    #region authorize
    $Scope = "https://graph.microsoft.com/.default"
    
    $Body = @{
        client_id = $AppCredential.UserName
        client_secret = $AppCredential.GetNetworkCredential().password
        scope = $Scope
        grant_type = 'client_credentials'
    }
    
    $GraphUrl = "https://login.microsoftonline.com/$($Tenant).onmicrosoft.com/oauth2/v2.0/token"
    $AuthorizationRequest = Invoke-RestMethod -Uri $GraphUrl -Method "Post" -Body $Body
    $Access_token = $AuthorizationRequest.Access_token
    
    $Header = @{
        Authorization = $AuthorizationRequest.access_token
        "Content-Type"= "application/json"
    }
    #endregion
    
    #region get drives
    
    
    $GraphUrl = "https://graph.microsoft.com/v1.0/sites/$SiteID/drives"
    
    $BodyJSON = $Body | ConvertTo-Json -Compress
    $Result = Invoke-RestMethod -Uri $GraphUrl -Method 'GET' -Headers $Header -ContentType "application/json" 
    $DriveID = $Result.value| Where-Object {$_.webURL -eq $LibraryURL } | Select-Object id -ExpandProperty id
    
    If ($DriveID -eq $null){
    
        Throw "SharePoint Library under $LibraryURL could not be found."
    }
    
    #endregion
    
    #region upload file
    
    $FileName = $Path.Split("\")[-1]
    $Url  = "https://graph.microsoft.com/v1.0/drives/$DriveID/items/root:/$($FileName):/content"
    
    Invoke-RestMethod -Uri $Url -Headers $Header -Method Put -InFile $Path -ContentType 'multipart/form-data' -Verbose
    #endregion 

    At the end you will receive the following response as example

    VERBOSE: PUT with -1-byte payload
    VERBOSE: received -1-byte response of content type application/json;odata.metadata=minimal;odata.streaming=true;IEEE754Compatible=false;charset=utf-8
    
    
    @odata.context               : https://graph.microsoft.com/v1.0/$metadata#drives('b%21M-5c4xBtLE6oO0lqJgYq04f6JqJ_iTlEhBdXmkuqxRI4cWqlVo8-QKlAJO6KoBgT')/items/$entity
    @microsoft.graph.downloadUrl : https://m365x323732.sharepoint.com/sites/SalesAndMarketing/_layouts/15/download.aspx?UniqueId=9f900d6c-d023-41cc-8839-61f079916c03&Translate=fals
                                   e&tempauth=eyJ0eXAiOiJKV1QiLCJhbGciOiJub25lIn0.eyJhdWQiOiIwMDAwMDAwMy0wMDAwLTBmZjEtY2UwMC0wMDAwMDAwMDAwMDAvbTM2NXgzMjM3MzIuc2hhcmVwb2ludC5jb21AOG
                                   I5Y2ZmMzQtNjg4YS00YTkzLThhZDMtMjNjYTQ3ZWU2ZTcyIiwiaXNzIjoiMDAwMDAwMDMtMDAwMC0wZmYxLWNlMDAtMDAwMDAwMDAwMDAwIiwibmJmIjoiMTY3MjgyMjg4MSIsImV4cCI6IjE
                                   2NzI4MjY0ODEiLCJlbmRwb2ludHVybCI6IjYrUUtpd1NldjBJdksyUFkwS2wyV0YveWNLSnYxQkdPc1RFb1pWclRyems9IiwiZW5kcG9pbnR1cmxMZW5ndGgiOiIxNDYiLCJpc2xvb3BiYWNr
                                   IjoiVHJ1ZSIsImNpZCI6IlpUSTFaakE0WTJJdE5XUTRPUzAwTldRd0xXSmtPVEV0WlRnMFpEUmhZVFJrTW1VMyIsInZlciI6Imhhc2hlZHByb29mdG9rZW4iLCJzaXRlaWQiOiJaVE0xWTJWb
                                   E16TXRObVF4TUMwMFpUSmpMV0U0TTJJdE5EazJZVEkyTURZeVlXUXoiLCJhcHBfZGlzcGxheW5hbWUiOiJTUF9TaXRlcy5TZWxlY3RlZF9TYWxlc2FuZE1hcmtldGluZyIsIm5hbWVpZCI6Im
                                   UwYjhhZWZhLWNiNTItNGJkYS05M2EwLTdkODcxMjBiY2RiYkA4YjljZmYzNC02ODhhLTRhOTMtOGFkMy0yM2NhNDdlZTZlNzIiLCJyb2xlcyI6InNlbGVjdGVkc2l0ZXMiLCJ0dCI6IjEiLCJ
                                   1c2VQZXJzaXN0ZW50Q29va2llIjpudWxsLCJpcGFkZHIiOiIyMC4xOTAuMTkwLjEwMSJ9.c0kydmY4eUFWS2lvWmJkTG1yTjJGbmV0SkVHVHRtdjNZWHppbm1SKytTRT0&ApiVersion=2.0
    createdDateTime              : 2023-01-04T09:01:21Z
    eTag                         : "{9F900D6C-D023-41CC-8839-61F079916C03},1"
    id                           : 01P5GC6MTMBWIJ6I6QZRAYQOLB6B4ZC3AD
    lastModifiedDateTime         : 2023-01-04T09:01:21Z
    name                         : security.png
    webUrl                       : https://m365x323732.sharepoint.com/sites/SalesAndMarketing/Shared%20Documents/security.png
    cTag                         : "c:{9F900D6C-D023-41CC-8839-61F079916C03},2"
    size                         : 129678
    createdBy                    : @{application=; user=}
    lastModifiedBy               : @{application=; user=}
    parentReference              : @{driveType=documentLibrary; driveId=b!M-5c4xBtLE6oO0lqJgYq04f6JqJ_iTlEhBdXmkuqxRI4cWqlVo8-QKlAJO6KoBgT; id=01P5GC6MV6Y2GOVW7725BZO354PWSELRRZ; 
                                   path=/drives/b!M-5c4xBtLE6oO0lqJgYq04f6JqJ_iTlEhBdXmkuqxRI4cWqlVo8-QKlAJO6KoBgT/root:}
    file                         : @{mimeType=image/png; hashes=}
    fileSystemInfo               : @{createdDateTime=2023-01-04T09:01:21Z; lastModifiedDateTime=2023-01-04T09:01:21Z}
    image                        : 
    shared                       : @{scope=users}


    Screenshot of the response

    As you can see, the file was uploaded successfully to the SharePoint Library

    Screenshot of the uploaded files to SharePoint using Graph API
     Screenshot of the picture in the SharePoint Library

    How to Upload Files to a Folder in SharePoint using Graph API?

    In order to upload files to folders, you just need to make sure that your URI contains the folder structure after root:/.
    In my example below, I uploaded apicture to the Subfolder folder.

    $Url = "https://graph.microsoft.com/v1.0/drives/$DriveID/items/root:/General/Subfolder/$($FileName):/content"
    
    Param (
        $Tenant = "m365x04995906",
        $AppID = "3669592a-9085-4f09-8c03-2b2223aa002c",
        $SiteID = "0a749590-8778-4779-808a-3bbb9bc1a5e1",
        $LibraryURL = "https://m365x04995906.sharepoint.com/sites/Remoteliving/Shared%20Documents",
        $Path = "C:\Users\Serka\OneDrive\Desktop\pngs\00003.jpg",
        $Folder = "General/Subfolder"
    )
    
    #$AppCredential = Get-Credential($AppID)
    
    #region authorize
    $Scope = "https://graph.microsoft.com/.default"
    
    $Body = @{
        client_id = $AppCredential.UserName
        client_secret = $AppCredential.GetNetworkCredential().password
        scope = $Scope
        grant_type = 'client_credentials'
    }
    
    $GraphUrl = "https://login.microsoftonline.com/$($Tenant).onmicrosoft.com/oauth2/v2.0/token"
    $AuthorizationRequest = Invoke-RestMethod -Uri $GraphUrl -Method "Post" -Body $Body
    $Access_token = $AuthorizationRequest.Access_token
    
    $Header = @{
        Authorization = $AuthorizationRequest.access_token
        "Content-Type"= "application/json"
    }
    #endregion
    
    #region get drives
    
    
    $GraphUrl = "https://graph.microsoft.com/v1.0/sites/$SiteID/drives"
    
    $BodyJSON = $Body | ConvertTo-Json -Compress
    $Result = Invoke-RestMethod -Uri $GraphUrl -Method 'GET' -Headers $Header -ContentType "application/json" 
    $DriveID = $Result.value| Where-Object {$_.webURL -eq $LibraryURL } | Select-Object id -ExpandProperty id
    
    If ($DriveID -eq $null){
    
        Throw "SharePoint Library under $LibraryURL could not be found."
    }
    
    #endregion
    
    #region upload file
    
    $FileName = $Path.Split("\")[-1]
    $Url = "https://graph.microsoft.com/v1.0/drives/$DriveID/items/root:/$Folder/$($FileName):/content"
    
    Invoke-RestMethod -Uri $Url -Headers $Header -Method Put -InFile $Path -ContentType 'multipart/form-data' -Verbose
    #endregion 

    Once executed, you’ll get back following response:

    VERBOSE: HTTP/1.1 PUT with 232877-byte payload
    VERBOSE: received -byte response of content type application/json
    VERBOSE: Content encoding: utf-8
    
    @odata.context               : https://graph.microsoft.com/v1.0/$metadata#drives('b%21kJV0CniHeUeAiju7m8Gl4ZmfCOoRAXJNrYB9wjbkfZ-Vmuw3EELGQ7bZlNIfSaf4')/items/$entity
    @microsoft.graph.downloadUrl : https://m365x04995906.sharepoint.com/sites/Remoteliving/_layouts/15/download.aspx?UniqueId=2c3c2e98-5be4-4ce2-8a81-2c0d4bab00b4&Translate=false&tempauth=eyJ0eXAiOiJKV1QiLCJhbGciOiJIUzI1NiJ9.eyJhdWQiOiIwMDAwMDAwMy0wMDAwLTBmZjEtY2UwMC0wMDAwMDAwMDAwMDAvbTM2NXgwNDk5NTkwNi5zaGFyZXBvaW50LmNv 
                                   bUAxZjc5NWU5NS1jMDZiLTQxMDktOTI0ZS0zNTY5ZmRkZjQ5OWYiLCJpc3MiOiIwMDAwMDAwMy0wMDAwLTBmZjEtY2UwMC0wMDAwMDAwMDAwMDAiLCJuYmYiOiIxNjk3NDQ0MDk5IiwiZXhwIjoiMTY5NzQ0NzY5OSIsImVuZHBvaW50dXJsIjoiWjA4ZkI5NTdNQklCckgzRUg4VHp1N0RuT3lTWVhCMHQ4VE5zZTNvNmMvMD0iLCJlbmRwb2ludHVybExlbmd0aCI6IjE0MyIsImlzbG 
                                   9vcGJhY2siOiJUcnVlIiwiY2lkIjoiWktRTFZjNHhUMEt2RlF2YSsxMjZJZz09IiwidmVyIjoiaGFzaGVkcHJvb2Z0b2tlbiIsInNpdGVpZCI6Ik1HRTNORGsxT1RBdE9EYzNPQzAwTnpjNUxUZ3dPR0V0TTJKaVlqbGlZekZoTldVeCIsImFwcF9kaXNwbGF5bmFtZSI6IlNQU2l0ZXNfUmVhZFdyaXRlQWxsIiwibmFtZWlkIjoiMzY2OTU5MmEtOTA4NS00ZjA5LThjMDMtMmIyMjIz 
                                   YWEwMDJjQDFmNzk1ZTk1LWMwNmItNDEwOS05MjRlLTM1NjlmZGRmNDk5ZiIsInJvbGVzIjoiYWxsc2l0ZXMud3JpdGUiLCJ0dCI6IjEiLCJpcGFkZHIiOiIyMC4xOTAuMTkwLjk5In0.2EMXEM184-nAFJnbOJy_PM8q5YKvOK66IoqggTX0g_E&ApiVersion=2.0
    createdDateTime              : 16.10.2023 08:14:59
    eTag                         : "{2C3C2E98-5BE4-4CE2-8A81-2C0D4BAB00B4},1"
    id                           : 01NLC4VWMYFY6CZZC34JGIVAJMBVF2WAFU
    lastModifiedDateTime         : 16.10.2023 08:14:59
    name                         : 00003.jpg
    webUrl                       : https://m365x04995906.sharepoint.com/sites/Remoteliving/Shared%20Documents/General/Subfolder/00003.jpg
    cTag                         : "c:{2C3C2E98-5BE4-4CE2-8A81-2C0D4BAB00B4},2"
    size                         : 232877
    createdBy                    : @{application=; user=}
    lastModifiedBy               : @{application=; user=}
    parentReference              : @{driveType=documentLibrary; driveId=b!kJV0CniHeUeAiju7m8Gl4ZmfCOoRAXJNrYB9wjbkfZ-Vmuw3EELGQ7bZlNIfSaf4; id=01NLC4VWOFX4E7TTHLCNB256DE3BDS7OML; name=Subfolder; path=/drives/b!kJV0CniHeUeAiju7m8Gl4ZmfCOoRAXJNrYB9wjbkfZ-Vmuw3EELGQ7bZlNIfSaf4/root:/General/Subfolder;
                                   siteId=0a749590-8778-4779-808a-3bbb9bc1a5e1}
    file                         : @{mimeType=image/jpeg; hashes=}
    fileSystemInfo               : @{createdDateTime=16.10.2023 08:14:59; lastModifiedDateTime=16.10.2023 08:14:59}
    image                        : 
    shared                       : @{scope=users}

    Further Reference

    You might be also interested in following articles, which are related to MS Graph API:

    Security of app registration in Azure Active Directory | SPO Scripts

    Create SharePoint list items using Graph API (PowerShell) (workplace-automation.com/)

    How to get SharePoint List Items with Graph API (PowerShell) | SPO Scripts

  • Create SharePoint list items using Graph API (PNP.PowerShell)

    Create SharePoint list items using Graph API (PNP.PowerShell)

    In this article, I want to show you how you can create SharePoint list items using Graph API.

    Prerequistes

    Step 1: Configure the Azure Enterprise Application

    I am following the least privilege approach and grant only the necessary permission for the app registration to create SharePoint list items using Graph API.

    Hence, I have created an App registration with following permissions:

    Permission NameType
    Sites.Selected Application
    User.ReadDelegated
    Application Registration in Microsoft Azure for reading SharePoint List Items

    If you don’t know how to create it, follow my next steps, otherwise if you are familiar with it, you can also skip to the Step 2 – Grant the Enterprise Application the Permission.

    1. Browse to Azure Portal and Search for Application Registrations and click on New registration

    Create a new Azure App registration Screenshot

    2. Give the App a meaningful name, which follows your organization standards (Different admins should recognize what the purpose for this app is) and Register it

    Registration of new App registration in Azure Portal

    3. Note down the Application ID and go to Certificates & Secrets

    Display of Application Registration in Azure Portal

    4. Create a new client secret or upload a certificate (I will show the secret approach)

    Creation of new client secret in Azure Portal

    5. Also, here a meaningful name is supportive for other colleagues. For the duration, it makes sense to go with a reasonable duration. I would go with the recommendation of Microsoft as you might have lost this application out of sight in 24 months, which is the maximum duration for a client secret.

    Creation of client secret for an App registration


    6. Now you will have ONE chance to note down the client secret. Treat it like a password. Depending on your App Permission your App might be powerful. Hence you should save for instance in a Password Manager.

    Client Secret Exposure for App registration

    7. Now Click on API permissions on the left navigation pane and add a permission for Microsoft Graph

    Adding Permission for Microsoft Graph

    8. Add the Application Permission Sites.Selected if you want the code run in the background without a signed-in user.

    API Permission for Application Permissions
    Sites.Selected Graph Permissions

    9. Once you added that, you will need to consent the permission from a global administrator.

    Not granted permissions for sites.selected

    Granted permissions look like this:

    Granted app registration permissions

    That’s it. You created an Azure App registration with Sites.Selected permission, where you need now to grant the permissions for the specific site.

    Step 2: Grant Enterprise application write permissions for SharePoint site

    For this step, you need to ensure that PNP Module is installed on your client and that you are allowed to use it.

    If both conditions are applying, you can use this code to grant Enterprise App, created in Step 1 the right permission for the site. In this case, I am granting a write role.

    Import-Module PnP.PowerShell
    
    $AppID = "9ea2120f-288c-47b6-8895-31e0fb4d9211"
    
    $DisplayNameofSitePermission = "Enterprise Application SP_Access_SharePoint_List_SalesAndMarketing_Write"
    $SiteURL = "https://m365x323732.sharepoint.com/sites/SalesAndMarketing"
    
    
    Connect-PnPOnline -Url $SiteURL -Interactive
    Grant-PnPAzureADAppSitePermission -AppId $AppID -DisplayName $DisplayNameofSitePermission -Site $SiteURL -Permissions Write

    You will need to log in with an account, which has access to the site.

    After that you will see, that the Enterprise Application has now write access to the Site.

    Screenshot of write permissions for Enterprise Application to create SharePoint list items using Graph API

    Step 3: Create SharePoint list items using Graph API with PowerShell

    As the enterprise application has now the permission to write contents to the designated SharePoint Site, you are able create SharePoint list items using Graph API.

    For this we need the app credentials and the site id of the site in which you want to create SharePoint list items using Graph API.

    Param (
        $AppID = "9ea2120f-288c-47b6-8895-31e0fb4d9211",
        $Scope = "https://graph.microsoft.com/.default",
        $Tenant = "m365x323732",
        $SiteID = "e35cee33-6d10-4e2c-a83b-496a26062ad3",
        $ListTitle = "Product%20List"
    )
    
    Import-Module PnP.PowerShell
    $AppCredential = Get-Credential($AppID)
    
    
    #region authorize
    $Body = @{
        client_id = $AppCredential.UserName
        client_secret = $AppCredential.GetNetworkCredential().password
        scope = $Scope
        grant_type = 'client_credentials'
    }
    $GraphUrl = "https://login.microsoftonline.com/$($Tenant).onmicrosoft.com/oauth2/v2.0/token"
    $AuthorizationRequest = Invoke-RestMethod -Uri $GraphUrl -Method "Post" -Body $Body
    $Access_token = $AuthorizationRequest.Access_token
    
    $Header = @{
        Authorization = $AuthorizationRequest.access_token
        "Content-Type"= "application/json"
    }
    #endregion
    
    
    #region create items
    
    $Body = @{
    	fields = @{
    		Title = "Test"
    	}
    }
    
    
    $GraphUrl = "https://graph.microsoft.com/v1.0/sites/$SiteID/lists/$ListTitle/items"
    
    
    $BodyJSON = $Body | ConvertTo-Json -Compress
    Invoke-RestMethod -Uri $GraphUrl -Method 'POST' -Body $BodyJSON -Headers $Header -ContentType "application/json" 
    
    
    #endregion 

    As you can see the item with the title Test was created in the SharePoint List Product List.

    Screenshot of the result "create SharePoint list items using Graph API"

    Further Reference

    3 of the most important SharePoint PowerShell Modules and Snappins

    Access SharePoint via Graph API in PowerShell

    Add items to SharePoint Online lists with Powershell

    Microsoft Graph overview – Microsoft Graph | Microsoft Learn

    Working with SharePoint sites in Microsoft Graph – Microsoft Graph v1.0 | Microsoft Learn

  • How to get all lists and libraries in SharePoint Online

    How to get all lists and libraries in SharePoint Online

    Hey folks, at some time we come to a point, where we want to know, what is going on in our intranet. Either if we plan to migrate the content to another tenant or to clean up our intranet. I wrote a step-by-step instruction for you to find get all lists and libraries in your SharePoint environment. At the end of this blog post, you’ll find also the ready-to-use script.

    Since the official module of Microsoft does not include a cmdlet for lists, I will use the PNP.PowerShell module.

    Prerequisites

    Before we start with coding, we should be aware, that there are some prerequisites, we need to fulfil in order to get all lists and libraries in our farm.

    Step-by-Step Instruction to get all lists and libraries

    Add your service account as admin to all sites

    You might ask yourself, why is it necessary to add a service account to all sites. In SharePoint Server it works as soon as you have access to the SharePoint Shell. You need it because the cloud model does not provide access to all sites just by having the SharePoint admin role. You have to enable your service account with the rights to access the sites, prior accessing them.

    Even if you have connected to the admin site, you will notice, that it does not work:

    Error message for not found list

    To add the service account to all sites, you have to make use of the module Microsoft.Online.SharePoint.PowerShell. If you are not familiar with this, check out SharePointOnlinePowerShell: How to connect to SharePoint (workplace-automation.com/).

    Connecting to the environment, can be achieved with this cmdlets:.

    
    $AdminUrl = "https://m365x388358-admin.sharepoint.com/" 
    $Credential = Get-Credential
    
    
    Import-Module -Name Microsoft.Online.SharePoint.PowerShell
    Connect-SPOService -Url $AdminUrl -Credential $Credential

    You’ll get a prompt for credentials. Provide the service account with SharePoint admin role here. We will reuse it later for the PNP module.

    Prompt for credential

    So after connecting, we can add our service user as site collection administrator with this script. Keep in mind to change the user variable to your service account’s user principal name.

    $User = "admin@M365x388358.onmicrosoft.com"
    
    $SPOSites = Get-SPOSite 
    foreach ($SPOSite in $SPOSites)
    {
        Set-SPOUser -Site $SPOSite.Url -LoginName $User -IsSiteCollectionAdmin $true
    }
    
    Disconnect-SPOService

    This is how the output looks for me:

    Output of the cmdlet, after adding site collection administrator permission

    Since our service user has access to all sites, we can now proceed with our analysis.

    Get all lists and libraries with PowerShell

    For the purpose of an interactive analysis of all lists and libraries, it is sufficient to connect interactively to the tenant with this script:

    
    $AdminUrl = "https://m365x388358-admin.sharepoint.com/" 
    $Credential = Get-Credential
    
    Import-Module PNP.PowerShell
    Connect-PnPOnline -Url $AdminUrl -Credentials $Credential
    

    You have to replace the URL with your SharePoint admins URL.

    If you run the cmdlet, credentials will be prompted. Please use a user account, which has the SharePoint administrator role granted. If you don’t know how to grant it, check out the official Microsoft references, they explain it with a video, which will help you.

    Prompt for credential

    After you have provided the credentials, you are connected. You can test it by querying all sites.

    Get-PnPTenantSite

    As you can see, I have a bunch of sites, which we will analyze further on.

    All sites in PowerShell
    $Export = New-Object System.Collections.Generic.List[object]
    $Sites = Get-PnPTenantSite
    
    $SitesCount = $Sites.Count
    $i= 1
    
    
    foreach ($Site in $Sites)
    {
        Write-Host "($i / $SitesCount) Processing site $($Site.Url)"
        Disconnect-PnPOnline
        Connect-PnPOnline -Url $Site.Url -Credentials $Credential
        $Site = Get-PnPSite
        
        #get the information of the list
        Get-PnPList | ForEach-Object { 
    
            $NewExport = New-Object PSObject -Property @{
                Title = $_.Title
                Id = $_.ID
                DefaultViewUrl =   $_.DefaultViewUrl
                ItemCount = $_.ItemCount
                ParentWebUrl = $_.ParentWebUrl
            }
            $Export.Add($NewExport)
        }
        
        $i++
    }

    You can export the information like this:

    $Export | Export-Csv -Path "C:\Users\Serkar\Desktop\lists.csv" -Delimiter ";" -NoTypeInformation

    Based on your location, you have to change your delimiter to comma instead of semicolon.

    The result of our scripting is, that we now have the possiblity to see all lists and libraries and also to identify lists and libraries with huge amount of data in it. Since it is a CSV file, you can open it with Excel to analyze the data:

    get all lists and libraries in Excel

    You can group all data with a pivot table, to see all lists to the corresponding web.

    get all lists and libraries in a pivot table

    Bonus: Ready-to-use Script

    #Provided by workplace-automation.com/
    
    $User = "admin@M365x388358.onmicrosoft.com"
    $AdminUrl = "https://m365x388358-admin.sharepoint.com/"
    $ExportPath = "C:\Users\Serkar\Desktop\lists.csv"
    
    $Credential = Get-Credential
    
    #region Set admin permissions
    
    Import-Module -Name Microsoft.Online.SharePoint.PowerShell
    Connect-SPOService -Url $AdminUrl -Credential $Credential
    
    $SPOSites = Get-SPOSite 
    foreach ($SPOSite in $SPOSites)
    {
        Set-SPOUser -Site $SPOSite.Url -LoginName $User -IsSiteCollectionAdmin $true
    }
    
    Disconnect-SPOService
    
    #endregion
    
    #region get all lists and libraries
    Import-Module PNP.PowerShell
    Connect-PnPOnline -Url $AdminUrl -Credentials $Credential
    
    $Export = New-Object System.Collections.Generic.List[object]
    $Sites = Get-PnPTenantSite
    
    $SitesCount = $Sites.Count
    $i= 1
    
    
    foreach ($Site in $Sites)
    {
        Write-Host "($i / $SitesCount) Processing site $($Site.Url)"
        Disconnect-PnPOnline
        Connect-PnPOnline -Url $Site.Url -Credentials $Credential
        $Site = Get-PnPSite
        
        #get the information of the list
        Get-PnPList | ForEach-Object { 
    
            $NewExport = New-Object PSObject -Property @{
                Title = $_.Title
                Id = $_.ID
                DefaultViewUrl =   $_.DefaultViewUrl
                ItemCount = $_.ItemCount
                ParentWebUrl = $_.ParentWebUrl
            }
            $Export.Add($NewExport)
        }
        
        $i++
    }
    #endregion
    
    $Export | Export-Csv -Path $ExportPath -Delimiter ";" -NoTypeInformation 
  • SharePoint PowerShell add site collection administrator

    SharePoint PowerShell add site collection administrator

    In this article, I am describing how to add site collection administrator to your SharePoint sites. I use this script, when I need to supply an application service for a new customer. I recommend running this script periodically (every day), so it is ensured, that you have access to new sites later also.

    You will learn how to add a user and an AD group to the site collection administrators.

    Prerequisites

    Before you can add a site collection administrator to a site collection, you need to ensure the following:

    Scheduled runs

    When you run the scripts below, it is only for the current existing sites, but since the departments won’t stop create sites, e.g. by creating a new team in Microsoft Teams, it makes sense to schedule the scripts. If you want to schedule the scripts, ensure that the connection to the tenant is not interactive, by exporting the credentials locally with the service user, which you will run to schedule the script and import the credential in your script. Only the user who exported the credentials object, can read the credential object on the same machine.

    Before you schedule the script, export your service user credential with this cmdlets (change the path before running):

    Get-Credential |Export-Clixml "C:\Users\Serkar\Desktop\devmod.key"

    You will be prompted for credentials and after this, a file will be created.

    Use this credential object before you connect to SharePoint like this:

    $Credential = Import-Clixml "C:\Users\Serkar\Desktop\devmod.key"
    

    And connect to SharePoint Online like this:

    Connect-SPOService -Url  $TenantUrl -Credential $Credential

    I wrote a detailed article about this. If you want to deepen your knowledge, check it out: Use credentials in PowerShell | SPO Scripts

    In the end of this article, I have also provided a script, which shows you how the script has to look, if you want to schedule it periodically.

    Add a user as a site colllection adminstrator

    If you want to add a user as a site collection administrator, you can do it like this:

    Please change the values of the variables.

    Connect-SPOService -Url  "https://devmodernworkplace-admin.sharepoint.com/"
    $User = "Serkar@devmodernworkplace.onmicrosoft.com"
    $SiteUrl = "https://devmodernworkplace.sharepoint.com/sites/Sales"
    
    Set-SPOUser -Site $SiteUrl -LoginName $User -IsSiteCollectionAdmin $true

    Add an AD group as a site collection administrators

    If you want to add the AD group to the site collection adminstrators, you need the Object ID of the group. You can look it up like this:

    Visit https://portal.azure.com

    Azure Portal home
    Azure active directory groups

    For this purpose I want to add the IT AD security group to the site collection administrators.

    Screenshot of an ad group, which I want to add as a site collection administrator

    Take a note of the Object Id

    Object ID of the ad group, which will be added as site collection administrator

    With the Object ID, we can add a group as a site collection administrator:

    Connect-SPOService -Url  "https://devmodernworkplace-admin.sharepoint.com/"
    $Group = "C:0t.c|tenant|df8e0958-7882-4835-b6a4-cc877922a1f8"
    $SiteUrl = "https://devmodernworkplace.sharepoint.com/sites/Sales"
    
    Set-SPOUser -Site $SiteUrl -LoginName $Group -IsSiteCollectionAdmin $true

    Add a user as a site collection administrator to all site collections

    If you want to add a single user as a site collection administrator, you can use this script:

    $TenantUrl = "https://devmodernworkplace-admin.sharepoint.com/"
    $User = "Serkar@devmodernworkplace.onmicrosoft.com"
    
    Connect-SPOService -Url  $TenantUrl 
    
    $SPOSites = Get-SPOSite 
    
    foreach ($SPOSite in $SPOSites)
    {
        Set-SPOUser -Site $SPOSite.Url -LoginName $User -IsSiteCollectionAdmin $true
    }

    Add an AD group as a site collection administrator to all site collections

    $TenantUrl = "https://devmodernworkplace-admin.sharepoint.com/"
    $Group = "C:0t.c|tenant|df8e0958-7882-4835-b6a4-cc877922a1f8"
    
    Connect-SPOService -Url  $TenantUrl 
    
    $SPOSites = Get-SPOSite 
    
    foreach ($SPOSite in $SPOSites)
    {
        Set-SPOUser -Site $SPOSite.Url -LoginName $Group -IsSiteCollectionAdmin $true
    }
    

    Scheduled runs: Add an AD group as a site collection administrator to all site collections

    If you run this script, you won’t get any prompt from PowerShell, but you have to ensure, that you have exported the credential object before, otherwise the script will not work.

    $TenantUrl = "https://devmodernworkplace-admin.sharepoint.com/"
    $Group = "C:0t.c|tenant|df8e0958-7882-4835-b6a4-cc877922a1f8"
    
    $Credential = Import-Clixml -Path "C:\Users\Serkar\Desktop\devmod.key"
    
    Connect-SPOService -Url  $TenantUrl -Credential $Credential
    
    $SPOSites = Get-SPOSite 
    
    foreach ($SPOSite in $SPOSites)
    {
        Set-SPOUser -Site $SPOSite.Url -LoginName $Group -IsSiteCollectionAdmin $true
    }

    Website vector created by stories – www.freepik.com

  • Run PowerShell script | a clear tutorial made for beginners

    PowerShell is the language, when it comes to automation of tasks and configuration in the Microsoft cosmos. Meanwhile, you can use it cross-platform, e.g., on Linux systems. This article intends to show you in few steps how to run a PowerShell script.

    There are many possibilities to run a PowerShell script. I want to show you the ways I know. If I forgot something, write me a mail: Serkar@workplace-automation.com.

    Scenario

    In the first step, I want to describe you, which script I run. For this purpose, I am starting the PowerShell ISE by clicking on the start menu button and typing ISE. PowerShell ISE is the preinstalled tool, where you can script your PowerShell scripts.

    Click on windows start button

    After clicking on Windows PowerShell ISE, a window pops up.

    The PowerShell ISE is structured in two panes — the script and command pane. In the script pane you can develop your PowerShell script and if you run this developed script, its output will be displayed in the command pane. You can also use the command pane to run cmdlets interactively.

    PowerShell ISE structure

    For my scenario, I am writing a code, where I prompt the user how the weather is. If you are seeking to learn something, I would recommend you to join me.

    PowerShell ISE with PowerShell Script

    Source code:

    Read-Host "How is the weather?"

    Save this script to your desktop, so you can find it later.

    Save as in PowerShell ISE

    Run PowerShell script from ISE

    When you want to run a PowerShell script directly from ISE, you have two possibilities:

    You can run a PowerShell script by clicking on the F5 button. As you can see, the prompt came up in the command pane.

    Result of the PowerShell script run

    I am stopping the script with the stop button

    Stop the PowerShell script

    You can also run the script, by clicking on the play button.

    Run PowerShell script with play button

    Run PowerShell script from explorer

    If we want to know how to run PowerShell script from explorer, we have to browse to our previously written PowerShell script, right-click the file and click on Run with PowerShell. A PowerShell window will pop up which runs the PowerShell script.

    Screenshot of run with PowerShell

    Output of the PowerShell script in Windows PowerShell

    Run PowerShell Script from PowerShell

    You also have the possibility to run PowerShell scripts directly from PowerShell. To do this, open Windows PowerShell.

    Again, I am clicking on the Windows start button and type in PowerShell. The search result will show me Windows PowerShell, which I want to start.

    Now I am getting the path of my file by using the keyboard combination of shift and mouse right click to copy the path.

    Copy as path option of windows explorer

    I am switching back to Windows PowerShell and press right click of the mouse to paste in my clipboard.

    pasted path of the powershell script

    Run PowerShell script – the standard way

    I am removing the quotes and press enter. As you see, the PowerShell script was started:

    Run PowerShell script – the dot sourcing

    You can also start your PowerShell script by adding a dot before the quoted path. This is called dot sourcing and it runs the contents of the script in your current context.

    Run PowerShell Script from Command Prompt

    You may know Command Prompt — the predecessor of PowerShell. You can also run PowerShell scripts in the Command Prompt. To run PowerShell scripts in Command Prompt, start Command Prompt, by pressing the windows button and typing command prompt. Click on the app and a black box should open.

    Screenshot of Windows Menu with Command Prompt in it

    Now you can start your script like this:

    Start PowerShell.exe “pathtoyourscript”

    You will notice, that PowerShell will open in a separate window and run your specified script:

    Screenshot of PowerShell session started from Command Prompt

    Run PowerShell script from a folder

    Run PowerShell script from a session, opened in script location

    You can also run a PowerShell script if you open a folder in Windows Explorer and start a PowerShell session there:

    So navigate to your folder and click on file

    Windows explorer with a bar towards file

    Now click on Open Windows PowerShell

    Open Windows PowerShell option from the file context menu

    You might notice, that the position is showing now the path, where the session has been started.

    Changed Path in Windows PowerShell

    If you enter a dot now, you can press the tabulator button and tab through each file in your path until you find your PowerShell script. My desktop is a bit messy, but after a while I could find the demo. By pressing on enter, the PowerShell script runs.

    PowerShell script started from localized PowerShell session

    Troubleshooting

    You might experience, that you cannot start a PowerShell script, because PowerShell states, that your script, which you try to run isn’t digitally signed. In this case, the execution policy of PowerShell blocks you from running scripts. Its purpose is to protect your computer from malicious scripts.

    In this case, read the script first and if you can confirm, that it is not harmful, you can unblock the script by following cmdlet:

    Unblock-File -Path "C:\Users\Serkar\Desktop\Demo.ps1"

    For more, please read the documentation of Microsoft:

    Set-ExecutionPolicy (Microsoft.PowerShell.Security) – PowerShell | Microsoft Docs

    Conclusio

    I hope that you have learned how to run a PowerShell script. Give it a try and try to run PowerShell scripts from by using various methods.

    Further Reading

    You may also want to get to know in detail what is PowerShell. I can recommend the docs of Microsoft, which give you a good understanding of PowerShell: What is PowerShell? – PowerShell | Microsoft Docs

  • How to restore SharePoint files with PowerShell

    Shit happens — sometimes we are not that concentrated when we are working. Somebody calls us without an appointment, and we were cleaning up our document libraries and by mistake we delete multiple files from SharePoint libraries. In this article, you will learn, how to restore SharePoint files from the diverse recycle bins in SharePoint. Like every time you will learn it for two ways: manually and automated. These instructions do also work for SharePoint items.

    Restore SharePoint files manually from the first-stage recycle bin

    Let’s assume, that you have a library with two documents in it.

    Screenshot of the document library Opportunitylibrary

    One unfocused moment, and you have deleted the file Opportunity2.docx without intention.

    Screenshot of SharePoint library, where the document have been removed by accident

    As a site member, you have in fact the possibility to check your recycle bin to restore the file. In order to do this, click on the settings gear in the upper right corner and click on site contents.

    SharePoint settings gear
    Settings contents setting

    Now click on Recycle Bin.

    Screenshot of link to the recycle bin

    As you can see, I can see the removed file from John dodo, which is my test user with member access. Now mark the file, you want to restore and click on Restore.

    Screenshot of restoring the file from the SharePoint recycle bin

    Thats it, your file is back at the place, where you have deleted it:

    Screenshot of a SharePoint library, where the opportunity2.docx could be restored succesfully

    If you cannot see the file here, ask your Site collection administrator, to check the second-stage recycle bin (site collection recycle bin), which’s content will be retained for 93 days, unless the limit of the site collection storage is not exceeded or the item have not been removed manually by a site collection administrator. In the following, I will describe how to restore from the second-stage recycle bin.

    Restore SharePoint files manually from the second-stage recycle bin

    Now we assume, that we have removed the file opportunity2.docx accidentially, but we need to restore it. We already have checked the site recycle bin, but we could not find the file in it.

    As you see, there is no opportunity2.docx file:

    Screenshot of a SharePoint site recycle bin, where the file opportunit2.docx could not be found.

    In this case, we need someone, who has the site collection administrator role, because we have to check the site collection settings. In the view as a member, the site collection settings look like this — so there is no option to visit the site collection recycle bin and therefore no option to restore SharePoint files.

    Screenshot of the site settings from a user, which has no site owner permission

    In order to show you the site settings as an owner, I have promoted John Dodo to Site Owner:

    Screenshot of group membership permissions

    As you can see, I cannot see more as a site owner:

    Screenshot of site settings as a site owner

    Therefore, I will switch the user to one with site collection admin rights and we will see way more settings:

    Screenshot of site settings as a site collection admin

    Maybe you have noticed, that you can see Recycle Bin setting below Site collection Administration

    Screenshot of the recycle bin setting in the site settings

    This is the place, where we can see the files, which are removed, but also can be restored from users without the site collection administrator permission. As you can see, there is a hint to the second-stage recycle bin. Click on the hint.

    Screenshot of first stage recycle bin, with the hint to the second stage recycle bin

    This is the place, where we can see the files, which are in the second-stage recycle bin. We should see the opportunity2.docx file here:

    Screenshot of the second stage recycle bin

    Restore SharePoint files automatically from the second-stage recycle bin

    Prerequisites

    The prerequisite is, that you have to use a user, which has site collection administrator permissions.

    Screenshot of site collection administrators

    Description

    Previously we saw, that you can restore files easily by hand, but imagine, that you have removed more than 100 files, this might be a bit clicky time-consuming. So let’s check what we can do with PNP PowerShell.

    I am using John Dodo, who is currently a site collection administrator. John Dodo has removed more than 100 files by accident and I want to restore SharePoint files removed by John Dodo. This is currently not possible in GUI.

    Screenshot of removed items in the recycle bin

    In order to restore SharePoint files, I am using the PowerShell Module PNP.PowerShell.

    I am connecting to the sales site. If you feel unsafe with connecting, check out the post Connect to SharePoint with PowerShell | SharePoint Online (workplace-automation.com/)

    Connect-PnPOnline https://devmodernworkplace.sharepoint.com/sites/Sales/ -Interactive

    After connecting, I can see the items in the recycle bin. I have removed more than 100 files. You can do it with the cmdlet:

    Get-PNPRecycleBinItem
    Screenshot of the removed files in PowerShell

    When you pass the ID, you can also get seperate recycle bin items:

    
    Get-PnPRecycleBinItem -Identity "eaf270e4-08f0-41b3-a424-d804c6f33a16"

    If you pipe the Item, you can directly restore it:

    Get-PnPRecycleBinItem  -Identity "eaf270e4-08f0-41b3-a424-d804c6f33a16" | Restore-PnPRecycleBinItem -Force
    
    Screenshot of a specific item in the recycle bin in PowerShell

    I want to restore only the files, from John Dodo, so I am doing the restore with the out grid view cmdlet:

    Get-PnPRecycleBinItem  |
        Select-Object Title, ID, AuthorEmail, DeletedbyEmail, DeletedDate, DirName | 
            Out-GridView -PassThru |
                ForEach-Object { Restore-PnPRecycleBinItem -Identity $_.Id.Guid -Force}

    Now you can see the grid, where you can choose John Dodo as the deletor:

    Screenshot of the out gridview output, which shows all the items in the recycle bin

    I add a filter criteria:

    Screenshot of the out gridview output, which shows the SharePoint files, with filtering options

    Now I can add John Dodos mailaddress and with CTRL + A you can mark all entries and confirm with ok

    Screenshot of the out gridview output, which shows the SharePoint files, before the restore filtered on John.Dodo

    After doing this, the files, which have been by John Dodo are restored!

    Screenshot of the recycle bin after the restore of SharePoint files

    Troubleshooting

    If you experience this issue, your permission is not sufficient for the site:

    Get-PnPRecycleBinItem : Access is denied. (Exception from HRESULT: 0x80070005 (E_ACCESSDENIED))
    At line:1 char:1
    + Get-PnPRecycleBinItem
    + ~~~~~~~~~~~~~~~~~~~~~
        + CategoryInfo          : WriteError: (:) [Get-PnPRecycleBinItem], ServerUnauthorizedAccessException
        + FullyQualifiedErrorId : EXCEPTION,PnP.PowerShell.Commands.RecycleBin.GetRecycleBinItems

    If you encounter this issue, a file with the name already exists at the location, where it was. Rename the file in the library or remove it, to restore the file.

    Restore-PnPRecycleBinItem : A file with this name "Document.docx" already exists in "sites/Sales/Invoices". To restore the file, rename the existing file and try again.
    At line:17 char:30
    + ... rEach-Object { Restore-PnPRecycleBinItem -Identity $_.Id.Guid -Force}
    +                    ~~~~~~~~~~~~~~~~~~~~~~~~~~~~~~~~~~~~~~~~~~~~~~~~~~~~~
        + CategoryInfo          : WriteError: (:) [Restore-PnPRecycleBinItem], ServerException
        + FullyQualifiedErrorId : EXCEPTION,PnP.PowerShell.Commands.RecycleBin.RestoreRecycleBinItem

    If this error occurs, it is because you have stressed the API.

    Get-PnPRecycleBinItem : The request uses too many resources.
    At line:1 char:1
    + Get-PnPRecycleBinItem | Select-Object Title, ID, AuthorEmail, Deleted ...
    + ~~~~~~~~~~~~~~~~~~~~~
        + CategoryInfo          : WriteError: (:) [Get-PnPRecycleBinItem], ServerException
        + FullyQualifiedErrorId : EXCEPTION,PnP.PowerShell.Commands.RecycleBin.GetRecycleBinItems

    Retry your cmdlet and if it is still problematic, add -rowlimit 5000, so you will see the first 5000 items.

    If you add rowlimit to your code, it will look like this:

    Get-PnPRecycleBinItem -RowLimit 5000 |
        Select-Object Title, ID, AuthorEmail, DeletedbyEmail, DeletedDate, DirName | 
            Out-GridView -PassThru |
                ForEach-Object { Restore-PnPRecycleBinItem -Identity $_.Id.Guid -Force}

    BONUS: Ready-to-run PowerShell script

    param
    (
        [Parameter(Mandatory=$true,
                       ValueFromPipelineByPropertyName=$true,
                       Position=0)]
         $SiteUrl
    )
    
    
    Connect-PnPOnline -Url $SiteUrl -Interactive -ErrorAction Stop
    
    
    Get-PnPRecycleBinItem  |
        Select-Object Title, ID, AuthorEmail, DeletedbyEmail, DeletedDate, DirName | 
            Out-GridView -PassThru |
                ForEach-Object { Restore-PnPRecycleBinItem -Identity $_.Id.Guid -Force}

    Further Reading

    Out-Gridview gives us many possibilities to filter objects interactively, check out the blog post to learn more: How to filter for PowerShell objects easily | SPO Scripts

    Here you can find the official reference of Microsoft regarding the recycle bin: Manage the Recycle bin of a SharePoint site (microsoft.com)

    References

    Cover picture:

    Haus Foto erstellt von kues1 – de.freepik.com
  • 3 of the most important SharePoint PowerShell Modules and Snappins

    In my role as an automation consultant, I encounter several challenges, where you have to think out of the box. Thinking out of the box also means, to reconsider the tools, which you are using. If you start with SharePoint/ M365 automation, you will notice that there are at least three SharePoint PowerShell modules and snappins, with which you can automate your SharePoint environment. All of the SharePoint PowerShell modules/ snappins have indeed a reason for existence. In this article, I will show you where the focus of each module is, so you can get an idea, when to use which module. You will also get a overview, how to use all of them and what pros and cons eacht SharePoint PowerShell module/ snappin has.

    Think out of the box when designing an automation solution

    PNP PowerShell

    The beginning of PNP PowerShell was a community project of several developers, which have developed many client side object model (CSOM) wrappers for SharePoint 2013, 2016 and 2019. In fact PNP stands for Patterns and Practices. The modules are known as SharePointPnPPowerShell20xx or SharePointPnPPowerShellOnline. About the turn of the year all consolidated to PNP.PowerShell. Also the main focus from “catchall” have changed to the cloud version of SharePoint.

    When to use PNP PowerShell

    PNP.PowerShell is developing to one of the overreaching modules in Microsoft 365 cosmos. I would recommend to try everything first with PNP.PowerShell before you try doing it with SharePointOnlinePowerShell, since the development of the module goes on and on and you can do way more things with PNP PowerShell, than with SharePointOnlinePowerShell in terms of business process automation.

    Topics covered by PNP PowerShell

    Currently PNP PowerShell covers following topics and services:

    • SharePoint Online
    • SharePoint Server (on premises)
    • M365 Groups
    • Power Automate
    • Azure AD
    • SharePoint Syntex
    • Microsoft Teams
    • Microsoft Planner

    Pros and Cons of PNP PowerShell

    ProsCons
    ✅ You can use it for on-premises and cloud services❌ Some cmdlets are not working as expected e.g. Set-PNPSite -SitecollectionAdmin
    ✅ You can use it on all servers/ clients, which have access to the tenant/ farm (online or on-premises)❌ With constant development, cmdlets might change, so you have to monitor the changes, when updating the module
    ✅ Constant development of module❌ You have to consent the access with the global admin role
    ✅ Supports many branches of M365 (SharePoint, Teams, Planner etc.)❌ Microsoft Support won’t support if there is a bug in the modules. You have to open a request in github
    ✅ You don’t have to make breaking changes to your scripts if you move from SharePoint Server to SharePoint Online
    ✅ You can change a wide range of content in SharePoint (Sites, Lists, Items)
    ✅ You don’t need SharePoint Admin permission to connect to a site

    How to make use of PNP PowerShell?

    If you want to make use of PNP PowerShell, check out this blog post, which describes every step of it in detail: Connect to SharePoint with PowerShell | SharePoint Online (workplace-automation.com/)

    What can I change with PNP PowerShell?

    In this section, I want to give you an overview of what you can change with PNP Powershell. Indeed there are more objects in SharePoint. I focus in the first place on objects, which I think are mostly changed with PowerShell for business process automation.

    ObjectChanging
    possible
    with
    PNP PowerShell?
    CmdletPrequisitesReference
    TenantSet-PNPTenantSharePoint Admin RoleSet-PnPTenant (PnP.Powershell) | Microsoft Docs
    Hub SiteSet-PNPHubSite Access to SiteSet-PnPHubSite (PnP.Powershell) | Microsoft Docs
    SiteSet-PNPSiteAccess to Site Set-PnPSite (PnP.Powershell) | Microsoft Docs
    Sub SiteSet-PNPWeb Access to Site and SubsiteSet-PnPWeb (PnP.Powershell) | Microsoft Docs
    ListSet-PNPList Access to Site & ListSet-PnPList (PnP.Powershell) | Microsoft Docs
    LibrarySet-PNPSite Access to Site & Library Set-PnPList (PnP.Powershell) | Microsoft Docs
    ItemSet-PNPListItemAccess to Site & List & ItemSet-PnPListItem (PnP.Powershell) | Microsoft Docs
    FileSet-PNPListItem Access to Site & Library & FileSet-PnPListItem (PnP.Powershell) | Microsoft Docs
    PageSet-PNPage Access to Site & Library & Page Set-PnPPage (PnP.Powershell) | Microsoft Docs

    Who is maintaing PNP PowerShell?

    The module is maintained by the PNP Developer Community. At this stage I have to thank you guys for your hard and good work. It was really a game changer, when I didn’t had to use scripts on the SharePoint Server.

    Since it is all open source, you can also check the source code here: Microsoft 365 Community (github.com)

    You can find more about the community here: SharePoint Developer Community (SharePoint PnP) resources | Microsoft Docs

    What if I find a bug in PNP Powershell?

    Be sure to follow their rules, when you open an issue, so they can help you faster. In the first step check the discussions. You have to be patient, since it is a community developed module.

    If you find a bug, you have to open a github issue here: pnp/powershell: PnP PowerShell (github.com)

    SharePointOnlinePowerShell

    SharePointOnlinePowerShell is the official Module, which is published by Microsoft. In comparison to PNP Powershell, SharePointOnlinePowerShell focuses only on the administration of SharePoint Online.

    When to use SharePointOnlinePowerShell

    My strategy is to use SharePointOnlinePowerShell, when I experience a buggy behaviour by PNP.PowerShell. Altough it is the official SharePoint PowerShell module, you cannot change e.g. list items.

    Topics covered by SharePointOnlinePowerShell

    SharePointOnlinePowerShell is only focussing on SharePoint Online. You cannot connect to another service or to SharePoint Server (on premises).

    Pros and Cons of SharePointOnlinePowerShell

    ProsCons
    ✅ I have experienced more stability on this module – It tends to have less bugs❌ You can only administer SharePoint. Business process automation will be hard to cover with this module, because you cannot change webs, lists or items
    ✅ It is supported by Microsoft❌ You can use it only for SharePoint Online
    ✅ Constant development of module – I have not experienced any breaking changes❌ You have to have SharePoint admin role

    How to make use of SharePointOnlinePowerShell?

    I have described how to install and connect with this SharePoint PowerShell Module here: SharePointOnlinePowerShell: How to connect to SharePoint Online (workplace-automation.com/)

    What can I change with SharePointOnlinePowerShell ?

    In this section, I want to give you a overview of what you can change with PNP Powershell.

    ObjectChanging
    possible
    with
    SharePointOnlinePowerShell?
    CmdletPrequisitesReference
    TenantSet-SPOTenantSharePoint Admin RoleSet-SPOTenant (SharePointOnlinePowerShell) | Microsoft Docs
    Hub SiteSet-PNPHubSite SharePoint Admin RoleSet-SPOHubSite (SharePointOnlinePowerShell) | Microsoft Docs
    SiteSet-SPOSiteSharePoint Admin RoleSet-SPOSite (SharePointOnlinePowerShell) | Microsoft Docs
    Sub Site
    List
    Library
    Item
    File
    Page

    Who is maintaing SharePointOnlinePowerShell?

    The module is developed and maintained by Microsoft. You can find the source code is here: Microsoft 365 Community (github.com)

    What if I find a bug in SharePointOnlinePowerShell ?

    You can contact Microsoft Support or try to “Contact Owners” in PowerShellGallery: https://www.powershellgallery.com/packages/Microsoft.Online.SharePoint.PowerShell

    SharePointOnlinePowerShell PowerShell Gallery

    Microsoft.SharePoint.PowerShell

    Microsoft.SharePoint PowerShell is the only type of cmdlets, which is not a SharePoint PowerShell Module, but a PSSnappin. Snapins are considered as the old way to add cmdlets and other resources. It’s focus is SharePoint Server.

    When to use Microsoft.SharePoint.PowerShell

    I recommend to use Microsoft.SharePoint.PowerShell in following situations:

    • You don’t plan to migrate the automation solution to SharePoint Online
    • You have access to the SharePoint Servers
    • You want to administer SharePoint Server

    Topics covered by Microsoft.SharePoint.PowerShell

    With Microsoft.SharePoint.PowerShell you can only connect to SharePoint Server (on premises). You can see all cmdlets here from the Microsoft reference: SharePointServer Module | Microsoft Docs

    Pros and Cons of Microsoft.SharePoint.PowerShell

    ProsCons
    ✅ Microsoft.SharePoint.PowerShell is a established PSSNappin, which tends to have very few bugs❌ You have to readapt the scripts, if you want to migrate to SharePoint Online
    ✅ It is supported by Microsoft❌ You can use it only for SharePoint Server
    ✅ You can change nearly everything with this SharePoint PowerShell Module on your SharePoint Server❌ You need SPShellAdmin rights to access SharePoint Server with this SharePoint PowerShell Module

    How to make use of Microsoft.SharePoint.PowerShell?

    1. Connect to SharePoint Server with a user, which is SPShellAdmin
    2. Start Windows PowerShell
    3. Type Add-PSSnapin Microsoft.SharePoint.Powershell
    4. You are connected!

    What can I change with Microsoft.SharePoint.PowerShell?

    If you work with this SharePoint PowerShell snappin, you will notice, that you have to use mostly the SpWeb classes to change everything below a SpWeb. Check out the Microsoft docs to see, which classes are below SPWeb: SPWeb Class (Microsoft.SharePoint) | Microsoft Docs. If you need help, don’t hesitate to contact me: Serkar@workplace-automation.com

    ObjectChanging
    possible
    with
    PNP PowerShell?
    CmdletPrequisitesReference
    FarmSet-SPFarmConfigSPShellAdminAcessSet-SPFarmConfig (SharePointServer) | Microsoft Docs
    SiteSet-SPSite SPShellAdminAcess Set-SPSite (SharePointServer) | Microsoft Docs
    Sub SiteSet-SPWeb SPShellAdminAcess Set-SPWeb (SharePointServer) | Microsoft Docs
    ListNo dedicated cmdlet. You have to call lists from web object
    (get-spweb "url").lists
    SPShellAdminAcess
    Library No dedicated cmdlet. You have to call libraries from web object

    (get-spweb "url").lists
    SPShellAdminAcess
    ItemNo dedicated cmdlet. You have to call libraries from list object

    (get-spweb "url").lists.items
    SPShellAdminAcess
    FileNo dedicated cmdlet -You have to call the file from the item object

    (get-spweb "url").lists.items[0].file
    SPShellAdminAcess
    PageNo dedicated cmdlet – You have to call it from the sitepages library. SPShellAdminAcess

    Who is maintaing Microsoft.SharePoint.PowerShell?

    The module is maintained by Microsoft.

    What if I find a bug in Microsoft.SharePoint.PowerShell?

    You can contact Microsoft Support and report the bug there.

    Conclusio

    As you saw each of the SharePoint PowerShell module / snappin got its pros and cons. PNP PowerShell is the number one choice, if you want to automate processes in Microsoft Cloud. Beside this SharePointOnlinePowerShell is the second tool recommended, If you only seek to administer SharePoint Online. As a final point Microsoft.SharePoint.PowerShell should be mentioned as a powerful tool if you want to administer SharePoint Server (on-premises). If I missed a point, I would appreciate, if you contact me: serkar@workplace-automation.com.

    Further Documentation

    This is the direct link to PNP documentation: http://aka.ms/m365pnp

    PNP provide code samples, which you can find here: PnP | Microsoft 365

    You can check out the PNP repro on github here. GitHub – pnp/powershell: PnP PowerShell

  • Multi value arrays in PowerShell: How to create them really easy

    Hello together, in my latest activity as an consutlant I encountered following issue: I got a objects with two meta data. In my example it was a milestone with an link to the milestone activity. Since it were more than 30 items, I didn’t want to work with PSObjects. I was searching for a solution to create multi value arrays in PowerShell with little code as possible. If I would work with PSObjects, it would blow up my code. In this article, I will show you how you can create “normal” arrays and also how you can enhance this arrays, to multi value arrays in PowerShell.

    Create Standard PowerShell Arrays in PowerShell

    A standard array is set up like this:

    $array = @("Value1","Value2")

    You can also write it like this:

    $Array = @( 
        "Value1"
        "Value2"
    )

    So you can get the single values, by putting in the index number of it in square brackets – like $Array[0] for the first value and $Array[1] for the second value. With [-1] you can get the last value of the array.

    PowerShell standard arrays

    Add Value to Standard PowerShell Arrays

    You can add new lines in the array like this:

    $Array.Add("Value3")

    Remove Value from Standard PowerShell Arrays

    You can remove the lines of an array like this:

    $Array.Remove("Value2")
    Removed array

    Create multi value arrays in PowerShell

    DisplaynameLink
    Microsofthttps://microsoft.com
    SPOScriptshttps://workplace-automation.com/
    Azure Portalhttps://portal.azure.com
    ZMYLERhttps://zmyler.com

    For creating a multi value arrays in PowerShell, we have to inject a hashtable to each array line.

    A hashtable looks like this:

    @{KEY="VALUE"; KEY2 = "VALUE2"; KEYn = "VALUEn"}

    So your multi value arrays will look like this:

    $Array = @( 
        @{ Key1=("Value1"); Key2=("Value2")}
        @{ Key1=("Value3") ;Key2=("Value4")}
    )

    For my example it looks like this:

    $Array = @( 
        @{ Displayname=("Microsoft"); Link=("https://microsoft.com")}
        @{ Displayname=("Google"); Link=("https://google.com")}
        @{ Displayname=("Azure Portal"); Link=("https://portal.azure.com")}
        @{ Displayname=("ZMYLER"); Link=("https://zmyler.com")}
    )

    As you can see, you can also get the single values of each line in array:

    Single value of array

    Add Value to mutli value Arrays in PowerShell

    You can add a value to a multi value array in PowerShell like this:

    $Array.Add( @{ Displayname=("Ad-equum"); Link=("https://www.ad-equum.de/")} )
    Add value to mutli value arrays in PowerShell

    Remove Value from multi value arrays in PowerShell

    Removing a value from a multi value arrays in PowerShell is more complicated. You have to redefine the array, by filtering out the value, which you don’t want in your array:

    $Array = $Array | Where-Object {$_.displayname -ne "Ad-equum"}

    Conclusio

    If you want to create a multi value arrays in PowerShell, the only thing you have to do is to inject a hashtable to each line. I hope, that I have saved you a ton of work 🙂

    Further Reading

    Here is the official reference of Microsoft to arrays: Everything you wanted to know about arrays – PowerShell | Microsoft Docs

    If you are interested in hasthables, check Microsofts docs: Everything you wanted to know about hashtables – PowerShell | Microsoft Docs