In this article, I want to show you how to get SharePoint List Items with Graph API. Sometimes we are limited to the tools we can use, so we need to think about other approaches, to get our aim delivered. In this article, I want to show you how you can get SharePoint List items with the Microsoft Graph API by using PowerShell.
To get SharePoint List Items with Graph API, you can follow the next three steps:
Configure the Azure Enterprise Application
Grant the Enterprise Application the Permission
Get SharePoint List Items with Graph API in PowerShell
You will need the consent of a global administrator for the enterprise application
Step 1: Configure the Azure Enterprise Application
I am following the least privilege approach and grant only the necessary permission for the app registration.
Hence I have created an App registration with following permissions:
Permission Name
Type
Sites.Selected
Application
User.Read
Delegated
If you don’t know how to create it, follow my next steps, otherwise if you are familiar with it, you can also skip to the Step 2 – Grant the Enterprise Application the Permission.
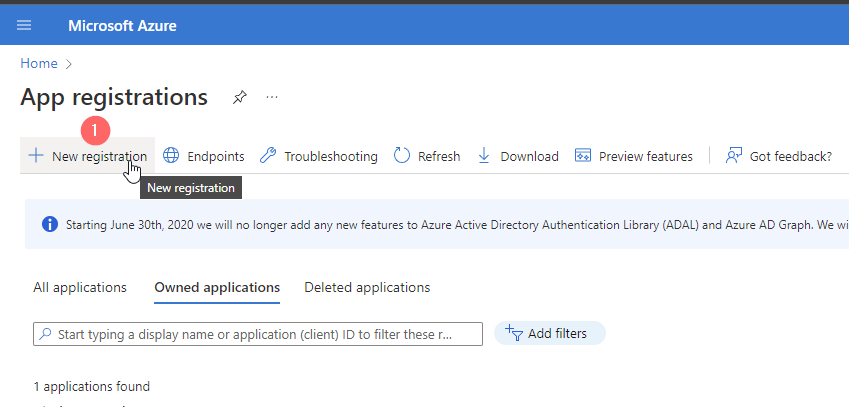
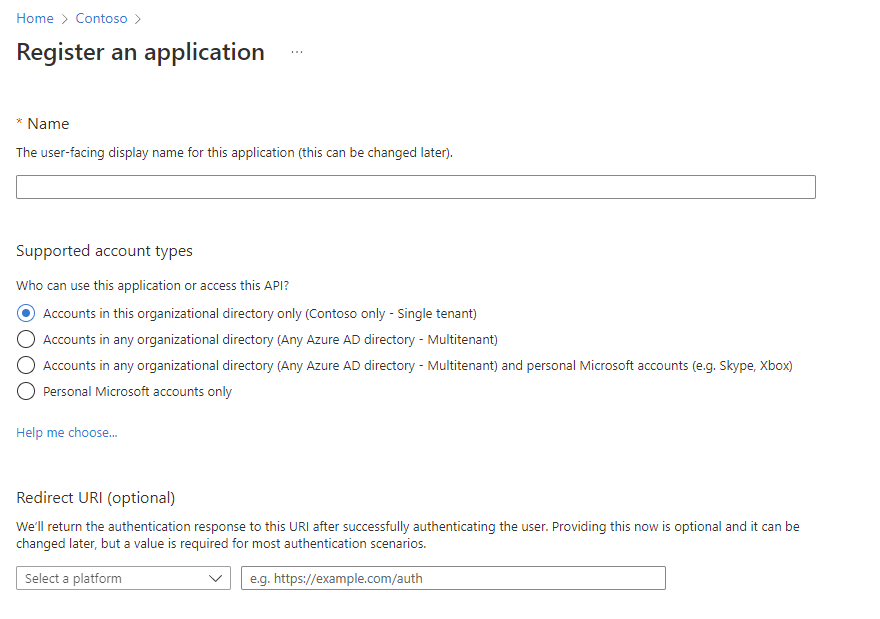
1. Browse to Azure Portal and Search for Application Registrations and click on New registration
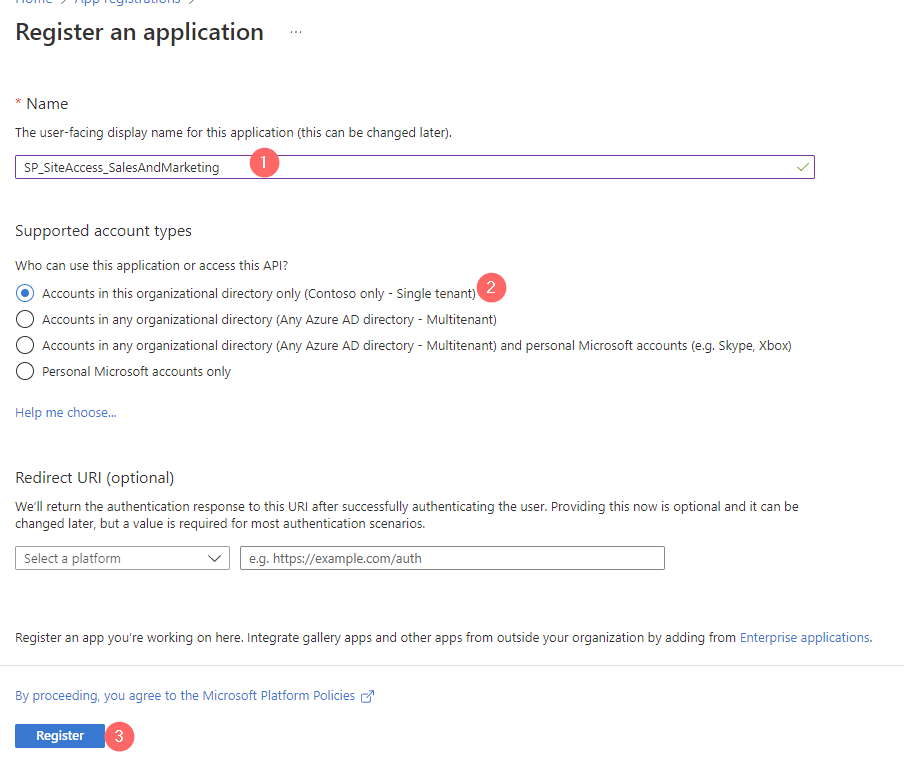
2. Give the App a meaningful name, which follows your organization standards (Differnt admins should recognize what the purpose for this app is) and Register it
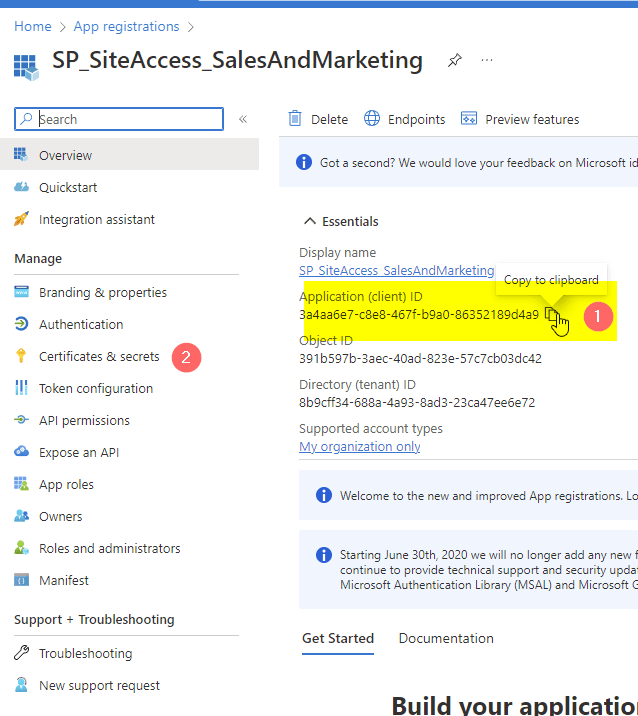
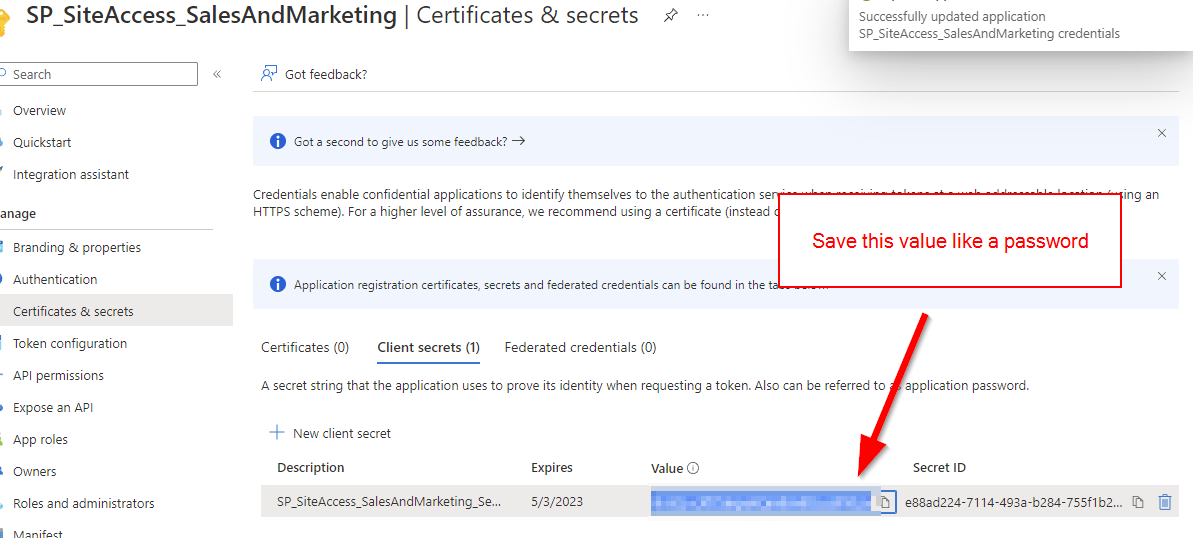
3. Note down the Application ID and go to Certificates & Secrets
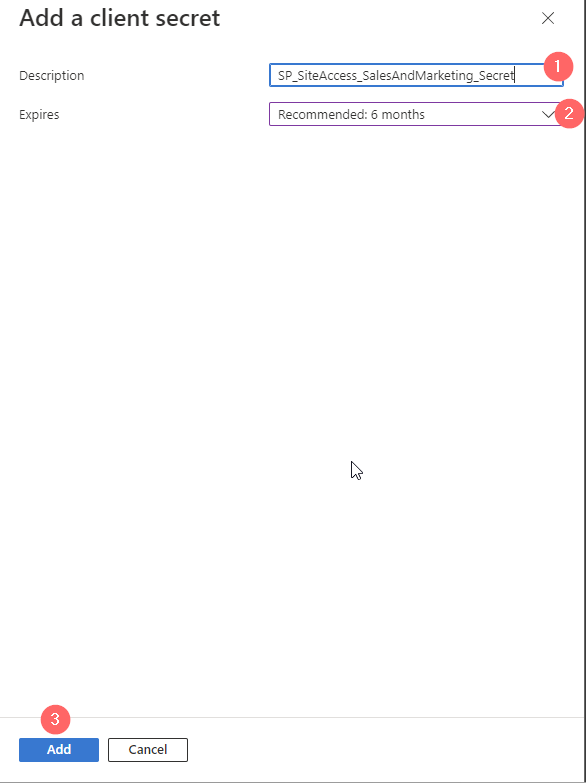
4. Create a new client secret or upload a certificate (I will show the secret approach)
5. Also here a meaningful name is supportive for other colleauges. For the duration it makes sense to go with a reasonable duration. I would go with the recommendation of Microsoft as you might have lost this application out of sight in 24 months, which is the maximum duration for a client secret. 6. Now you will have ONE chance to note down the client secret. Treat it like a password. Depending on your App Permission your App might be powerful. Hence you should save for instance in a Password Manager.
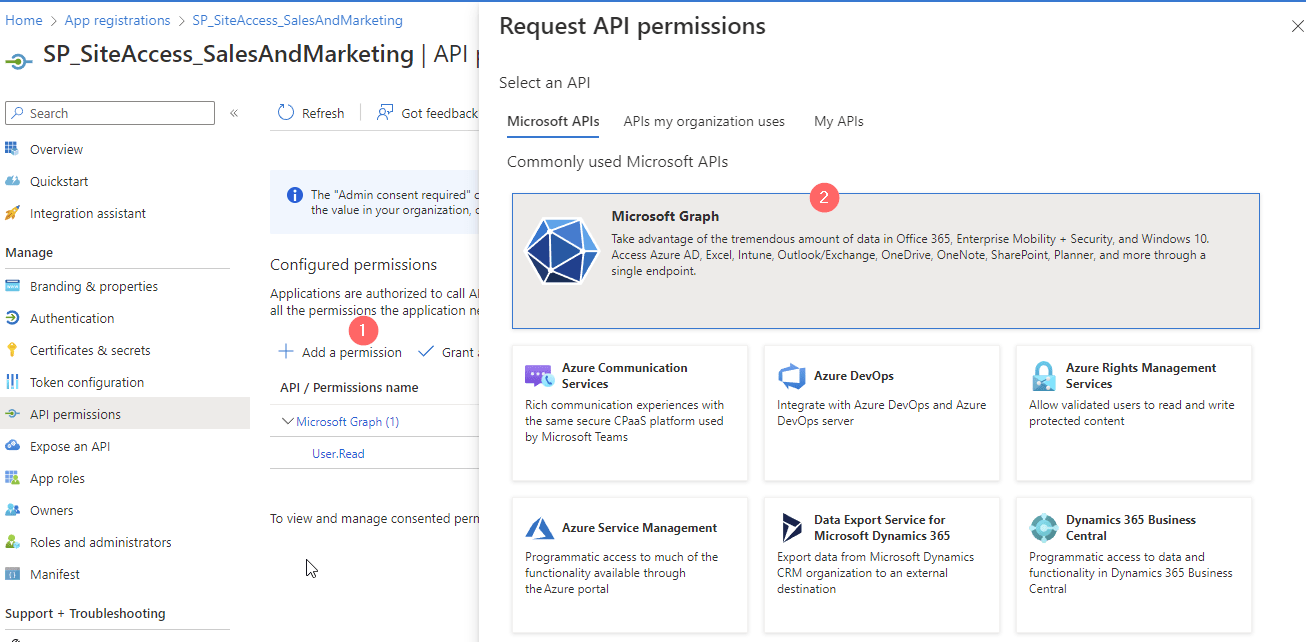
7. Now Click on API permissions on the left navigation pane and add a permission for Microsoft Graph
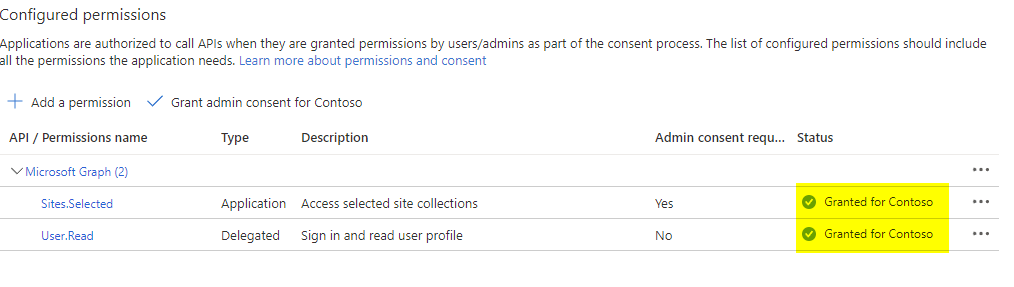
8. Add the Application Permission Sites.Selected if you want the code run in the background without a signed-in user. 9. Once you added that, you will need to consent the permission from a global administrator. Granted permissions look like this:
That’s it. You created an Azure App registration with Sites.Selected permission, where you need now to grant the permissions for the specific site.
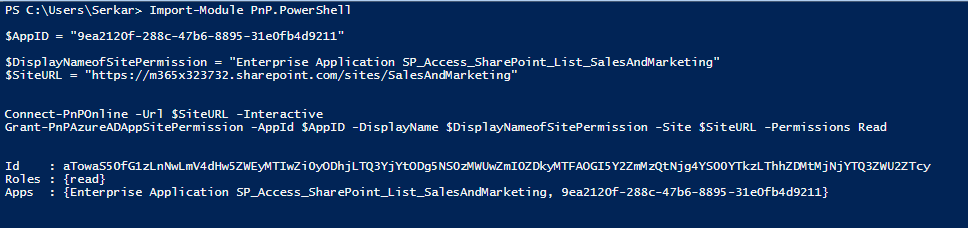
Step 2: Grant the Enterprise Application the Permission
For this step you need to ensure that PNP Module is installed on your client and that you are allowed to use it.
If both conditions are appliying, you can use this code to grant Enterprise App, created in Step 1 the right permission for the site. In this case I am granting a read role.
You will need to log in with an account, which has access to the site.
After that you will see, that the Enterprise Application has now read access to the Site.
Step 3: Get SharePoint List Items with Graph API in PowerShell
As the enterprise application has now the permission to read contents from the designated SharePoint Site, you are able to read the contents of the SharePoint Site.
For this we need the app credentials and the site id of the site for which you want to read out the content.
App registration for MS Graph are really powerful, as you can raise any request if granted. In this article, I want to illuminate, what is an app registration. For what can it be used and what are the boundaries. After setting a common understanding, I want to share you my considerations about the security of app registrations. At the end of the article you’ll also be able to understand how to create an app registration with the right permissions for MS Graph
Before we start highlighting this topic, let’s answer the following question:
What is an app registration in Azure Active Directory?
An app registration in Azure Active Directory is an authentication and authorization layer to access Microsoft cloud services.
If we want to impersonate or use our scripts as a backend automation e.g., to get SharePoint Sites with Microsoft Graph, we need to ensure, that we have set up an app registration in Azure Active Directory. The app registration and the resulting enterprise application provides us the ability to authenticate to Microsoft’s cloud services and also to authorize us for the actions we need to trigger. Means we are not dependent to a functional account like a service user, if we want to run this code as an application, with no human interaction.
You can configure the app to run in the background – This would be considered as an app with “application permission”.
On the other hand you can configure app, which impersonate someone – Here you would take “delegated permission”
Considerations about app registration in Azure Active Directory
In this section I want to give you an overview, what to consider in terms of security of app registration in Azure Active Directory
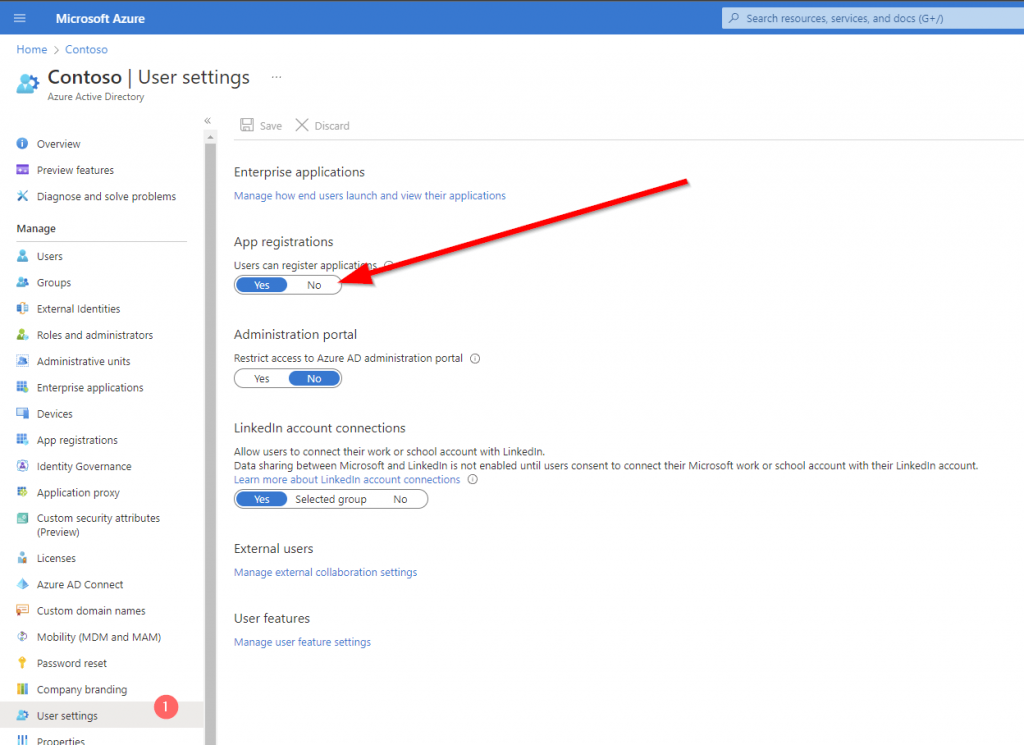
Permissions to create App registration for MS Graph
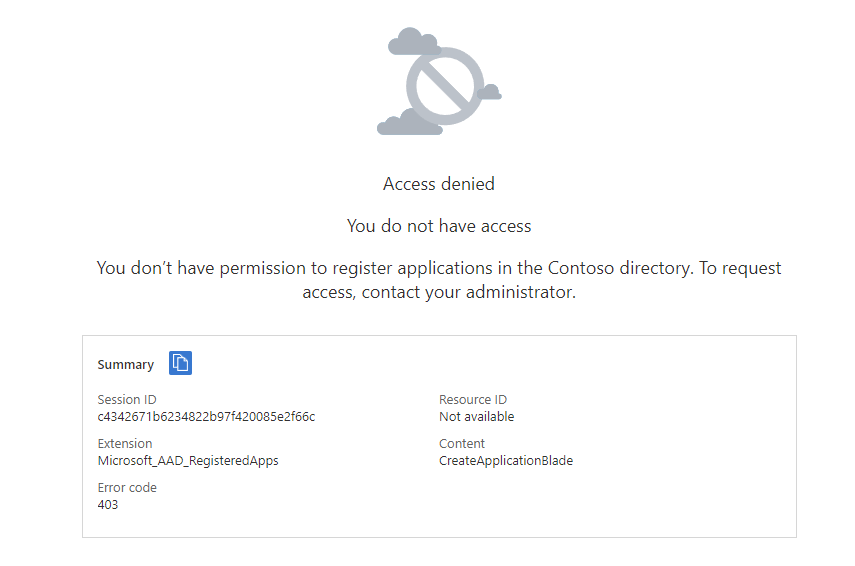
To create an app registration for MS Graph, you need the proper permissions for your user account. By default, every user has the permission to create app registrations in the tenant. If you want to restrict this, you should change this setting below User settings page for your organization (azure.com).
Even if every user is able to create an app registration, they require the requested permission granted by a global administrator for some special permissions. So it is actually not a bad idea to let the users preconfigure their apps.
What permissions can be granted with an app registration in azure active directory?
Before we set up an application registration, we need to think about the security requirements of our organization, and we should answer us the questions accordingly. Since you will be able to have a big impact on the tenant, I suggest you to consult also the security department of your organization to be on the safe side.
Will this script run in the background e.g., as a Scheduled Task / Runbook in an Azure Automation Account or will this script used by personnel, which can interact with the script and which are granted permission to the content.
If human interaction is OK, we should design the register the application as delegated permissioned application
Does any security requirement/ guide/ policy restricts me to use an enterprise application?
If yes, we should think about an application registration with delegated permissions.
In general, I would strongly encourage you to think about your solution, before you start delegating application permission to your application registration. If any malicious user gets access to the application ID and application secret, he will be able to raise any action in your tenant for the defined set of the permission.
If you encounter this, your administrator has restricted the permission to create apps:
Otherwise, you should see this:
Based on your use case you have the ability to create different supported account types
Type
Use case
Accounts in this organizational directory only (Contoso only – Single tenant)
If your app will be used to access resources within your tenant, this is the way to go
Accounts in any organizational directory (Any Azure AD directory – Multitenant)
If your app will be used to access resources across your tenant, this is the way to go. This might make sense if your organization is a software provider and wants to grant access to the customer.
Accounts in any organizational directory (Any Azure AD directory – Multitenant) and personal Microsoft accounts (e.g. Skype, Xbox)
If your app will be used to access resources across your tenant, this is the way to go. This might make sense if your organization is a software provider and wants to grant access to the customer. In addition you enable users to make use of different identity providers.
Personal Microsoft accounts only
If your app is a consumer faced app, this is the way to go. Not suitable for b2b or inter organizational use.
In my example I am looking forward to get all SharePoint Sites in my SharePoint tenant.
How to grant the least privilege Permission to the Azure Application to work with SharePoint Sites?
Allows the app to read documents and list items in all site collections without a signed in user.
Yes
Read content from all Sites
Sites.ReadWrite.All
Read and write items in all site collections
Allows the app to create, read, update, and delete documents and list items in all site collections without a signed in user.
Yes
Write content to all sites (you cannot create Lists/Libraries with this permission)
Sites.Manage.All
Create, edit, and delete items and lists in all site collections
Allows the app to manage and create lists, documents, and list items in all site collections without a signed-in user.
Yes
Write content to all sites including lists and libraries
Sites.FullControl.All
Have full control of all site collections
Allows the app to have full control to SharePoint sites in all site collections without a signed-in user.
Yes
Write content to all sites including lists and libraries + Manage Site permissions
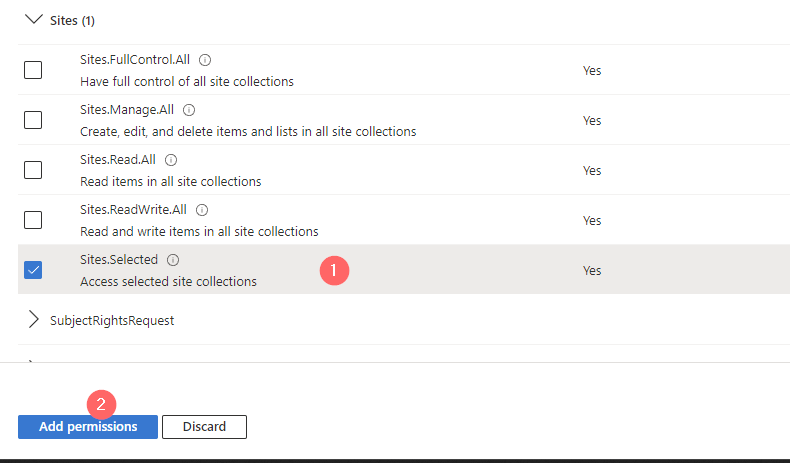
Sites.Selected
Access selected site collections
Allow the application to access a subset of site collections without a signed in user. The specific site collections and the permissions granted will be configured in SharePoint Online.
Yes
Write content for one specific site including lists and libraries + Manage Site permissions
For my current example, I am designing the Azure Application to run in the background, therefore I am choosing the Application Permission type and as I am targeting least privilege, I am using Sites.Read.All. However, you should carefully select the permission level and make sure that you follow the least privilege approach, try to use Sites.Selected if you can.
In order to configure it, switch to the API Permission blade.
To add the permission, click on add permission
As I want to add Graph permissions, I am clicking on Microsoft Graph.
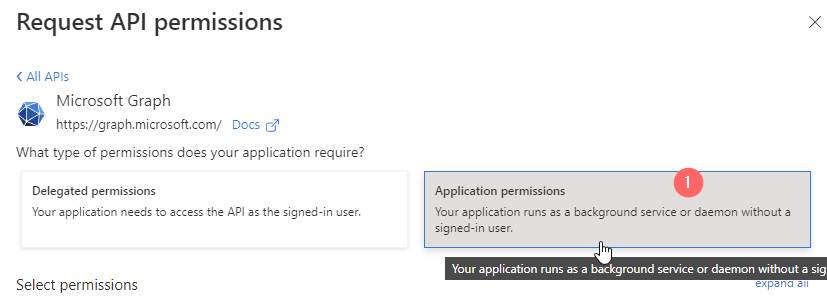
Now you can select between Delegated and Application Permission. In my case I am using Application permissions.
By searching for sites, I am getting to the sites permission section. Follow the enumeration in red circles to add the permission.
Now you need to ensure, that the global administrator in your organization grants the permission for the organization, for which you are requesting the permission. In my example, I am requesting the permission for my organization and as I am the global administrator, I am able to directly grant the permission.
This is how it looks like, once the permissions for the designated organization is granted.
In order to use the app registration, you need to configure the app secret or credential part.
This can be done in the Credential& secrets blade of your azure app registration.
Now you have the option, either to upload a certificate or create a secret.
How to Create and Upload a certificate for an App Registration
I have used following script to create the certificate and export it.
$Certname = "SPSitesReadAll2"    ## Replace {certificateName}
$ExportFilePathPFX = "C:\Users\Serka\OneDrive\Desktop\PS\Keys\SPSitesReadAll2.pfx"   # Path to save the exported certificate with private key
$ExportFilePathCer = "C:\Users\Serka\OneDrive\Desktop\PS\Keys\SPSitesReadAll2.cer"   # Path to save the exported certificate (only public part)

$Cert = New-SelfSignedCertificate -Subject "CN=$certname" -CertStoreLocation "Cert:\CurrentUser\My" -KeyExportPolicy Exportable -KeySpec Signature -KeyLength 2048 -KeyAlgorithm RSA -HashAlgorithm SHA256


# Define parameters

$Password = Read-host -Prompt "Provide a password for the certificate" -AsSecureString | ConvertTo-SecureString  -Force -AsPlainText   # Password to protect the private key (if exporting private key)

# Retrieve the certificate by its subject name
$Certificate = Get-ChildItem -Path Cert:\CurrentUser\My | Where-Object { $_.Subject -like "CN=$Certname" }

# Check if the certificate was found
if ($null -eq $Certificate)
{
    Write-Error "Certificate with the name $Certname not found."
    return
}

# Export the certificate (with private key, as PFX)
Export-PfxCertificate -Cert $Certificate -FilePath $ExportFilePathPFX -Password $Password
Export-Certificate -Cert $Cert -FilePath $ExportFilePathCER

Write-Output "Certificate exported successfully to $ExportFilePathPFX and $ExportFilePathCer"
Now upload the certificate and give it a meaningful name:
This is how it shall look like after the upload:
With the uploaded certificate, I can now make use of the Azure App registration to get all sites.
You can see below, that I was able to authenticate with my application and fetch all sites.
How to create a client secret in an App Registration
Besides the certificate option, you can also create an Client Secret in Azure Portal. Give it a meaningful name.
Upon addition, you’ll see the app secret value once. Make sure to store it at a protected place like Azure Key Vault.
How to use the Site Selected Permission in an App Registration for MS Graph?
In order to use the site selected permission in an app registration, you need to create two apps:
TenantAdminApp with the permissions Sites.FullControl.All
SpSiteAdmin App with the permission Sites.Selected
You need to upload a certificate or a client secret to authenticate with this application. You can do it like this: I gave the app secret a meaningful name: SharePointAdmin_AppOnlySecret_6months. Note the secret down, you’ll need it when you want to grant the SiteAdminApp the permission to alter a specific site.
he TenantAdminApp should look like this:
Your SiteAdminApp registration shall look like this, when it comes to the permissions:
How to Grant the App registration Permissions to use Sites.Selected permissions using MS Graph
Now, that the App has in principle the permission to alter SharePoint Sites, we need to specify for which SharePoint Site the App registration is entitled to conduct the changes. This can be done by running this script after adjusting the parameters:
$Tenant: Specifies the Entra ID tenant ID, which is used for authentication. The tenant ID is the unique identifier for your organization in Azure AD. It helps the script understand which Entra ID to authenticate against (e.g., m365x16735261) in my example.
$TenantAppID: The Application (client) ID of the Entra ID application that will handle permissions related to creating SharePoint sites. This app registration is responsible for granting the necessary permissions to interact with SharePoint resources on behalf of the script. You can obtain the App ID from the overview page of the TenantAdminApp App Registration.
$SiteAdminAppID: The Application (client) ID of another Entra ID application. This app is the one that will be responsible for performing administrative tasks related to SharePoint site creation, such as managing permissions and administering the site. You can obtain the App ID from the overview page of the SiteAdminApp App Registration.
$PermissionDisplayName: The name associated with a specific permission in SharePoint, which you are looking forward to grant to the SiteAdminApp.
$HostName: The domain name for your tenant’s SharePoint environment. This is used to construct the base URL for interacting with SharePoint resources (e.g., m365x16735261.sharepoint.com).
$ServerRelativePath: The relative path to the SharePoint site you wish to access. This is typically used after the hostname to construct the full URL to the site (e.g., /sites/GraphSite1), where the script will perform the necessary actions.
When you run the script, you’ll be prompted for the app secret of the TenantApp.
# Define parameters for the tenant, application ID, site name, and mail nickname
Param (
    # The Entra ID tenant ID for authentication
    $Tenant = "m365x16735261",
    # The Application (client) Id of the registered Entra ID application registration, which is supposed to grant permissions to the App registration, which creates the SharePoint Site (TenantAdminApp)
    $TenantAppID = "39180af4-ad90-442f-a4ca-028b9221b133",
    # The Application (client) ID of the registered Entra ID application registration, which is supposed to create SharePoint Sites (SPSiteAdminApp)
    $SiteAdminAppID = "3342565c-dca1-4b55-b107-7aa0e2f7bfd6",
    # The displayname of the permission as part of the SharePoint Site
    $PermissionDisplayName = "GraphSites_ReadWrite_Permission",
    # hostname of the tenant
    $HostName = "m365x16735261.sharepoint.com",
    # The relative path of the site, beginning with /sites/, /teams/, or another valid site type path.
    $ServerRelativePath = "sites/GraphSite1"
)
# Function to obtain the Microsoft Graph API token
function Get-GraphToken
{
    param (
        [string]$Tenant,
        [PSCredential]$AppCredential
    )

    # Define the required scope for accessing the Microsoft Graph API
    $Scope = "https://graph.microsoft.com/.default"

    # Prepare the body for the token request with client ID, client secret, and scope
    $Body = @{
        client_id     = $AppCredential.UserName                     # Client ID from app registration
        client_secret = $AppCredential.GetNetworkCredential().password   # Securely retrieve the client secret
        scope         = $Scope                                         # API scope required for MS Graph API access
        grant_type    = 'client_credentials'                      # Grant type for app-only authentication
    }

    # Entra ID endpoint to request an OAuth token
    $GraphUrl = "https://login.microsoftonline.com/$($Tenant).onmicrosoft.com/oauth2/v2.0/token"

    try
    {
        # Request the access token from Entra ID
        $AuthorizationRequest = Invoke-RestMethod -Uri $GraphUrl -Method "Post" -Body $Body
        # Retrieve the access token from the response
        return $AuthorizationRequest.Access_token
    }
    catch
    {
        # Handle authentication errors, if any
        Write-Error "Error during token retrieval: $_"
        return $null
    }
}

#region authentication - obtain bearer token
$TenantAdminAppCredential = Get-Credential -UserName $TenantAppID -Message "Enter the client secret for the app TenantAppID $TenantAppID"

# Call the Get-GraphToken function and store the result
$Access_token = Get-GraphToken -Tenant $Tenant -AppCredential $TenantAdminAppCredential

# Check if access token is successfully obtained
if (-not $Access_token)
{
    Write-Error "Failed to retrieve access token. Exiting script."
    return
}

# Set the Authorization header with the bearer token for API requests
$Header = @{
    Authorization  = "Bearer $Access_token"              # Bearer token for API authorization
    "Content-Type" = "application/json"                 # JSON content type for the request body
}

Write-Output "Access token retrieved successfully."
#endregion

#Obtain the SiteID of the Site

$Url = "https://graph.microsoft.com/v1.0/sites/${HostName}:/$ServerRelativePath"
$Site = Invoke-RestMethod -Uri $Url -Headers $Header

#region grant the SiteAdminApp the write permission for the Site

$Url = "https://graph.microsoft.com/v1.0/sites/$($Site.ID)/permissions"
$Body = @{
    roles               = @("write")
    grantedToIdentities = @(
        @{
            application = @{
                id          = $SiteAdminAppID
                displayName = $PermissionDisplayName
            }
        }
    )
}

$BodyJSON = $Body | ConvertTo-Json -Depth 3

try
{
    # Send the HTTP POST request to create the Grant write permission to the specified site
    $response = Invoke-RestMethod -Uri $Url -Headers $Header -Method Post -Body $BodyJSON
    Write-Output "Permission granted successfully:"
    Write-Output $response
}
catch
{
    # Handle errors that may occur during the permission granting process
    Write-Error "The permission could not be granted successfully."
    Write-Error $Error[0]
}
#endregion
Hey folks, at some time we come to a point, where we want to know, what is going on in our intranet. Either if we plan to migrate the content to another tenant or to clean up our intranet. I wrote a step-by-step instruction for you to find get all lists and libraries in your SharePoint environment. At the end of this blog post, you’ll find also the ready-to-use script.
Since the official module of Microsoft does not include a cmdlet for lists, I will use the PNP.PowerShell module.
Prerequisites
Before we start with coding, we should be aware, that there are some prerequisites, we need to fulfil in order to get all lists and libraries in our farm.
Service user with the role SharePoint administrator
Step-by-Step Instruction to get all lists and libraries
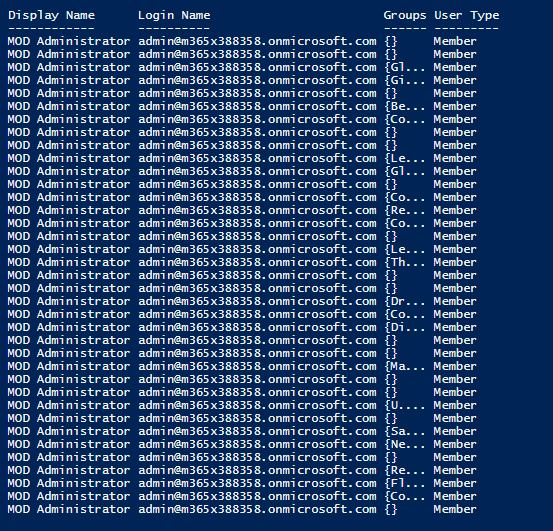
Add your service account as admin to all sites
You might ask yourself, why is it necessary to add a service account to all sites. In SharePoint Server it works as soon as you have access to the SharePoint Shell. You need it because the cloud model does not provide access to all sites just by having the SharePoint admin role. You have to enable your service account with the rights to access the sites, prior accessing them.
Even if you have connected to the admin site, you will notice, that it does not work:
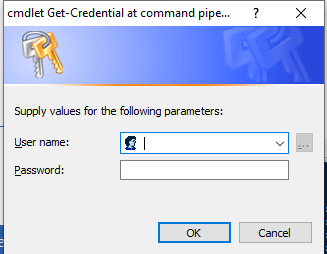
You’ll get a prompt for credentials. Provide the service account with SharePoint admin role here. We will reuse it later for the PNP module.
So after connecting, we can add our service user as site collection administrator with this script. Keep in mind to change the user variable to your service account’s user principal name.
You have to replace the URL with your SharePoint admins URL.
If you run the cmdlet, credentials will be prompted. Please use a user account, which has the SharePoint administrator role granted. If you don’t know how to grant it, check out the official Microsoft references, they explain it with a video, which will help you.
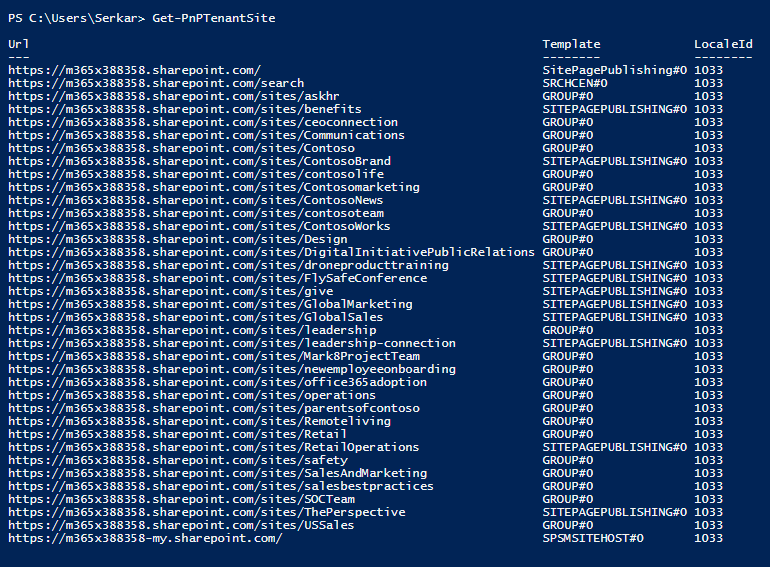
After you have provided the credentials, you are connected. You can test it by querying all sites.
Get-PnPTenantSite
As you can see, I have a bunch of sites, which we will analyze further on.
$Export = New-Object System.Collections.Generic.List[object]
$Sites = Get-PnPTenantSite

$SitesCount = $Sites.Count
$i= 1


foreach ($Site in $Sites)
{
    Write-Host "($i / $SitesCount) Processing site $($Site.Url)"
    Disconnect-PnPOnline
    Connect-PnPOnline -Url $Site.Url -Credentials $Credential
    $Site = Get-PnPSite

    #get the information of the list
    Get-PnPList | ForEach-Object {

        $NewExport = New-Object PSObject -Property @{
            Title = $_.Title
            Id = $_.ID
            DefaultViewUrl =   $_.DefaultViewUrl
            ItemCount = $_.ItemCount
            ParentWebUrl = $_.ParentWebUrl
        }
        $Export.Add($NewExport)
    }

    $i++
}
Based on your location, you have to change your delimiter to comma instead of semicolon.
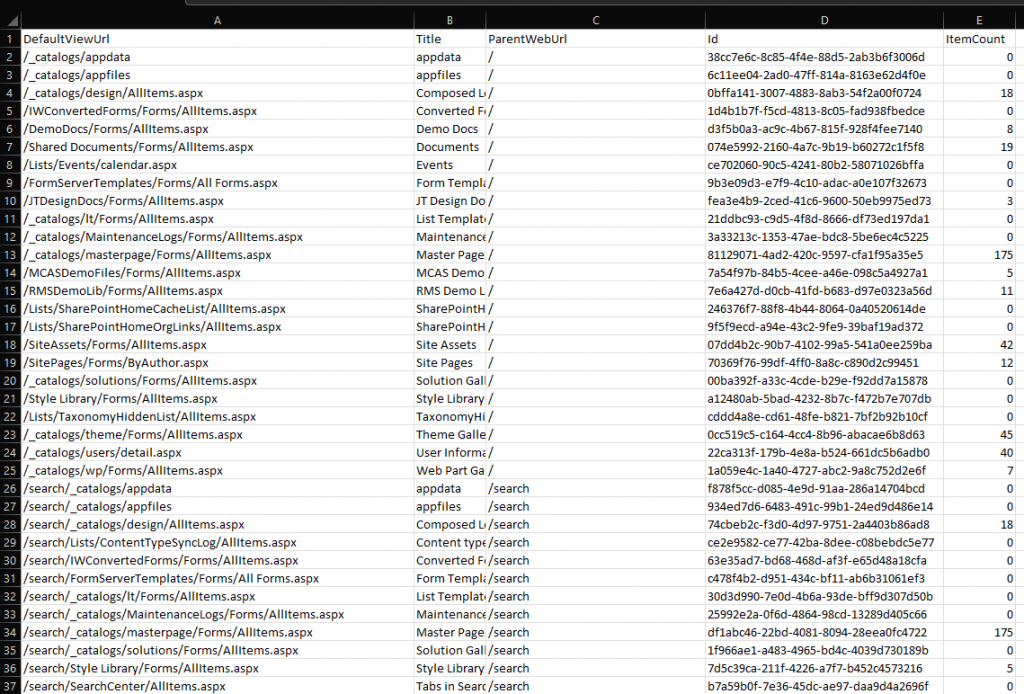
The result of our scripting is, that we now have the possiblity to see all lists and libraries and also to identify lists and libraries with huge amount of data in it. Since it is a CSV file, you can open it with Excel to analyze the data:
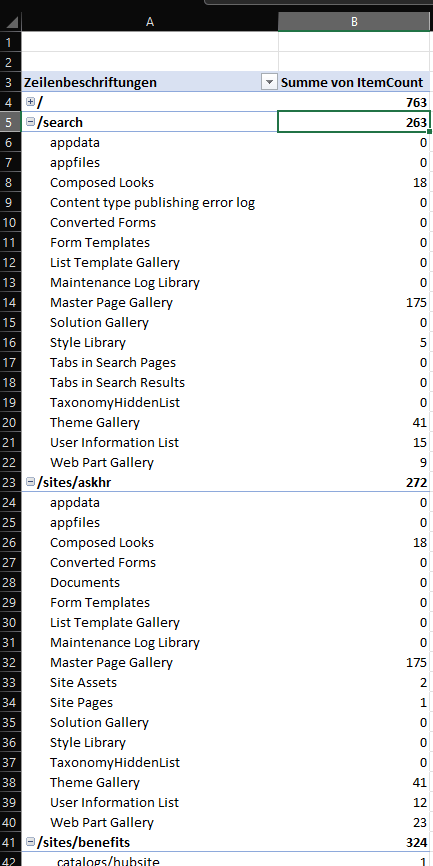
You can group all data with a pivot table, to see all lists to the corresponding web.
Bonus: Ready-to-use Script
#Provided by workplace-automation.com/

$User = "admin@M365x388358.onmicrosoft.com"
$AdminUrl = "https://m365x388358-admin.sharepoint.com/"
$ExportPath = "C:\Users\Serkar\Desktop\lists.csv"

$Credential = Get-Credential

#region Set admin permissions

Import-Module -Name Microsoft.Online.SharePoint.PowerShell
Connect-SPOService -Url $AdminUrl -Credential $Credential

$SPOSites = Get-SPOSite
foreach ($SPOSite in $SPOSites)
{
    Set-SPOUser -Site $SPOSite.Url -LoginName $User -IsSiteCollectionAdmin $true
}

Disconnect-SPOService

#endregion

#region get all lists and libraries
Import-Module PNP.PowerShell
Connect-PnPOnline -Url $AdminUrl -Credentials $Credential

$Export = New-Object System.Collections.Generic.List[object]
$Sites = Get-PnPTenantSite

$SitesCount = $Sites.Count
$i= 1


foreach ($Site in $Sites)
{
    Write-Host "($i / $SitesCount) Processing site $($Site.Url)"
    Disconnect-PnPOnline
    Connect-PnPOnline -Url $Site.Url -Credentials $Credential
    $Site = Get-PnPSite

    #get the information of the list
    Get-PnPList | ForEach-Object {

        $NewExport = New-Object PSObject -Property @{
            Title = $_.Title
            Id = $_.ID
            DefaultViewUrl =   $_.DefaultViewUrl
            ItemCount = $_.ItemCount
            ParentWebUrl = $_.ParentWebUrl
        }
        $Export.Add($NewExport)
    }

    $i++
}
#endregion

$Export | Export-Csv -Path $ExportPath -Delimiter ";" -NoTypeInformation
Since SharePoint is not the only system you are using in your company, it might help to know how to upload documents to SharePoint from different systems programmatically. In this article, I want to show you what you can upload all types of files to SharePoint and what to consider, when you want to upload documents to SharePoint with PowerShell.
Prerequisites
In order to upload documents to SharePoint programmatically, you have to ensure, that these prerequisites are met.
You need to allow custom site scripts for the site
Before you run the scripts
In the following script, I have used a credential file, which you also should generate. Why? Because the purpose of this script, is to run in the background, without a credential prompt, so you can use it in a scheduled task. Don’t forget to change the parameters to your corresponding scenario.
PowerShell Scripts
I have provided a script to upload a single file and one to upload multiple files to the library.
Upload single document to SharePoint with PowerShell
With this script you can upload a single document to SharePoint with a PowerShell script. The script is ready to be used for a scheduled task, but before you plan it, run it with your service account.
Before:
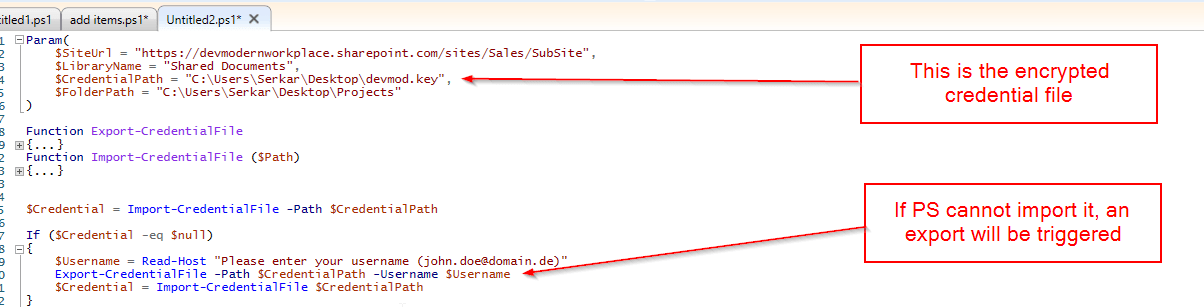
Param(
$SiteUrl = "https://devmodernworkplace.sharepoint.com/sites/Sales/SubSite",
$LibraryName = "Documents",
$CredentialPath = "C:\Users\Serkar\Desktop\devmod.key",
$FilePath = "C:\Users\Serkar\Desktop\Projectscope.xlsx"
)
Function Export-CredentialFile
{
param(
$Username,
$Path
)
While ($Username -eq "" -or $null -eq $Username)
{
$Username = Read-Host "Please enter your username (john.doe@domain.de)"
}
While ($Path -eq ""-or $null -eq $Path)
{
$Path = Read-Host "Where should the credentials be exported to?"
}
$ParentPath = Split-Path $Path
If ((Test-Path $ParentPath) -eq $false)
{
New-Item -ItemType Directory -Path $ParentPath
}
$Credential = Get-Credential($Username)
$Credential | Export-Clixml -Path $Path
Return $Credential
}
Function Import-CredentialFile ($Path)
{
if (! (Test-Path $Path))
{
Write-Host "Could not find the credential object at $Path. Please export your credentials first"
}
else
{
Import-Clixml -Path $Path
}
}
$Credential = Import-CredentialFile -Path $CredentialPath
If ($Credential -eq $null)
{
$Username = Read-Host "Please enter your username (john.doe@domain.de)"
Export-CredentialFile -Path $CredentialPath -Username $Username
$Credential = Import-CredentialFile $CredentialPath
}
#Connect to site
Connect-PnPOnline -Url $SiteUrl -Credentials $Credential
#upload documents to SharePoint
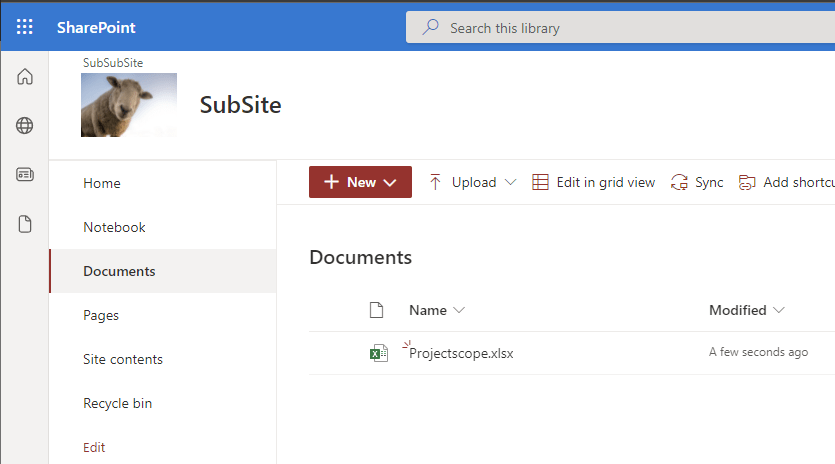
Add-PnPFile -Path $FilePath -Folder $LibraryName
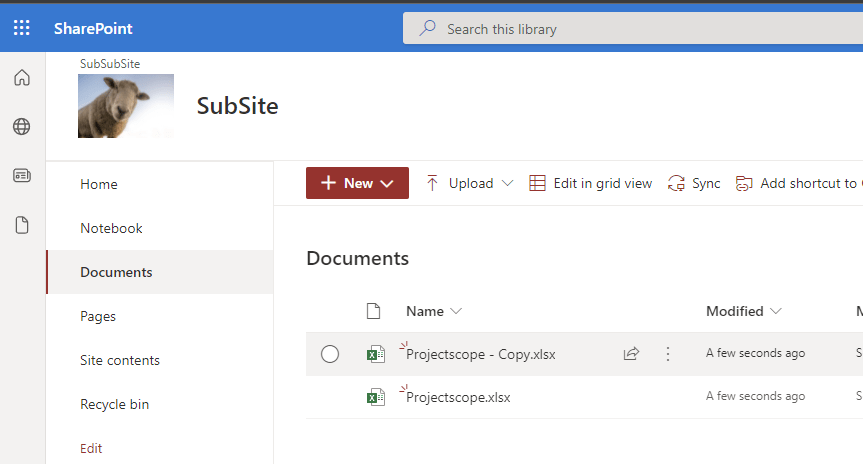
After:
Upload multiple documents to SharePoint with PowerShell
In order to upload multiple documents to SharePoint, I recommend putting the files in a dedicated folder, so the script can iterate through all documents in the folder.
Before:
Param(
$SiteUrl = "https://devmodernworkplace.sharepoint.com/sites/Sales/SubSite",
$LibraryName = "Shared Documents",
$CredentialPath = "C:\Users\Serkar\Desktop\devmod.key",
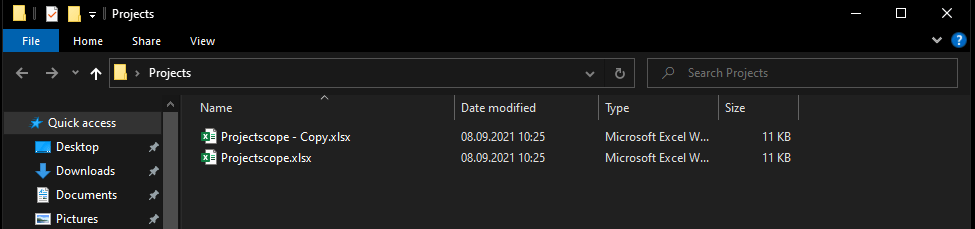
$FolderPath = "C:\Users\Serkar\Desktop\Projects"
)
Function Export-CredentialFile
{
param(
$Username,
$Path
)
While ($Username -eq "" -or $null -eq $Username)
{
$Username = Read-Host "Please enter your username (john.doe@domain.de)"
}
While ($Path -eq ""-or $null -eq $Path)
{
$Path = Read-Host "Where should the credentials be exported to?"
}
$ParentPath = Split-Path $Path
If ((Test-Path $ParentPath) -eq $false)
{
New-Item -ItemType Directory -Path $ParentPath
}
$Credential = Get-Credential($Username)
$Credential | Export-Clixml -Path $Path
Return $Credential
}
Function Import-CredentialFile ($Path)
{
if (! (Test-Path $Path))
{
Write-Host "Could not find the credential object at $Path. Please export your credentials first"
}
else
{
Import-Clixml -Path $Path
}
}
$Credential = Import-CredentialFile -Path $CredentialPath
If ($Credential -eq $null)
{
$Username = Read-Host "Please enter your username (john.doe@domain.de)"
Export-CredentialFile -Path $CredentialPath -Username $Username
$Credential = Import-CredentialFile $CredentialPath
}
#Connect to site
Connect-PnPOnline -Url $SiteUrl -Credentials $Credential
#upload documents to SharePoint
Get-ChildItem -Path $FolderPath |ForEach-Object {
Add-PnPFile -Path $_.FullName -Folder $LibraryName
}
If you experience this issue, custom scripts are not allowed on this site. You have to enable it by connecting to the tenant with a SharePoint Administrator and enabling custom scripts:
Hi folks, when migrating our SharePoint to SharePoint Online, it can be really hard to separate the wheat from the chaff. SharePoint Site usage helps you find, what is actually used in your current farm. SharePoint farms grow by new projects and with the change of structures. If you want to have an overview, it is every time a good idea, to get rid of old stuff.
In a previous article, I showed you how to get all sites and subsites in SharePoint Online. This is a good basis, but if you need more, you should definitely continue reading. In this article, I want to show you one of my tools, which shows you the SharePoint site usage for previous months, so you understand what is needed in your new environment and what’s not. I am getting the data by using the interface IAnalyticsItemData of the search analytics component.
Prerequisites
SharePoint Search is up and running
You have access to SharePoint Server with a highly privileged account (SP_Admin or SP_Farm)
Description of the PowerShell script
This script iterates through all sites and asks the Search service application for the roll-up analytics data for the month specific month. The offset is the integer, which states a gap between the current month and the offset month.
Example:
If the variable PrevMonthOffset is 3, it is 3 months ago from the current month.
After you run the script and export will be created at your user’s desktop with all the site usage for the previous months. The current configuration in the script shows the SharePoint Site usage for the previous six months ($PrevMonthOffset = 6). You can change it for more months, if you need to.
SharePoint Site Usage PowerShell script
If you run the script like this, you do get the SharePoint site usage statistics for the last six months.
SharePoint sites are created very fast. With a few clicks, admins and users can create dozens of sites and subsites. Since it is so easy to create sites, we as admins should have an overview, what is going on at our SharePoint environment. You need also an overview of your environment, If you are looking forward to migrate your environment to a different environment. For this purpose I wrote scripts to get all sites and subsites of your SharePoint, so you can trim your SharePoint to your business needs. You will find a script for SharePoint Online and SharePoint Server.
If you run the script, an export will be created at the path, which you have specified. If you want to change the separation of columns to comma separated, change the following export line:
If you don’t have access to all SharePoint sites, you will only get the SharePoint sites (not the subsites).
PowerShell Script to get all sites and subsites for SharePoint Online
In this script I used an exported credential to authenticate with the PNP module. As always, please change the values in the parameter block.
$CredentialPath is the path to an exported credential file of the user with the SharePoint administrator role. If you leave the variable empty, the script will notice, that the credential is empty (line 47). Thus, it will ask you for the username and password for the user, and also the path, where the script can locate the credential file (line 17, 29 and 22). After the export, it will import the credential file to connect to SharePoint Online.
Depending on your locality, you have to change the delimiter in the last line:
Param(
    $TenantUrl = "https://devmodernworkplace-admin.sharepoint.com/",
    $CredentialPath = "C:\Users\Serkar\Desktop\devmod.key",
    $DesktopPath = [System.Environment]::GetFolderPath([System.Environment+SpecialFolder]::Desktop),
    $ExportPath = $DesktopPath + "\SitesExport.csv"
)

Function Export-CredentialFile
{
    param(
    $Username,
    $Path
    )

    While ($Username -eq "" -or $null -eq $Username)
    {
        $Username = Read-Host "Please enter your username (john.doe@domain.de)"
    }

    While ($Path -eq ""-or $null -eq $Path)
    {
        $Path = Read-Host "Where should the credentials be exported to?"
    }
    $ParentPath = Split-Path $Path
    If ((Test-Path $ParentPath) -eq $false)
    {
        New-Item -ItemType Directory -Path $ParentPath
    }
    $Credential = Get-Credential($Username)
    $Credential | Export-Clixml -Path $Path
    Return $Credential
}
Function Import-CredentialFile ($Path)
{
    if (! (Test-Path $Path))
    {
        Write-Host "Could not find the credential object at $Path. Please export your credentials first"
    }
    else
    {
        Import-Clixml -Path $Path
    }
}

$Credential = Import-CredentialFile -Path $CredentialPath

If ($Credential -eq $null)
{
    $Username = Read-Host "Please enter your username (john.doe@domain.de)"
    Export-CredentialFile -Path $CredentialPath -Username $Username
    $Credential = Import-CredentialFile $CredentialPath
}

#Connect to tenant
Connect-PnPOnline -Url $TenantUrl -Credentials $Credential

$Export = New-Object System.Collections.Generic.List[object]

$Sites = Get-PnPTenantSite
$SitesCount = $Sites.Count
$i= 1

foreach ($Site in $Sites)
{
    Write-Host "($i / $SitesCount) Processing site $($Site.Url)"
    Disconnect-PnPOnline
    Connect-PnPOnline -Url $Site.Url -Credentials $Credential
    $Site = Get-PnPSite

    #get the information of the root
    $NewExport = New-Object PsObject -Property @{

            Url = $Site.URl
            SubSitesCount = (Get-PnPSubWebs -Recurse).count
            ParentWeb = $null
    }
    $Export.Add($NewExport)

    #get the information of subwebs
    Get-PnPSubWebs -Recurse  -Includes ParentWeb| ForEach-Object {
        $NewExport = New-Object PsObject -Property @{

            Url = $_.URl
            SubSitesCount = $_.Webs.count
            ParentWeb = $_.ParentWeb.ServerRelativeUrl
        }
        $Export.Add($NewExport)
    }
    $i++
}
$Export | Export-Csv -Path $ExportPath -NoTypeInformation -Delimiter ";" -Force
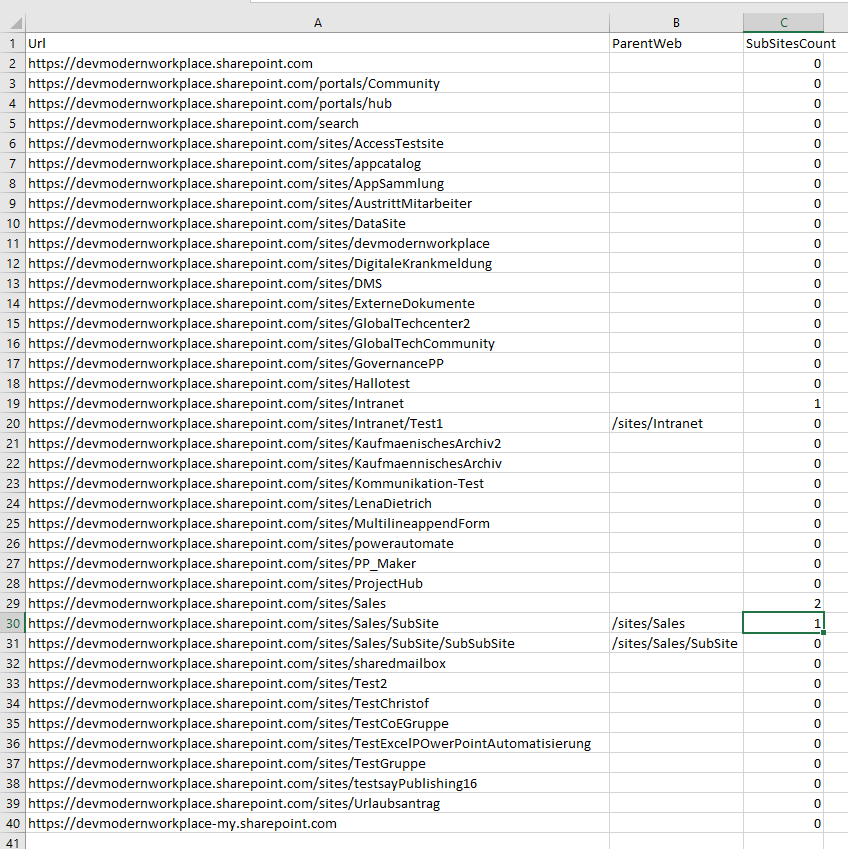
If you run the script, the export will be created on your desktop, which will look like this:
Get all sites and subsites for SharePoint Server
You can use this module for following SharePoint versions:
SharePoint 2013
SharePoint 2016
SharePoint 2019
If you start this script, your user context is used to run the cmdlets. An dedicated authentication is not needed.
Prerequisites
In order to run this script, you need to use a user, with permissions to access each all subsites. For this purpose I am using the SP_Admin account or SP_Farm account.
PowerShell script to get all sites and subsites for SharePoint Server
Since we got no authentication, It is way shorter, than the SharePoint Online script. If your export is not delimited properly, consider to change the delimiter, which I have described in the beginning.
Param(
    $DesktopPath = [System.Environment]::GetFolderPath([System.Environment+SpecialFolder]::Desktop),
    $ExportPath = $DesktopPath + "\SitesExport.csv"
)

Add-PSSnapin Microsoft.SharePoint.PowerShell

$Export = New-Object System.Collections.Generic.List[object]

$Sites = Get-SPSite -Limit all
$SitesCount = $Sites.Count
$i= 1

foreach ($Site in $Sites)
{
    Write-Host "($i / $SitesCount) Processing site $($Site.Url)"

    #get the information of the root
    #removed one site from allwebs, because it contains also the root
    $NewExport = New-Object PsObject -Property @{

            Url = $Site.URl
            SubSitesCount = ($Site.AllWebs.Count - 1)
            ParentWeb = $null
    }
    $Export.Add($NewExport)

    #get the information of subwebs
    #Skip the first web, since it is the rootweb
    Get-SPWeb -Site $Site.Url -Limit all | Select-Object -Skip 1 | ForEach-Object {
        $NewExport = New-Object PsObject -Property @{

            Url = $_.URl
            SubSitesCount = $_.Webs.Count
            ParentWeb = $_.Site.Url

        }
        $Export.Add($NewExport)
    }
    $i++
}
$Export | Export-Csv -Path $ExportPath -NoTypeInformation -Delimiter ";" -Force
Conclusion
Getting an overview for migration/ clean up purposes is key for a clean migration. With the scripts, I have provided, you get a brief overview over your environment. If it does not work for you, please write me a mail: Serkar@workplace-automation.com.
In this article, I am describing how to add site collection administrator to your SharePoint sites. I use this script, when I need to supply an application service for a new customer. I recommend running this script periodically (every day), so it is ensured, that you have access to new sites later also.
You will learn how to add a user and an AD group to the site collection administrators.
Prerequisites
Before you can add a site collection administrator to a site collection, you need to ensure the following:
When you run the scripts below, it is only for the current existing sites, but since the departments won’t stop create sites, e.g. by creating a new team in Microsoft Teams, it makes sense to schedule the scripts. If you want to schedule the scripts, ensure that the connection to the tenant is not interactive, by exporting the credentials locally with the service user, which you will run to schedule the script and import the credential in your script. Only the user who exported the credentials object, can read the credential object on the same machine.
Before you schedule the script, export your service user credential with this cmdlets (change the path before running):
Scheduled runs: Add an AD group as a site collection administrator to all site collections
If you run this script, you won’t get any prompt from PowerShell, but you have to ensure, that you have exported the credential object before, otherwise the script will not work.
Business process automation can help you to design a more efficient organization. With business process automation, you can guide your users through your processes, so your users know what to do and when to do it. In this article, I want to show you my key success factors, to make your customers happy.
I also have talked in the PowerShell DevOps Conference about this topic. Here you can find the video:
Know your customer
Each of these people can be our customer. The chemist on the upper left side might add some results of tests to forms, which you have designed. The engineers on the upper right side might request approval for a new production process, which they request over a PowerApp. The construction worker could give the site manager an update by adding the current state to an app, you have designed. But also office workers, like the lady in the lower right corner, appreciate faster processes through business process automation.
For all of our customers, we should have to try to look through their eyes and consider their working environment, e.g., the construction worker does need a responsive design, since he mostly will work with a tablet. Our aim should be to make their work as easy as possible.
Automation Journey
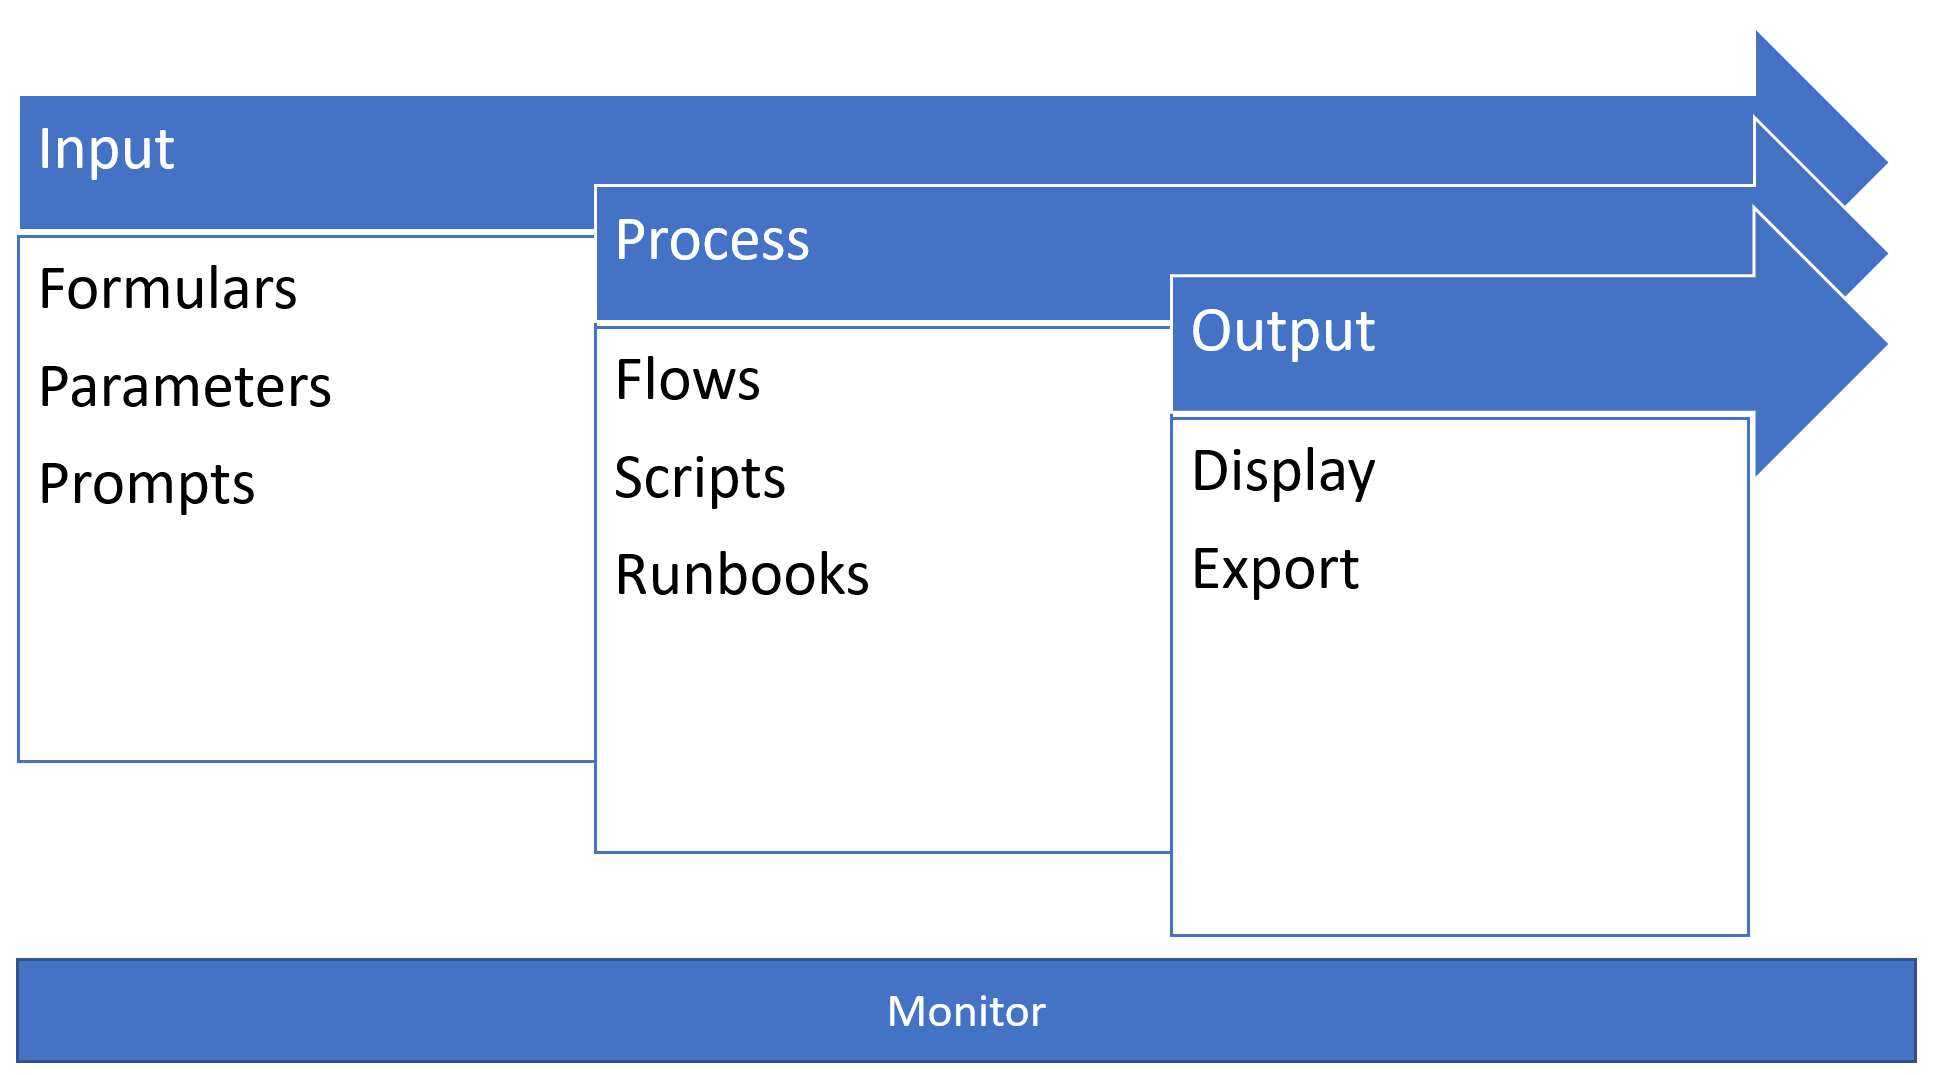
All of our customers are either directly or indirectly involved in our automation journey. Our customers input data by filling formulas, changing parameters in scripts or reacting to prompts in scripts. After entering the data, business process rules will be applied by flows, scripts, or Azure Runbooks. Here is the part, where we relieve our customers. Our processing component should lead to an appropriate output.
Automation Journey
6 Key factors for business process automation
Clear Expectations
Give your customers an idea, what you request from them
Focus on essentials
Focus on essentials, don’t show or request data, which don’t provide any benefit
Consideration of experience
People are influenced by their experience with previous forms.
Request as less manual input as possible
Manual input might lead to bad data quality.
Self-explanatory
Design the form, so nobody got any questions. Provide close and up-to-date help to guide new users.
Guide your users through the process
Give them an overview, where they stand and what will happen to their inputs.
In the following, I will describe my key factors to make our customers happy with business process automation.
Input
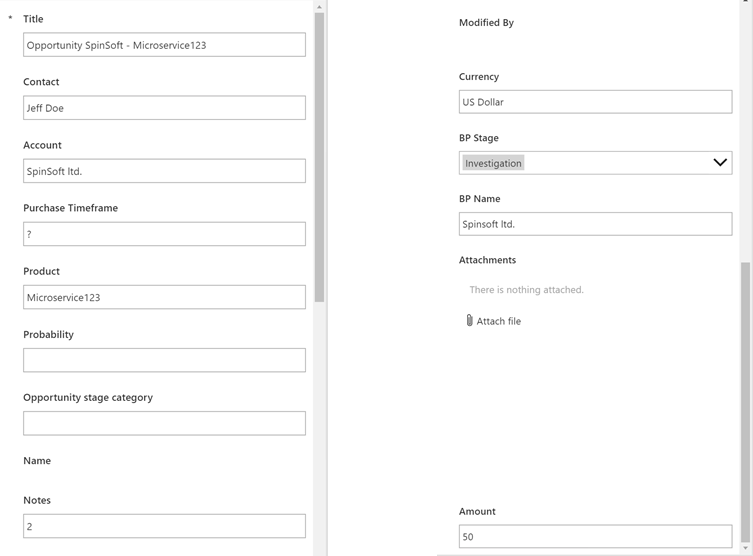
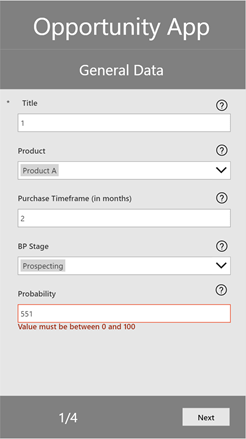
What do you notice, when you see the input form below?
Bad example for input of data
The expectations for the user are not clear
“What is expected from me?”
“How should the data, e.g. for probability, look like?”
This can result in demotivation and additional inquiries.
No focus on essentials
“Why is modified by and attachments in the form, when I cannot change them?”
People will spend time with things, which do not result in benefits.
People are influenced by their experience
“Why does this formula look so ugly and unstructured?”
People will be demotivated by an unstructured form.
Form is not self-explanatory
This will lead to inquiries, and so to more effort
Manual inputs are required
“Why should I type in the product?”
This will lead to mistakes, and it will be hard to analyse the data afterwards.
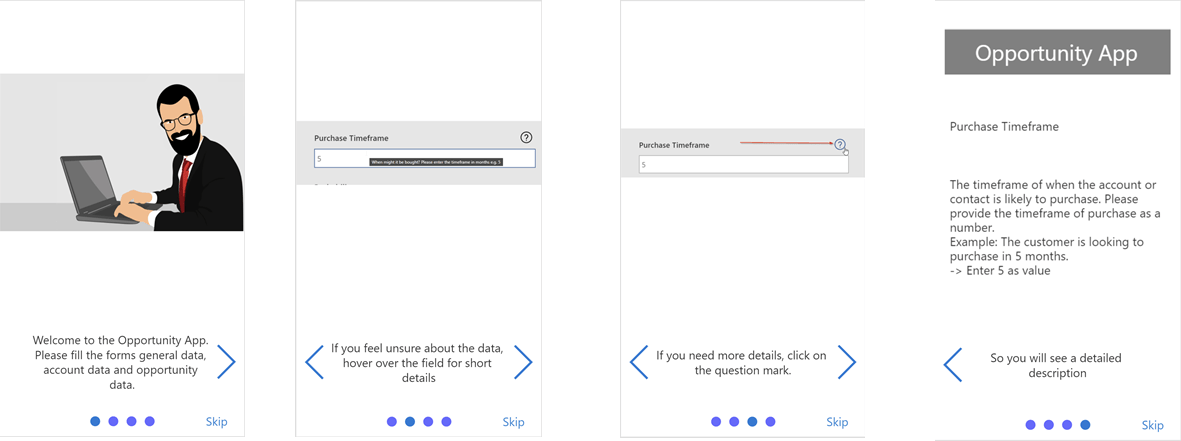
All these points are things, we should consider, when we want to make our customers happy. I have prepared a form, which covers the points:
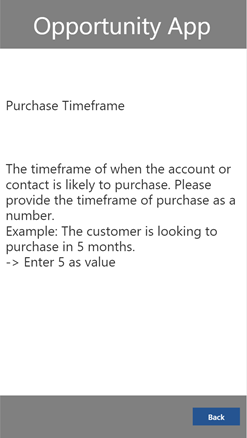
The form begins with an intro screen, describing what to do and what to do, if you feel unsure:
Better example for input of data – intro screen
The customer gets his expectations cleared, and also an example is shown how to get help.
As you can see, the form is more structured and does not overwhelm the user.
Better example for input of data — input form Better example for input of data — hint text Better example for input of data — detailed help
Expectations are clear
Focus is set on the essentials
The experience and influence of experience is considered in this form
The aim to request zero manual input is tracked
On the areas, where manual input is needed, the form guides the user by telling him, how the data should look like
The form is self-explanatory
It provides a close & up-to-date help for users, who are not sure.
It also references to further detailed help.
Process
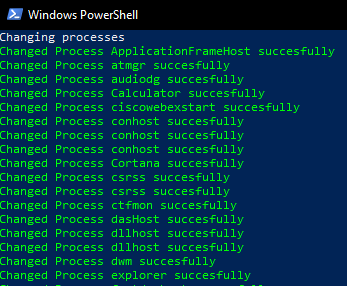
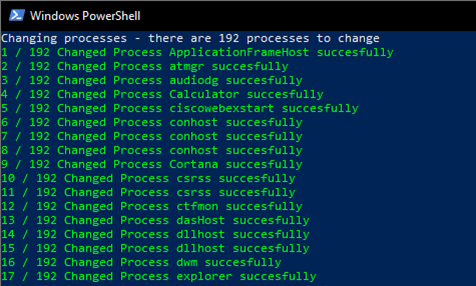
Processing the data in business process automation is the core benefit of it. When we check the picture below, we can see, that the user of the automation, does not know, how long it probably will take. The idea is to guide the user through the process, so he knows, where he stands.
We can help the user to indicate, how long the procedure will take, by showing him how many items are processed.
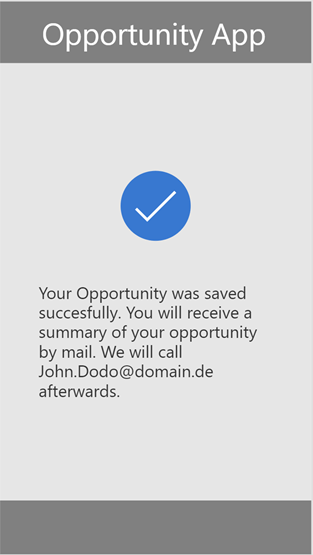
Output
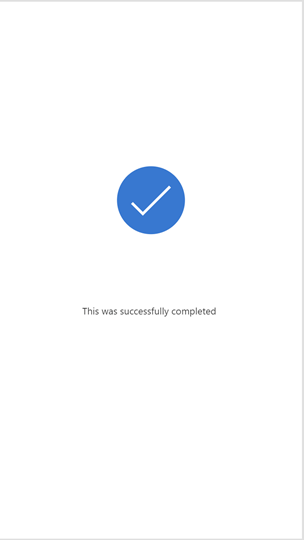
Telling the user, that the process is finished is a good starting point.
We can leverage the experience, by telling him, what will happen afterwards or what he shall make afterwards, so he is well-informed.
Conclusio
Business process automation can leverage the efficiency of the work, if you see you centre your automation on your users. The six key factors are for sure not sufficient. What do you think? Have I missed something, to improve the automation journey?
PowerShell is the language, when it comes to automation of tasks and configuration in the Microsoft cosmos. Meanwhile, you can use it cross-platform, e.g., on Linux systems. This article intends to show you in few steps how to run a PowerShell script.
There are many possibilities to run a PowerShell script. I want to show you the ways I know. If I forgot something, write me a mail: Serkar@workplace-automation.com.
Scenario
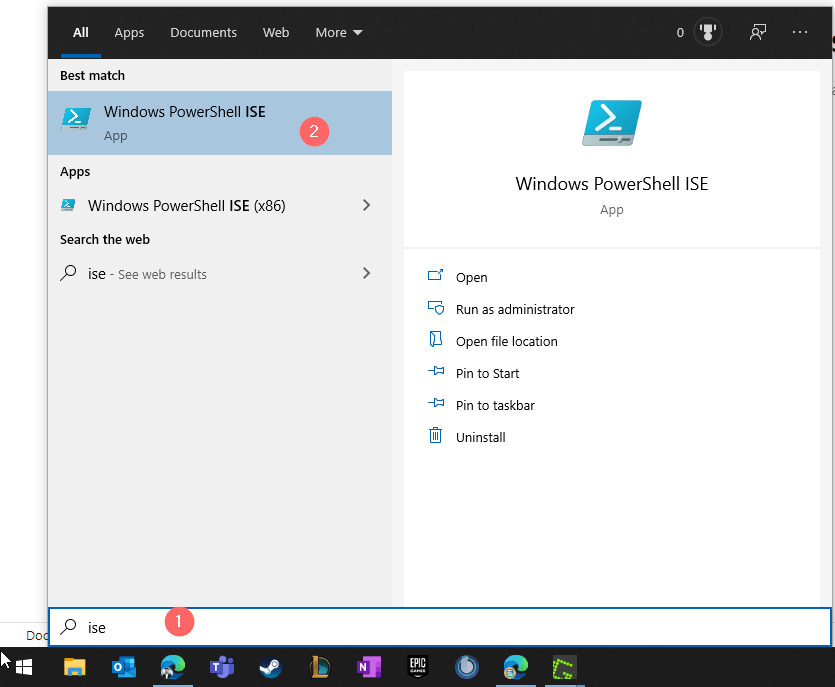
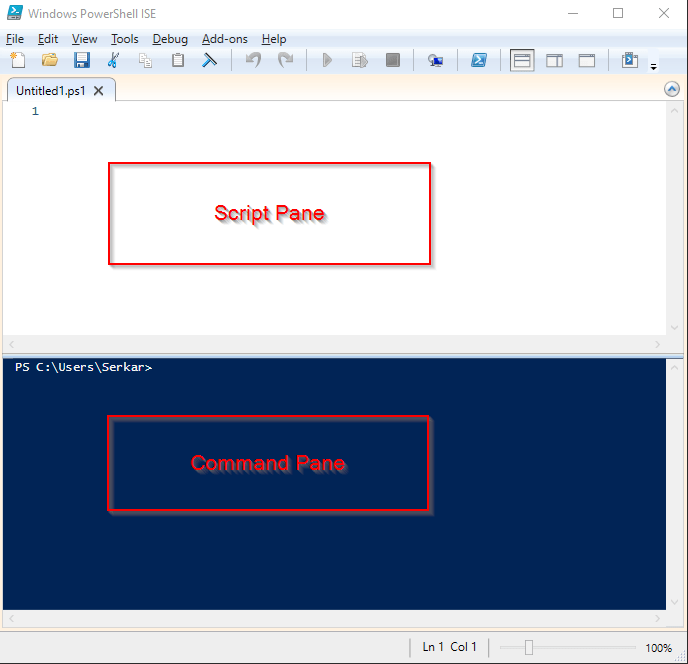
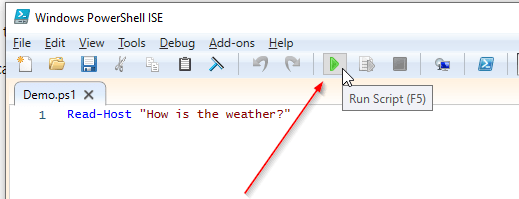
In the first step, I want to describe you, which script I run. For this purpose, I am starting the PowerShell ISE by clicking on the start menu button and typing ISE. PowerShell ISE is the preinstalled tool, where you can script your PowerShell scripts.
After clicking on Windows PowerShell ISE, a window pops up.
The PowerShell ISE is structured in two panes — the script and command pane. In the script pane you can develop your PowerShell script and if you run this developed script, its output will be displayed in the command pane. You can also use the command pane to run cmdlets interactively.
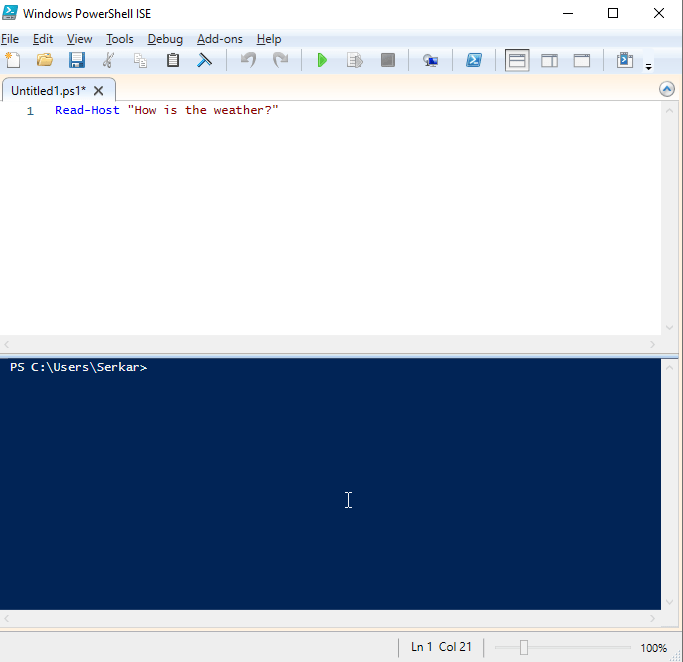
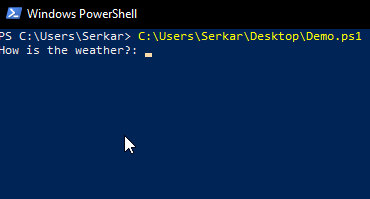
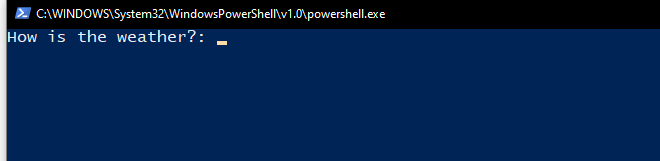
For my scenario, I am writing a code, where I prompt the user how the weather is. If you are seeking to learn something, I would recommend you to join me.
Source code:
Read-Host "How is the weather?"
Save this script to your desktop, so you can find it later.
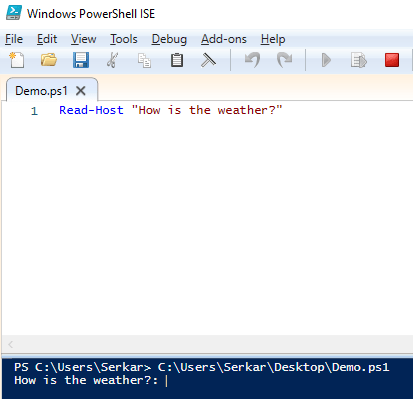
Run PowerShell script from ISE
When you want to run a PowerShell script directly from ISE, you have two possibilities:
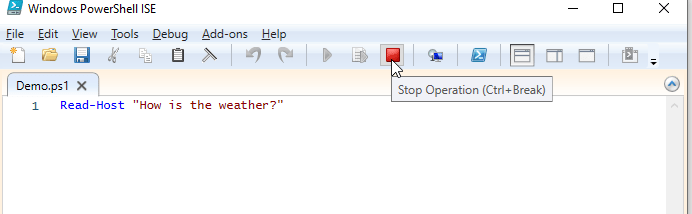
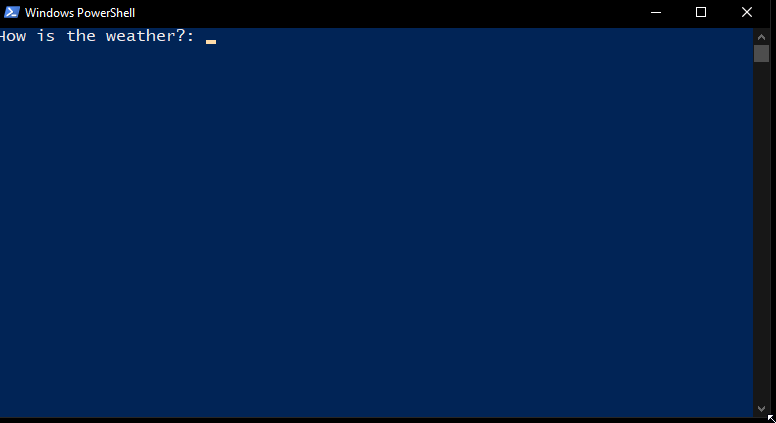
You can run a PowerShell script by clicking on the F5 button. As you can see, the prompt came up in the command pane.
I am stopping the script with the stop button
You can also run the script, by clicking on the play button.
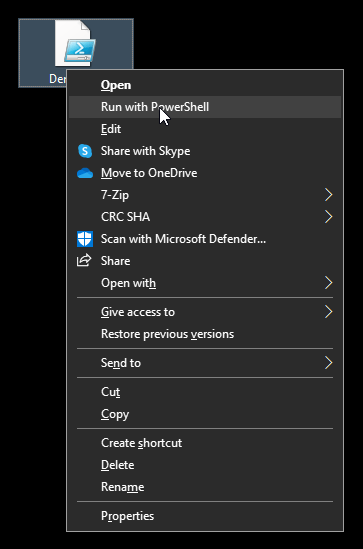
Run PowerShell script from explorer
If we want to know how to run PowerShell script from explorer, we have to browse to our previously written PowerShell script, right-click the file and click on Run with PowerShell. A PowerShell window will pop up which runs the PowerShell script.
Run PowerShell Script from PowerShell
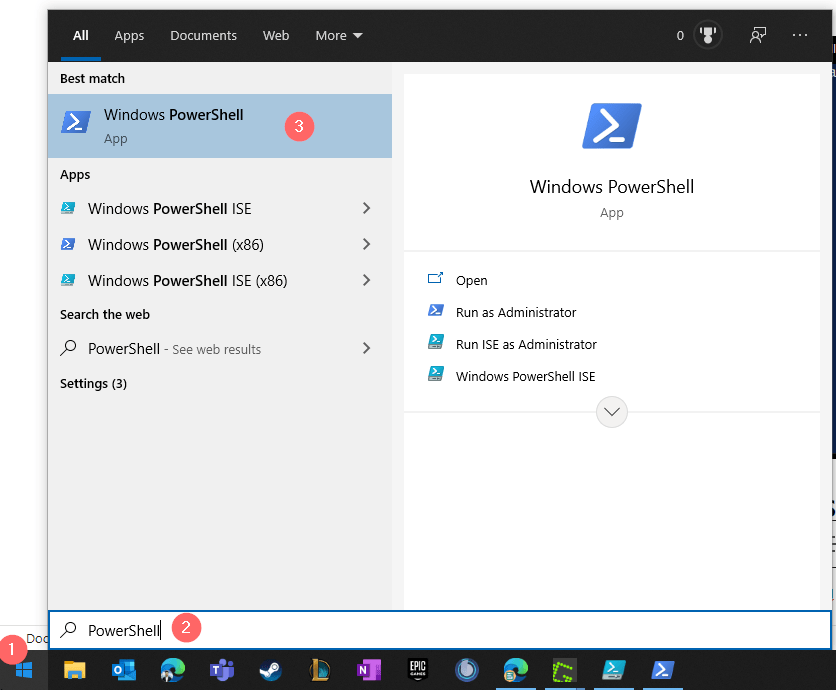
You also have the possibility to run PowerShell scripts directly from PowerShell. To do this, open Windows PowerShell.
Again, I am clicking on the Windows start button and type in PowerShell. The search result will show me Windows PowerShell, which I want to start.
Now I am getting the path of my file by using the keyboard combination of shift and mouse right click to copy the path.
I am switching back to Windows PowerShell and press right click of the mouse to paste in my clipboard.
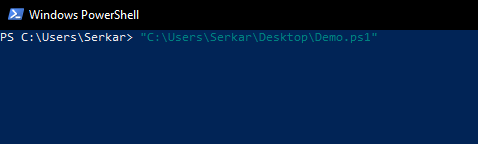
Run PowerShell script – the standard way
I am removing the quotes and press enter. As you see, the PowerShell script was started:
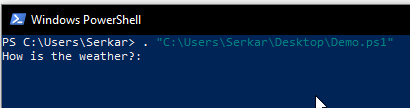
Run PowerShell script – the dot sourcing
You can also start your PowerShell script by adding a dot before the quoted path. This is called dot sourcing and it runs the contents of the script in your current context.
Run PowerShell Script from Command Prompt
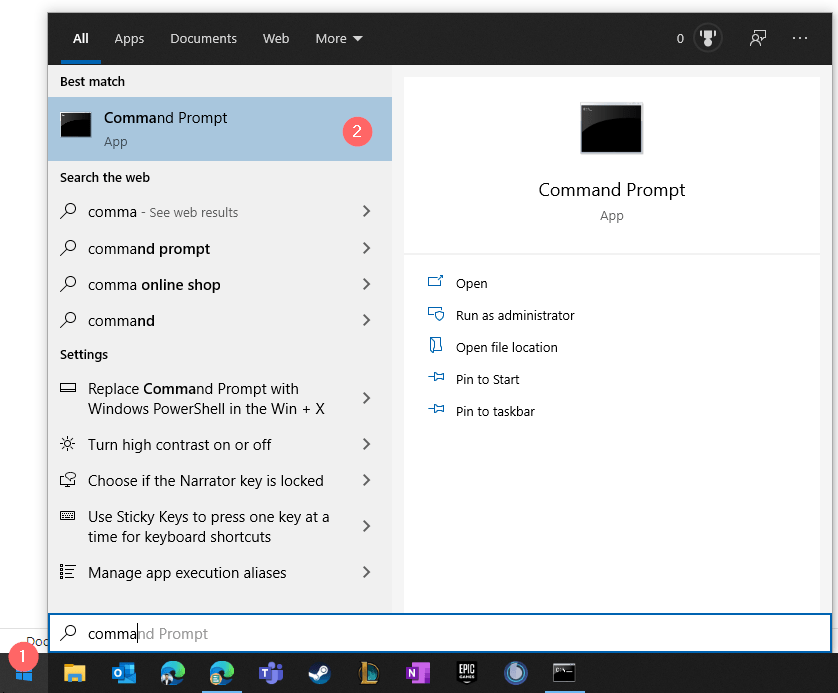
You may know Command Prompt — the predecessor of PowerShell. You can also run PowerShell scripts in the Command Prompt. To run PowerShell scripts in Command Prompt, start Command Prompt, by pressing the windows button and typing command prompt. Click on the app and a black box should open.
Now you can start your script like this:
Start PowerShell.exe “pathtoyourscript”
You will notice, that PowerShell will open in a separate window and run your specified script:
Run PowerShell script from a folder
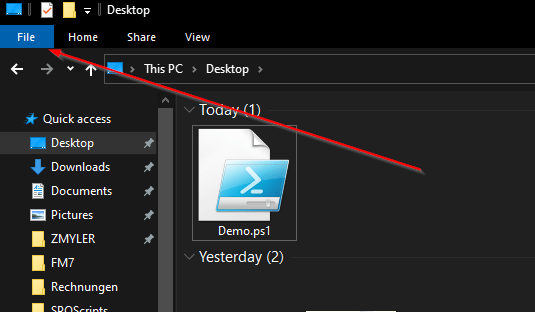
Run PowerShell script from a session, opened in script location
You can also run a PowerShell script if you open a folder in Windows Explorer and start a PowerShell session there:
So navigate to your folder and click on file
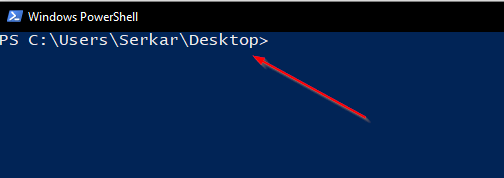
Now click on Open Windows PowerShell
You might notice, that the position is showing now the path, where the session has been started.
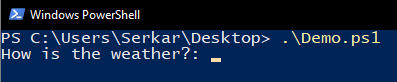
If you enter a dot now, you can press the tabulator button and tab through each file in your path until you find your PowerShell script. My desktop is a bit messy, but after a while I could find the demo. By pressing on enter, the PowerShell script runs.
Troubleshooting
You might experience, that you cannot start a PowerShell script, because PowerShell states, that your script, which you try to run isn’t digitally signed. In this case, the execution policy of PowerShell blocks you from running scripts. Its purpose is to protect your computer from malicious scripts.
In this case, read the script first and if you can confirm, that it is not harmful, you can unblock the script by following cmdlet:
I hope that you have learned how to run a PowerShell script. Give it a try and try to run PowerShell scripts from by using various methods.
Further Reading
You may also want to get to know in detail what is PowerShell. I can recommend the docs of Microsoft, which give you a good understanding of PowerShell: What is PowerShell? – PowerShell | Microsoft Docs
Downloading SharePoint files might be necessary in areas, where we have lack of good network bandwith, if you want to keep working e.g. when you travel by train or plane. Downloading sharepoint files can be time consuming if you have to do it one by one. In this article, you will learn, how you can do it easily in the GUI, but also how you can download your SharePoint files with a so called SharePoint Downloader – a PowerShell script. If you are only interested in the SharePoint downloader, click here.
Download SharePoint files in the GUI
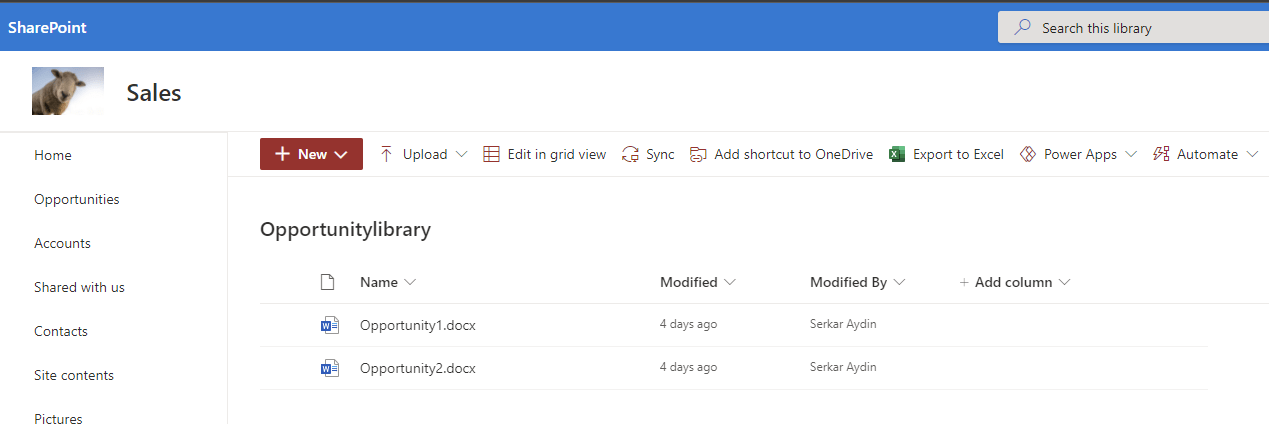
Before we start doing this with PowerShell, I want to show you how you download the file in the GUI. GUI stands for graphical user interface. I will show you how to download the file Opportunity2 from the SharePoint Library Opportunitylibrary. This is absolutely sufficient in our daily work routine.
In the first step we open a SharePoint library:
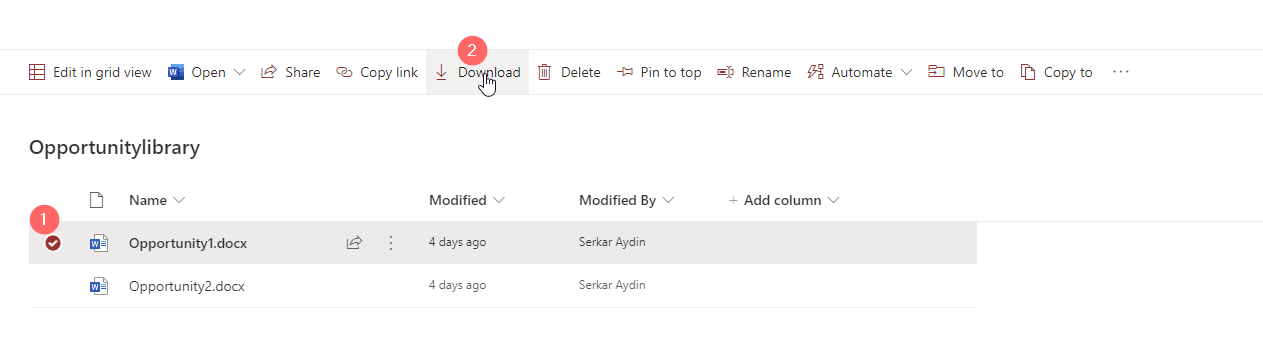
Here we can mark a file and then download – looks easy right?
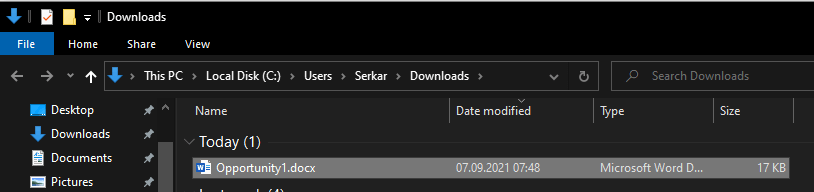
As you can see the file is downloaded and we can keep working offline – but hey don’t forget to upload it later to SharePoint again :).
Download SharePoint files with PowerShell
Scenario
If you need to download multiple SharePoint files – this makes sense, if you need the files in another system and you need to export the files periodically, you can do it with PNP.PowerShell. In the following scenario, I will show you how to download multiple files by the example of the Library “Opportunitylibrary”, which contains two documents.
I have exported the credential object previously to reuse it, which you also can do. This is strongly recommended if the script shall ran in the background e.g. when you want to make use it in task scheduler. Do not expose the credentials in blank text – this is very bad practise and is a security problem. If you want to make use of saved credentials like I did, check the article: Use credentials in PowerShell | SPO Scripts
Before you run the scripts, change the parameters to your siteurl, your path, your list and your credential file. The parameters I have provided won’t work, if you don’t change them.
For interactive PowerShell sessions, you can also choose this authentication mechanism. Interactive means, that a person is running the script and can interact with the PowerShell terminal. The opposite would be if you would schedule the task in the task scheduler and the task would run – let’s say once a day. For this purpose the script would ask the terminal, but since there is nobody responsing the authentication request, the script would be halted and no file would be downloaded.
Download all SharePoint files from a library with PowerShell
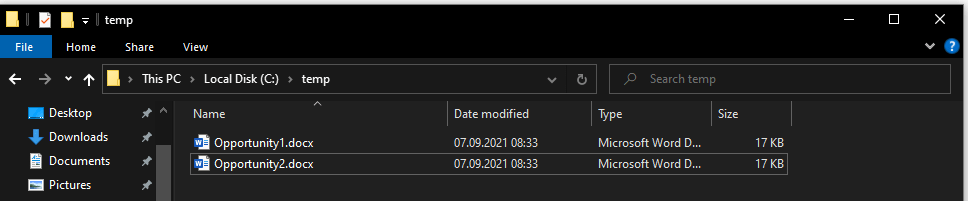
If you want to download all files of a library, you have to run following script. The script iterates through all files in your SharePoint library defined in the parameter block and it will download all the files to the downloadpath you have provided in the parameter block.
As you can see, I could download SharePoint files with PowerShell.
Download specific SharePoint files from a library with PowerShell
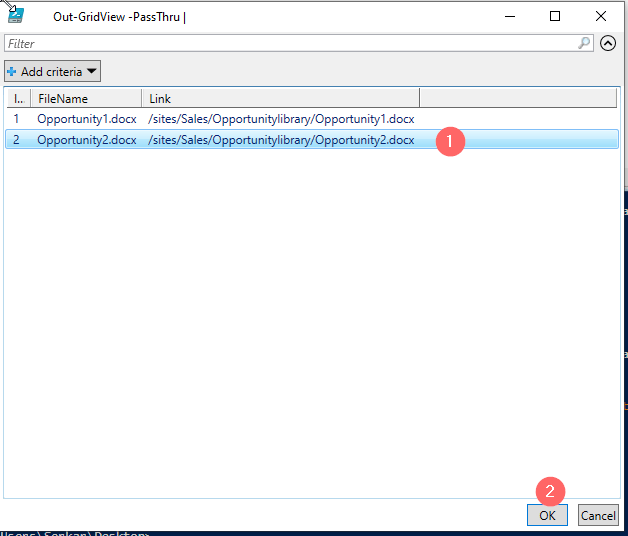
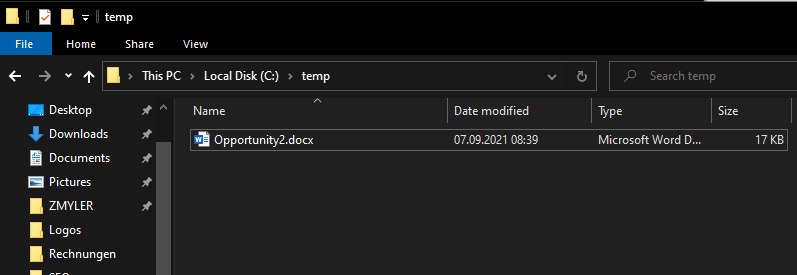
If you want to download only specific files, you can use following script. This script is using the out-gridview cmdlet to give you the possibility to choose only specific files.
A grid will pop up, where you can select the documents, which you want to download. I have marked the second file and clicked on OK. If we check the folder, we can see, that the file have been downloaded!
Et voilà – the file, which I have marked is downloaded!
SharePoint Downloader
In this section I provide you my ready to run scripts. I call them SharePoint Downloader – a small tool with big impact 🙂
SharePoint Downloader for automation: Ready-to-run script for automation
With this script you can download SharePoint files to your specified folder. It’s purpose is for automation, means that it can run in the background with azure automation triggered by a runhook or with task scheduler triggered by a time schedule. Please change the parameters of the SharePoint Downloader and ensure, that the credential object is exported to the CredPath before scheduling the script. If you forgot how to do it, check out this article: Use credentials in PowerShell | SPO Scripts
SharePoint Downloader for interactive: Ready-to-run script for interactive sessions
This script can be used for interactive sessions, so you need personally to start the script and not the task scheduler or azure automation. You will be asked for each parameter, when starting the script.
param
(
    [Parameter(
    Mandatory=$true,
    ValueFromPipelineByPropertyName=$true,
    Position=0,
    HelpMessage="Please provide the url in this format: https://tenant.sharepoint.com/sites/sitename")
    ]
    $SiteUrl,
    [Parameter(Mandatory=$true,
    ValueFromPipelineByPropertyName=$true,
    Position=1,
    HelpMessage="Please provide path, where the downloaded files should be located at.")
    ]
    $DownloadPath,
    [switch][Parameter(Mandatory=$false,
    ValueFromPipelineByPropertyName=$true,
    Position=2,
    HelpMessage="Use -Force paramater to overwrite existing files.")
    ]
    $Force = $true

)

Connect-PnPOnline -Url $SiteUrl -Interactive

#create folder if it does not exist

If (!(Test-Path $DownloadPath))
{
    New-Item -ItemType Directory $DownloadPath
}


$ListName = Get-PnPList | Out-GridView -PassThru | Select-Object Title -ExpandProperty Title

If ($Force)
{
    Get-PnPListItem -List $ListName |
    Select-Object Id,@{N="FileName";E={$_.FieldValues.FileLeafRef}}, @{N="Link";E={$_.FieldValues.FileRef}} |
        Out-GridView -PassThru |
            ForEach-Object {
                Get-PnPFile -Url $_.Link -Filename $_.FileName  -Path $DownloadPath -AsFile -Force -WarningAction Stop
                Write-Host "Downloaded $($_.FileName) Green to $DownloadPath" -ForegroundColor Green
            }
}
Else
{
    Get-PnPListItem -List $ListName |
    Select-Object Id,@{N="FileName";E={$_.FieldValues.FileLeafRef}}, @{N="Link";E={$_.FieldValues.FileRef}} |
        Out-GridView -PassThru |
            ForEach-Object {
                Get-PnPFile -Url $_.Link -Filename $_.FileName  -Path $DownloadPath -AsFile -WarningAction Stop
                Write-Host "Downloaded $($_.FileName) Green to $DownloadPath" -ForegroundColor Green
            }
}
Conclusio
With PNP.PowerShell we can download SharePoint files easily. In this article I have described, how you can download single and multiple SharePoint files with the GUI and with PowerShell. I have provided you the SharePoint Downloader – a script, which downloads all files in SharePoint library interactively or automated.